eHague – Filing Tutorial
(Latest revision: August 2023)
This tutorial walks you through the steps involved in filing an international design application online. Get started! If you would like to provide feedback or report issues, please Contact Hague.
Hot topics - My Workbench Tutorial and Strong Authentication Tutorial
eHague – Filing demo
Try our eHague filing demo to create a test version of an international design application from start to finish. Note: You cannot access the demo version of eHague using your regular WIPO Account. You need to create a ‘dummy’ WIPO Account, using different credentials:
- from the demo login page, click on Create WIPO Account below the username/password fields;
- complete the form and follow the instructions to validate the account;
- log in to the demo version of eHague using your dummy account credentials.
Important! Do not submit any confidential data, documents or real payment information.
Table of contents
- eHague Workbench: the gateway to create and manage applications
- eHague interface: the application form
- eHague Communication: Reply to Irregularities
eHague Workbench: The Gateway to Create and Manage Applications
The eHague Workbench helps you create new Hague System applications and manage your existing applications (both sent and unsent). In the future, the Workbench will help you manage the whole lifespan of your Hague System international registration, from filing to expiration.
Complete your application at your own pace
Your applications are automatically stored and saved in real-time. That means you can always come back and complete them later on.
Accessing eHague
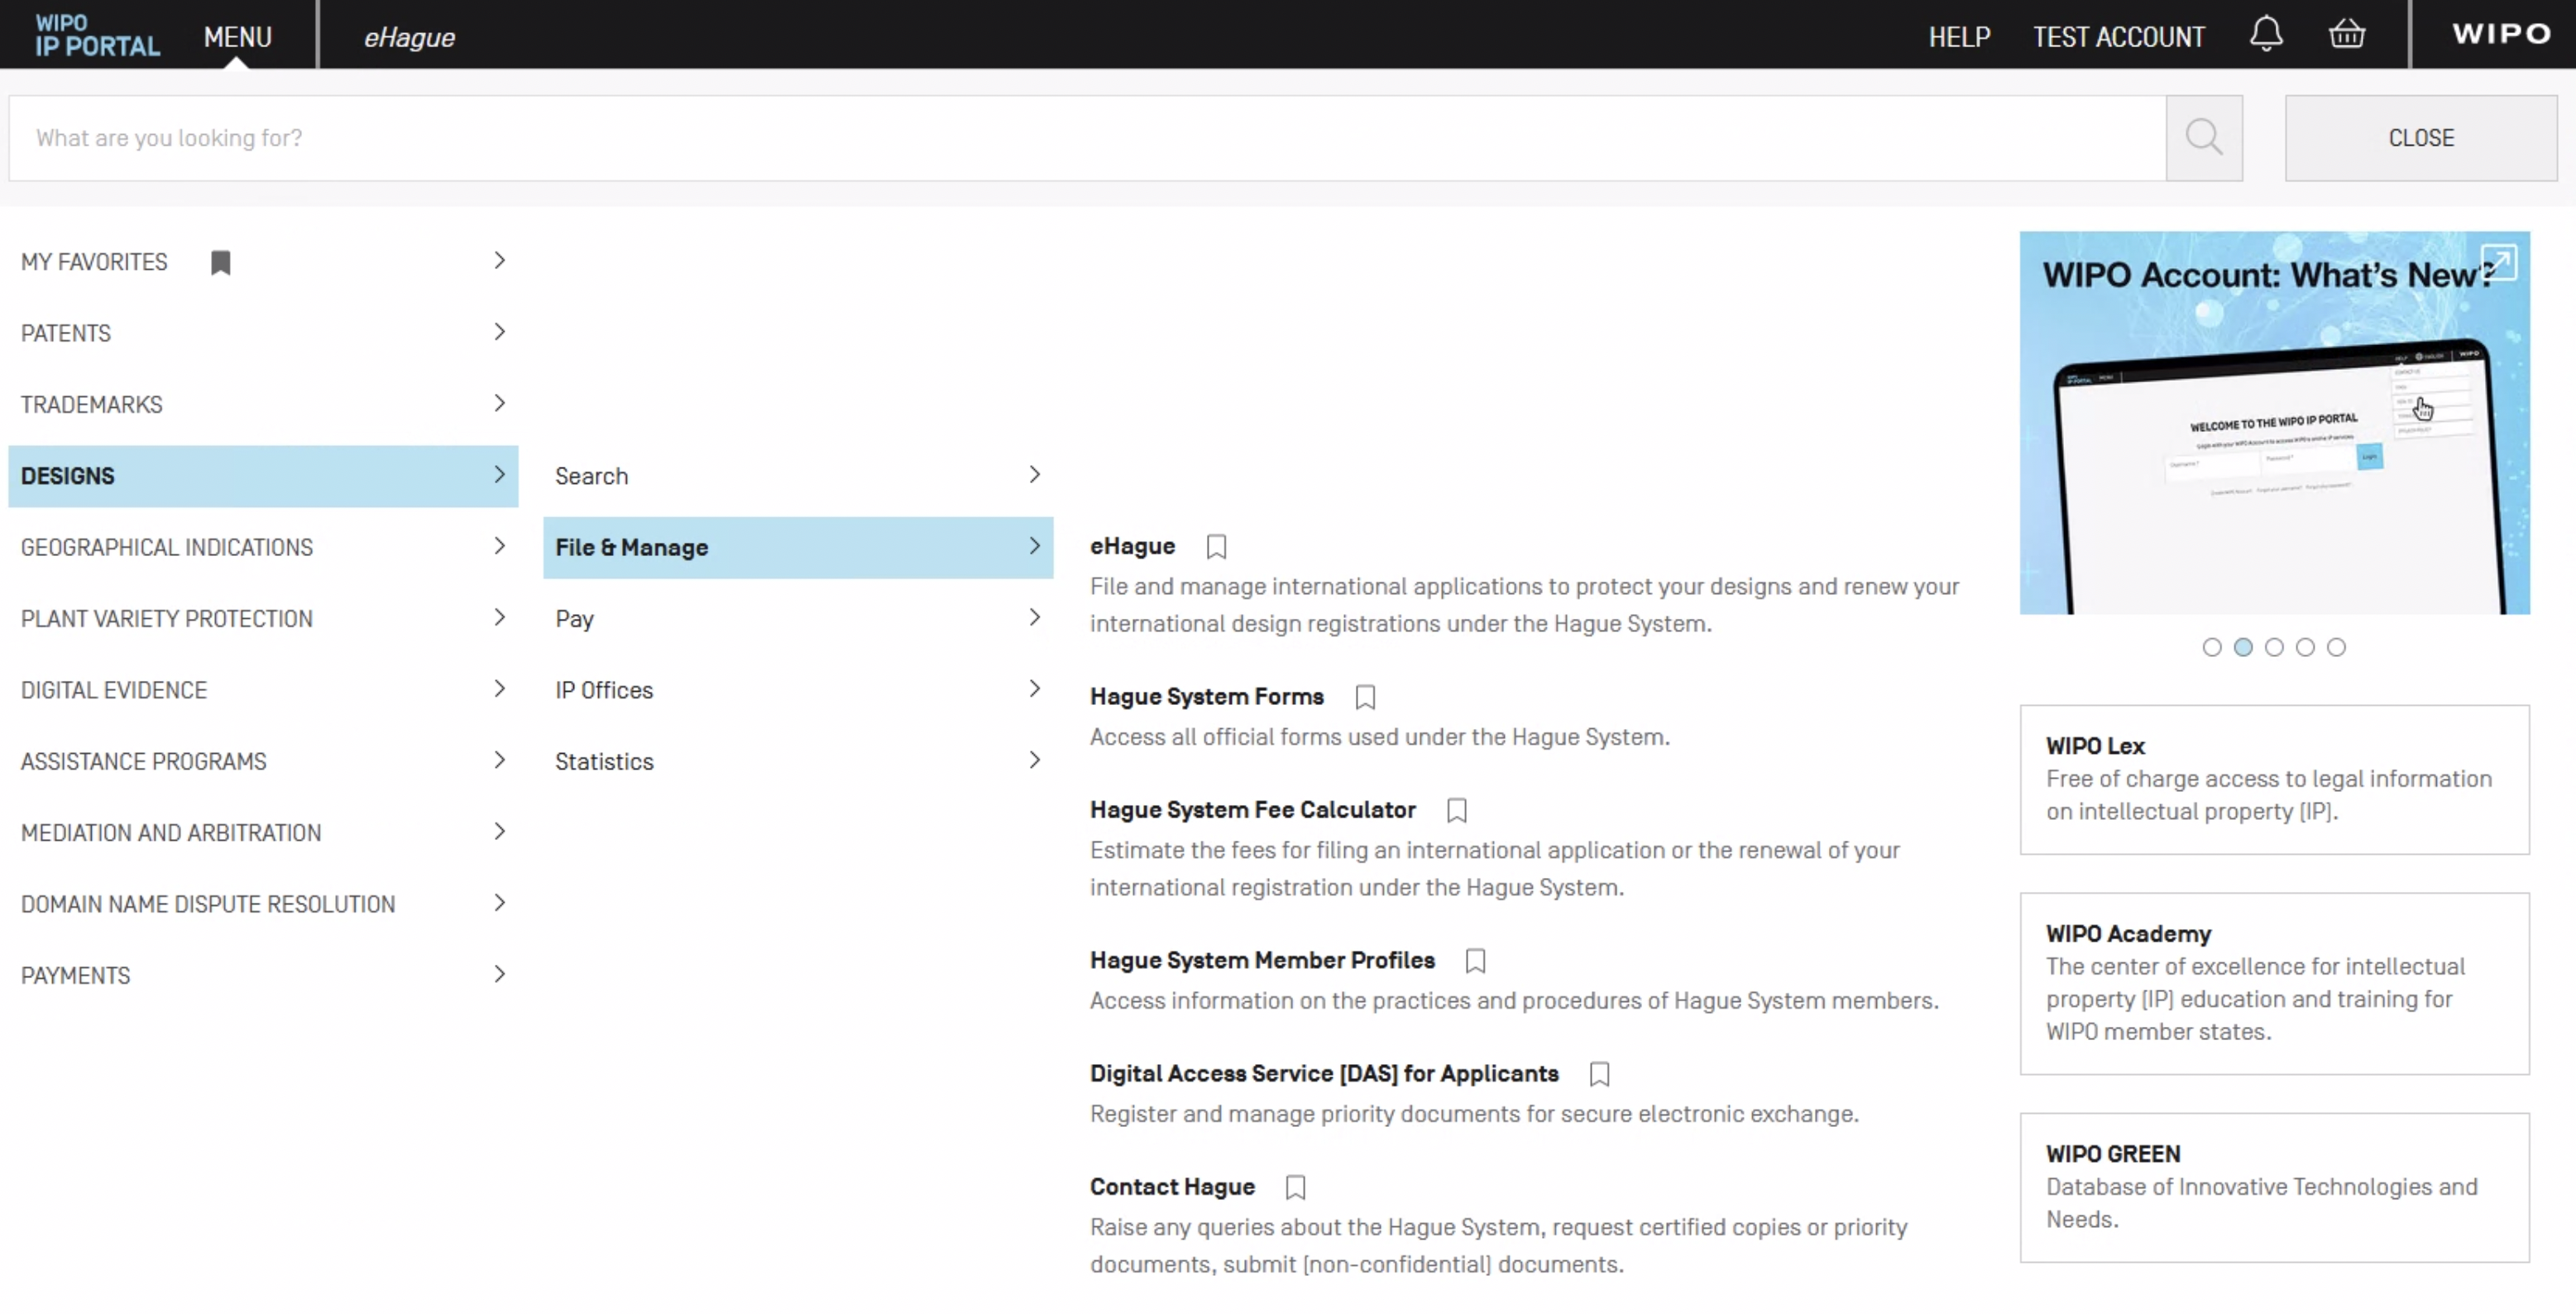
You can log in to eHague from the Hague System website under Resources or through the IP Portal. From the IP Portal, choose the Menu in the top left of the navigation bar, select Designs, File & Manage, and then eHague.
You will be presented with the eHague landing page, as shown below.
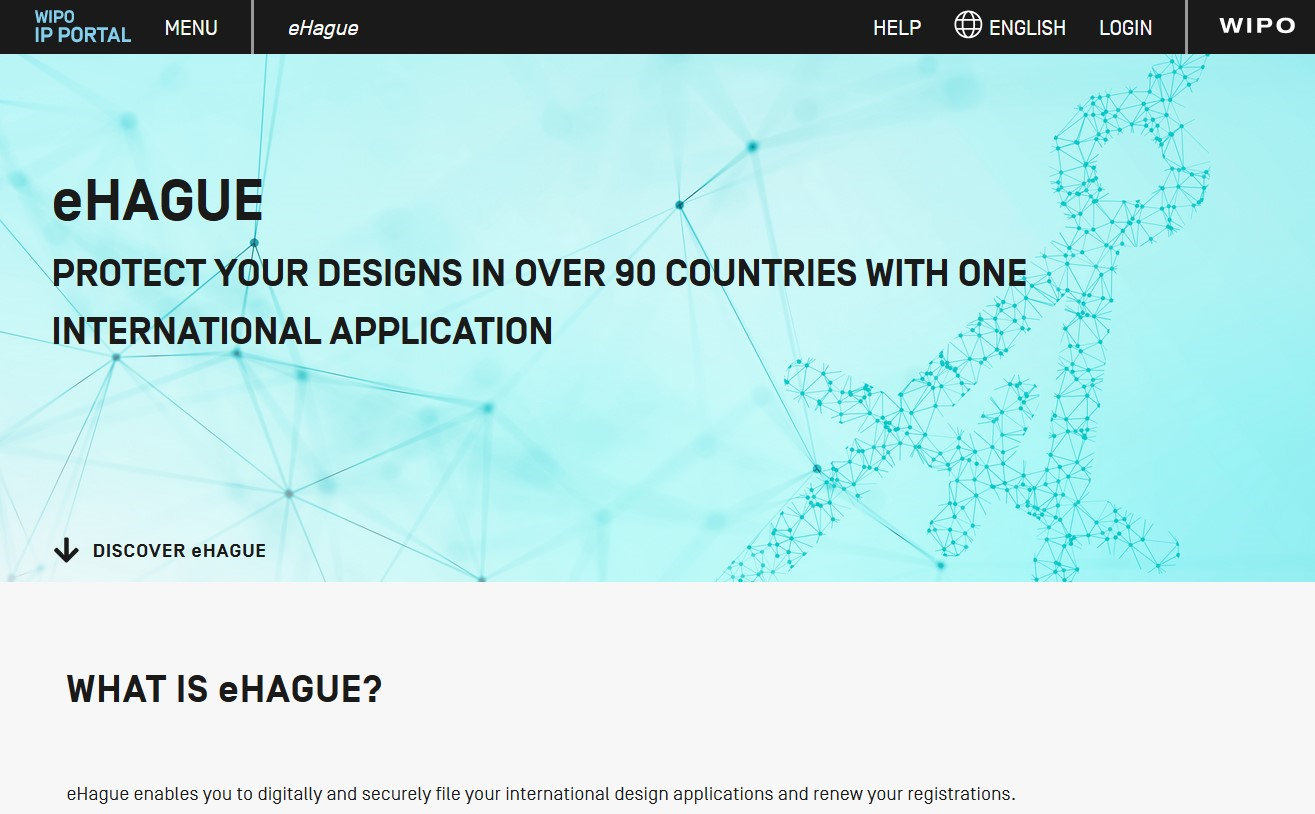
Scroll down to the eHague Services section and click on the Get Started button in the File box.

If you are not logged in to your WIPO Account you will be presented with the login screen. If you do not have a WIPO Account, you must create one before you can use eHague.

General features
After logging in, you will see your eHague Workbench as shown below. This screen includes four main sections:
- The top navigation bar, where you can access: the IP Portal, Help, your WIPO Account, notifications, and payment information;
- Tabs for the different features of the eHague Workbench;
- The application language selector; and
- The action window that displays the available functions depending on which tab is active.
Manage your applications and communication with WIPO
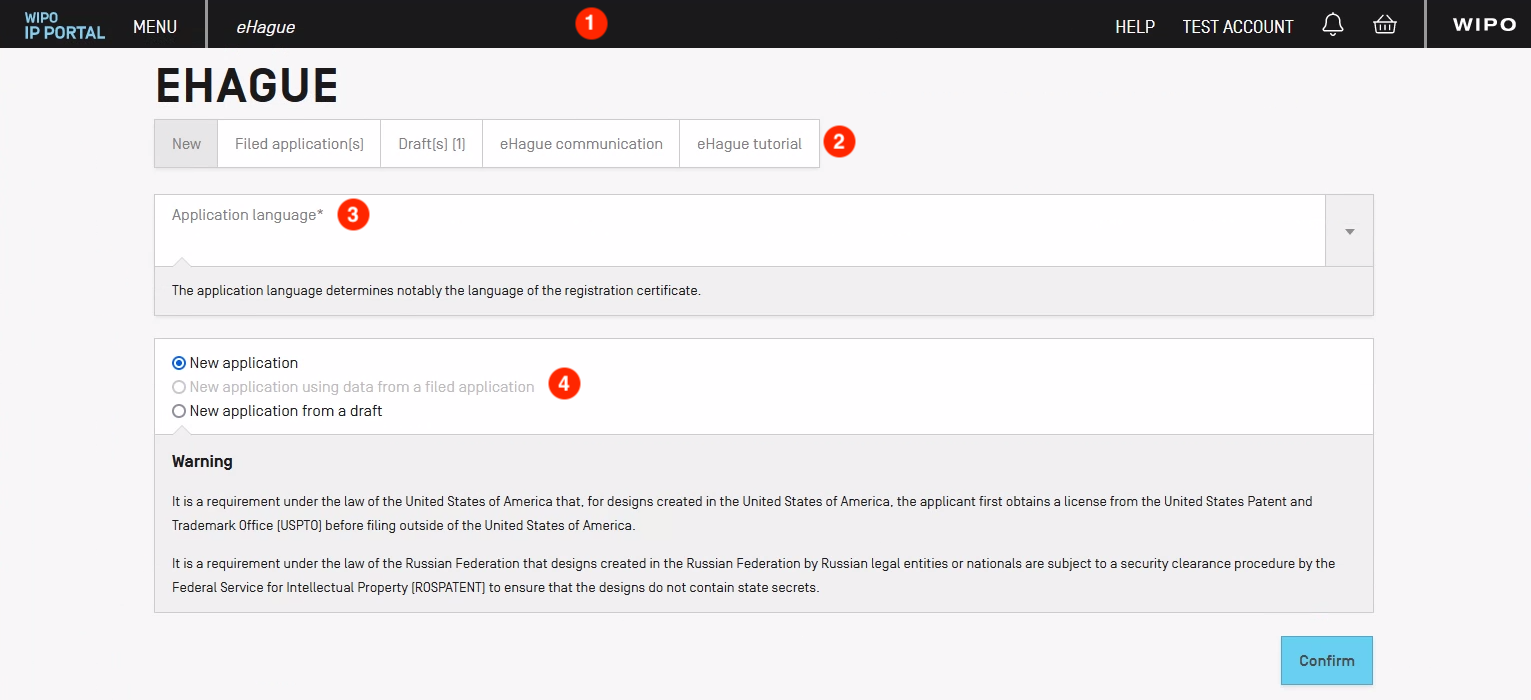
Using the tabs at the top of the main dialog box, you can create new applications (New), view applications already sent (Filed applications), edit and manage unfinished applications that have been saved (Drafts), reply to irregularities online (eHague communication), and access this tutorial.
The following sections describe these features in greater detail.
(1) Top navigation bar

The top navigation bar gives you quick access to all of the main features of the IP Portal and eHague. This navigation bar is accessible from anywhere in eHague and its content does not change. The features of the navigation bar include (from left to right):
- WIPO IP Portal: Clicking on this link will take you to the IP Portal landing page.
- Menu: From the Menu you can quickly access the various tools and features of WIPO’s Global IP Services. For more information about the IP Portal and Menu, visit the WIPO IP Portal FAQs.
- eHague: This returns you to the last tab you accessed in the eHague Workbench. For example, if you are editing a draft application and click on this link from within the application, you will return to the Draft(s) tab in the eHague Workbench.
- Help: Opening Help reveals two options: Contact Us and FAQs. Both of these options are available outside of the eHague Workbench.
- WIPO Account: Your WIPO Account information is displayed here, including your Customer ID and first and last name. This information is blurred out in the above screenshot. Clicking on this gives the following options:
- My WIPO Account: View and update the information in your WIPO Account, set up and manage strong authentication methods, change your password, or manage your eHandshakes (currently unavailable for the Hague system).
- Language: Change the language of the eHague interface. Three languages are available: English, French, or Spanish.
Important note regarding the language selection in the navigation bar: Changing the language of the eHague interface will not change the language of your application(s). When you make an application for the first time, you will choose the language of that application. Regardless of the language of the interface, the language of the application will remain the language that you chose when you created your application.
Example: A user creates a new language and chooses French as the application language. While editing the application in eHague, the user changes the eHague interface to Spanish from the navigation bar. The user submits the application with the Spanish interface enabled. The application will be submitted in French and all official communications from WIPO regarding this application will remain in French, not in Spanish. - Logout: Log out of eHague and the IP Portal.
- Messages: The bell icon is where you can access alert messages that are available through the IP Portal (consult the IP Portal FAQ for further information). If you have a new message the bell icon will be red. Selecting either option (Go to All Messages or Open Messages in New Tab) to view your messages.
- Basket: The basket icon notifies you of unpaid items in WIPO’s new payment system. Clicking on the Go to Payment or Open Payment in New Tab options will allow you to view and complete payments.
- WIPO Link: This link takes you to the main WIPO website.
1(a) eHague application navigation bar
When an application is open in eHague another navigation bar will be visible below the main IP Portal navigation bar. An example is shown below. More detailed information is available in another section of this tutorial.
(2) Tabs to access eHague functions
- New: The eHague Workbench defaults to the “New” tab. This tab allows you to view various options to create a new application.
- Filed application(s): View a list of your filed application(s).
- Draft(s): View a list of your draft application(s).
- eHague communication: Allows you to retrieve and reply to notification(s) sent by WIPO regarding international applications submitted through eHague. If you received a new notification, the text in this tab will be in red with a number in parentheses displaying the total number of unread communications. The features of the Communication tabs are described in detail in the section "eHague Communication: Reply to invitation to correct irregularities online". Please note that these notifications will not appear in the Messages of the IP Portal.
- eHague tutorial: Quickly access this tutorial.
(3) Action window
Depending on the tab selected, the available actions for each will appear in this window. More information for each action follows below.
Application language

Before you create a new application, you must select the application language. Click on the field to choose English, French, or Spanish as the application language.
Create a new application ("New" tab)
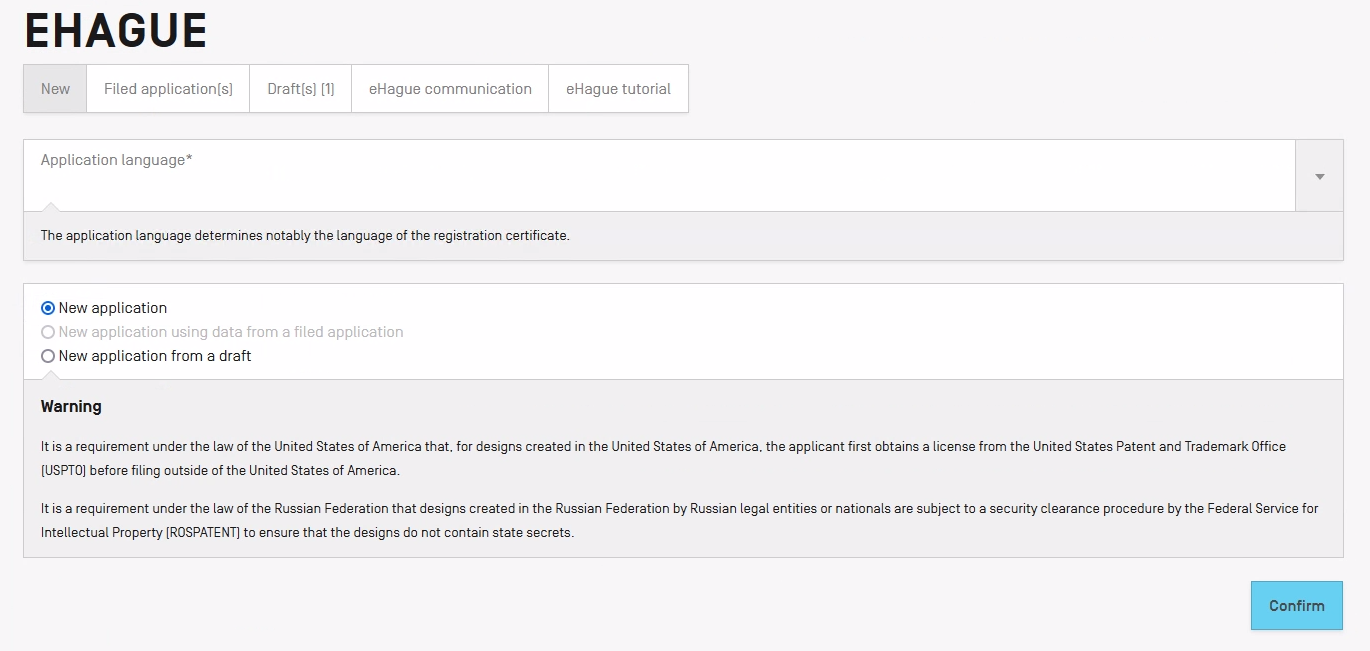
When you create a new application, you have three options:
Create an application from scratch
By default, the option is set to "New application". By simply leaving that option selected and then clicking "Confirm", you will create a new international application from scratch.
First application?
Is this your first international application using eHague? Make sure you have selected "By using an empty form", click "Confirm", and then just jump ahead to "the eHague Filing interface section" of this tutorial.
Create an application using a template
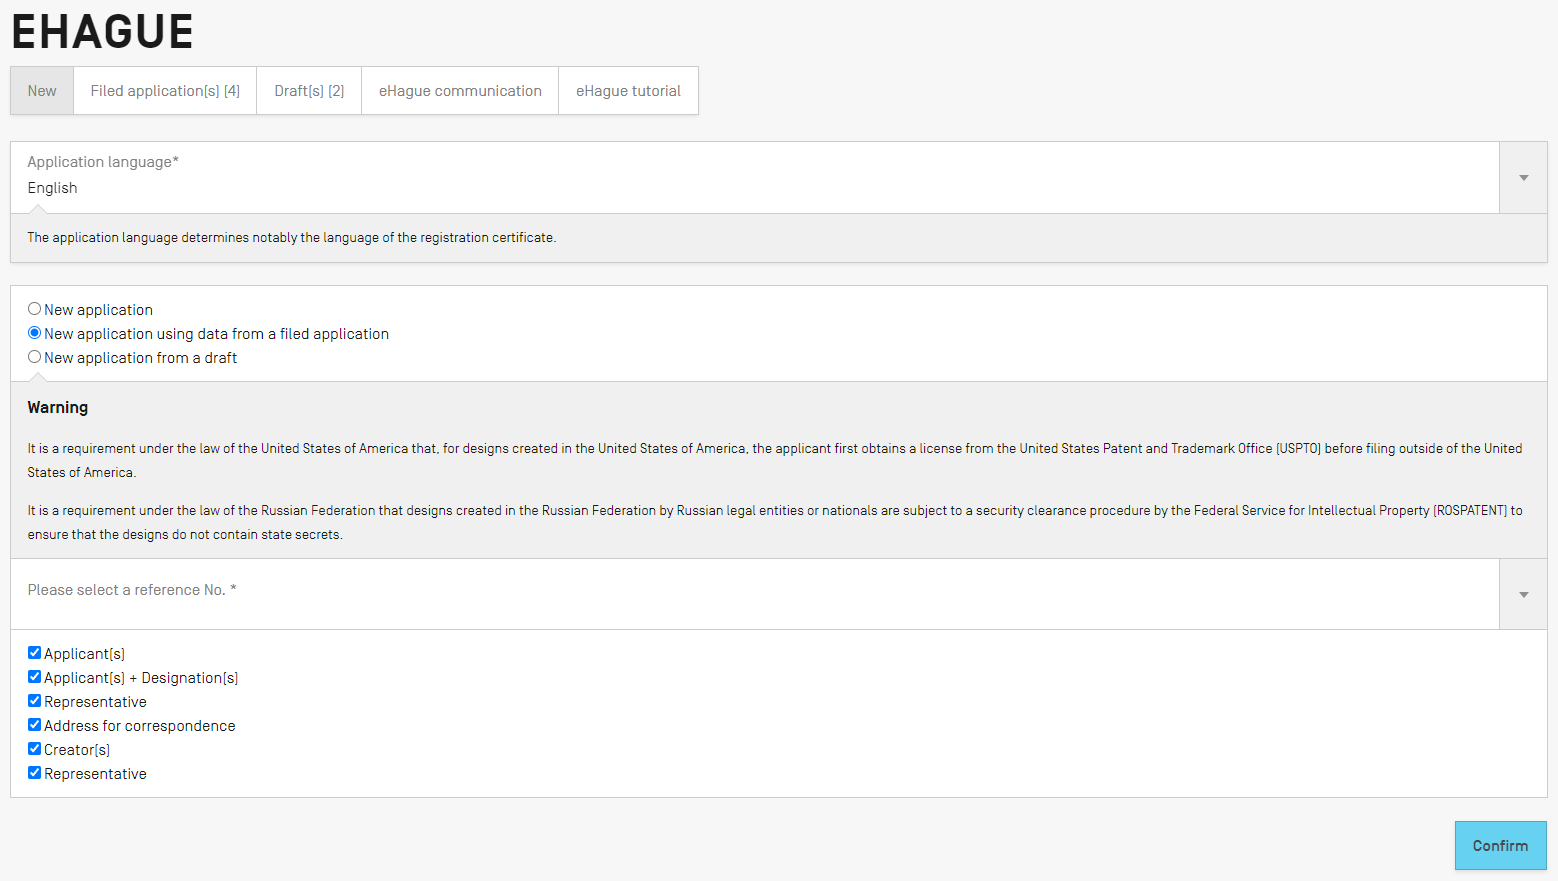
Once you have created at least one international application, you can save time by reusing some of the data entered in your previous application(s). You then have the option to select either "New application using data from a filed application" or "New application from a draft". Select a reference number and the elements of the application you wish to reuse. Click "Confirm".
View your filed applications ("Filed application(s)" tab)
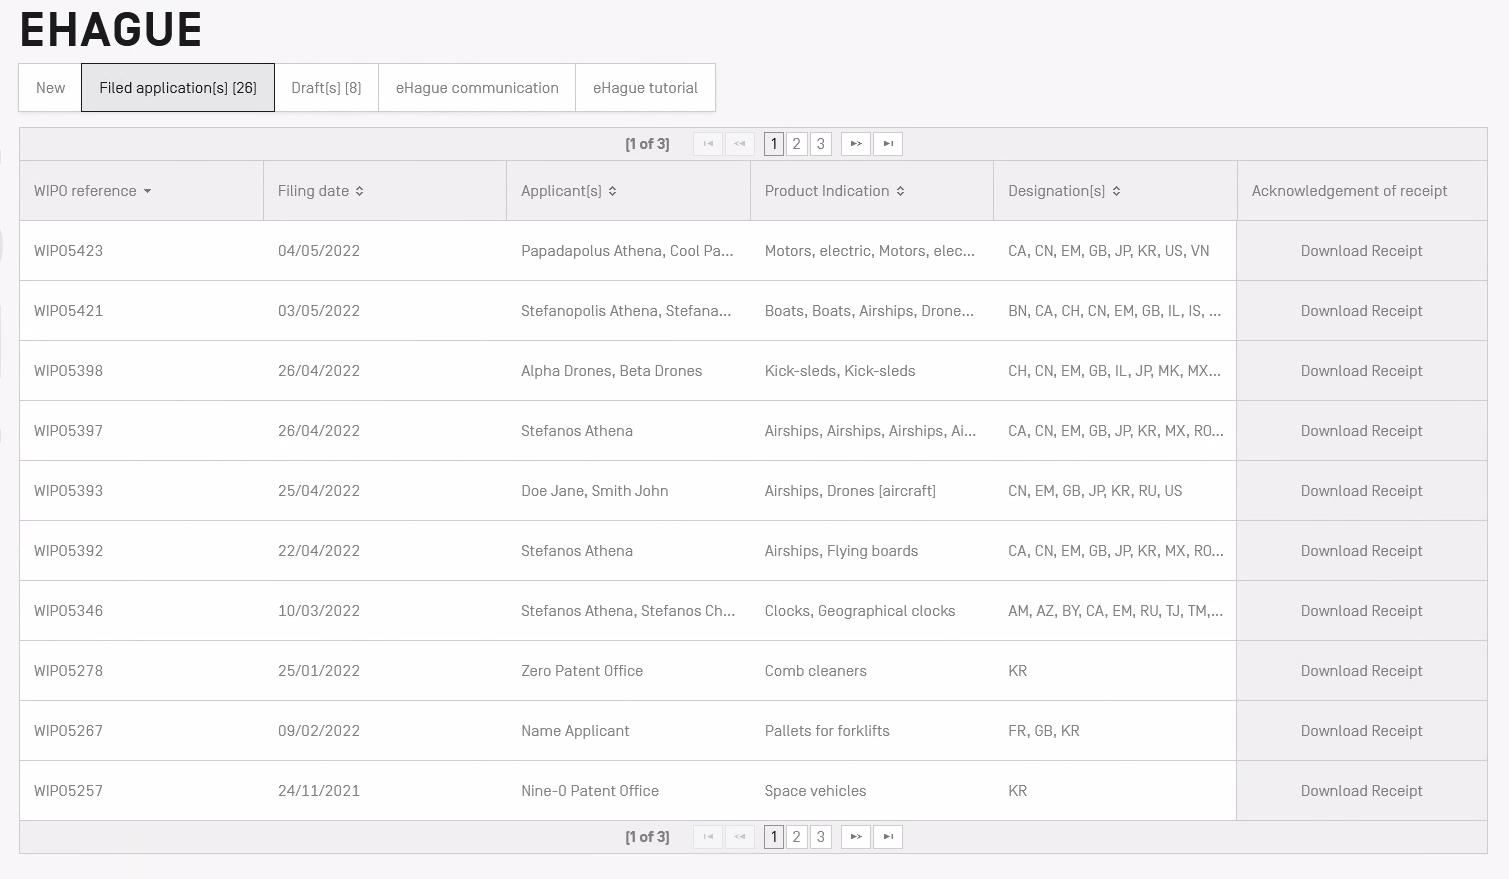
The "Filed application(s)" tab allows you to retrieve and view all the online applications you have previously filed by means of the eHague interface.
Locate an application
To sort the search results, click on a criterion. One click will sort the data in ascending order (numerically or alphabetically as applicable). Click once again for descending order.
Download acknowledgement of receipt

The "Filed application(s)" tab allows you to download the acknowledgement of receipt (PDF) for your application(s) issued by WIPO by clicking on the “Download Receipt” button of the row corresponding to the desired application.
Browse through multiple pages

Use the pagination options at the top or bottom of the list to move through multiple pages of applications (10 are displayed per page).
Edit your draft applications ("Draft application(s)" tab)
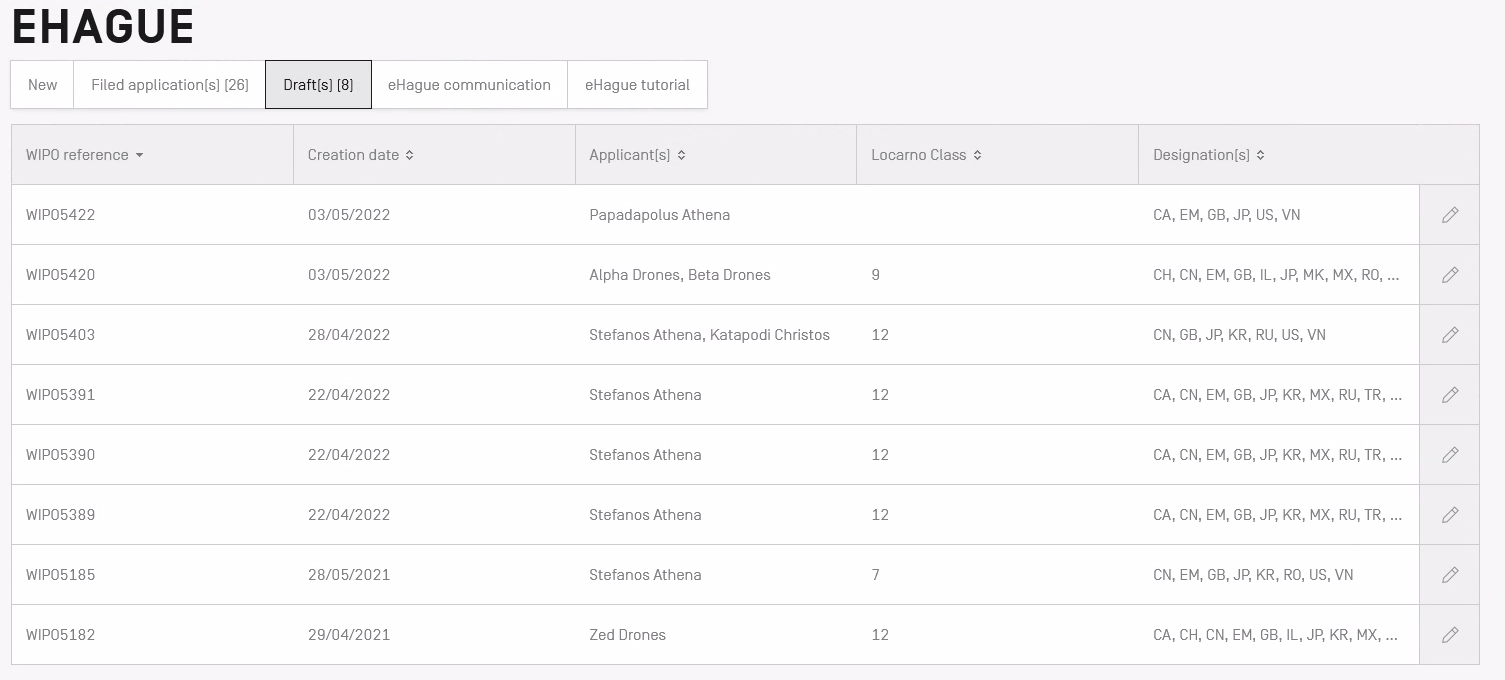
The "Draft application(s)" tab allows you to retrieve unfinished applications that have been saved.
To sort the applications using a particular field, click on a sorting criterion (such as WIPO reference or Creation date). One click will sort the data in ascending order (numerically or alphabetically as applicable). Click once again for descending order.

Under the "Draft application(s)" tab, hover your mouse over a row and click on the “Delete” (![]() ) button to delete an unsent application. Warning: this operation is permanent and cannot be reversed.
) button to delete an unsent application. Warning: this operation is permanent and cannot be reversed.
To resume editing of a saved application, click on the "Edit" (![]() ) button. You will be directed to the eHague filing interface where your application will be opened under the "Applicant" tab.
) button. You will be directed to the eHague filing interface where your application will be opened under the "Applicant" tab.
eHague Filing interface: The application form
General features
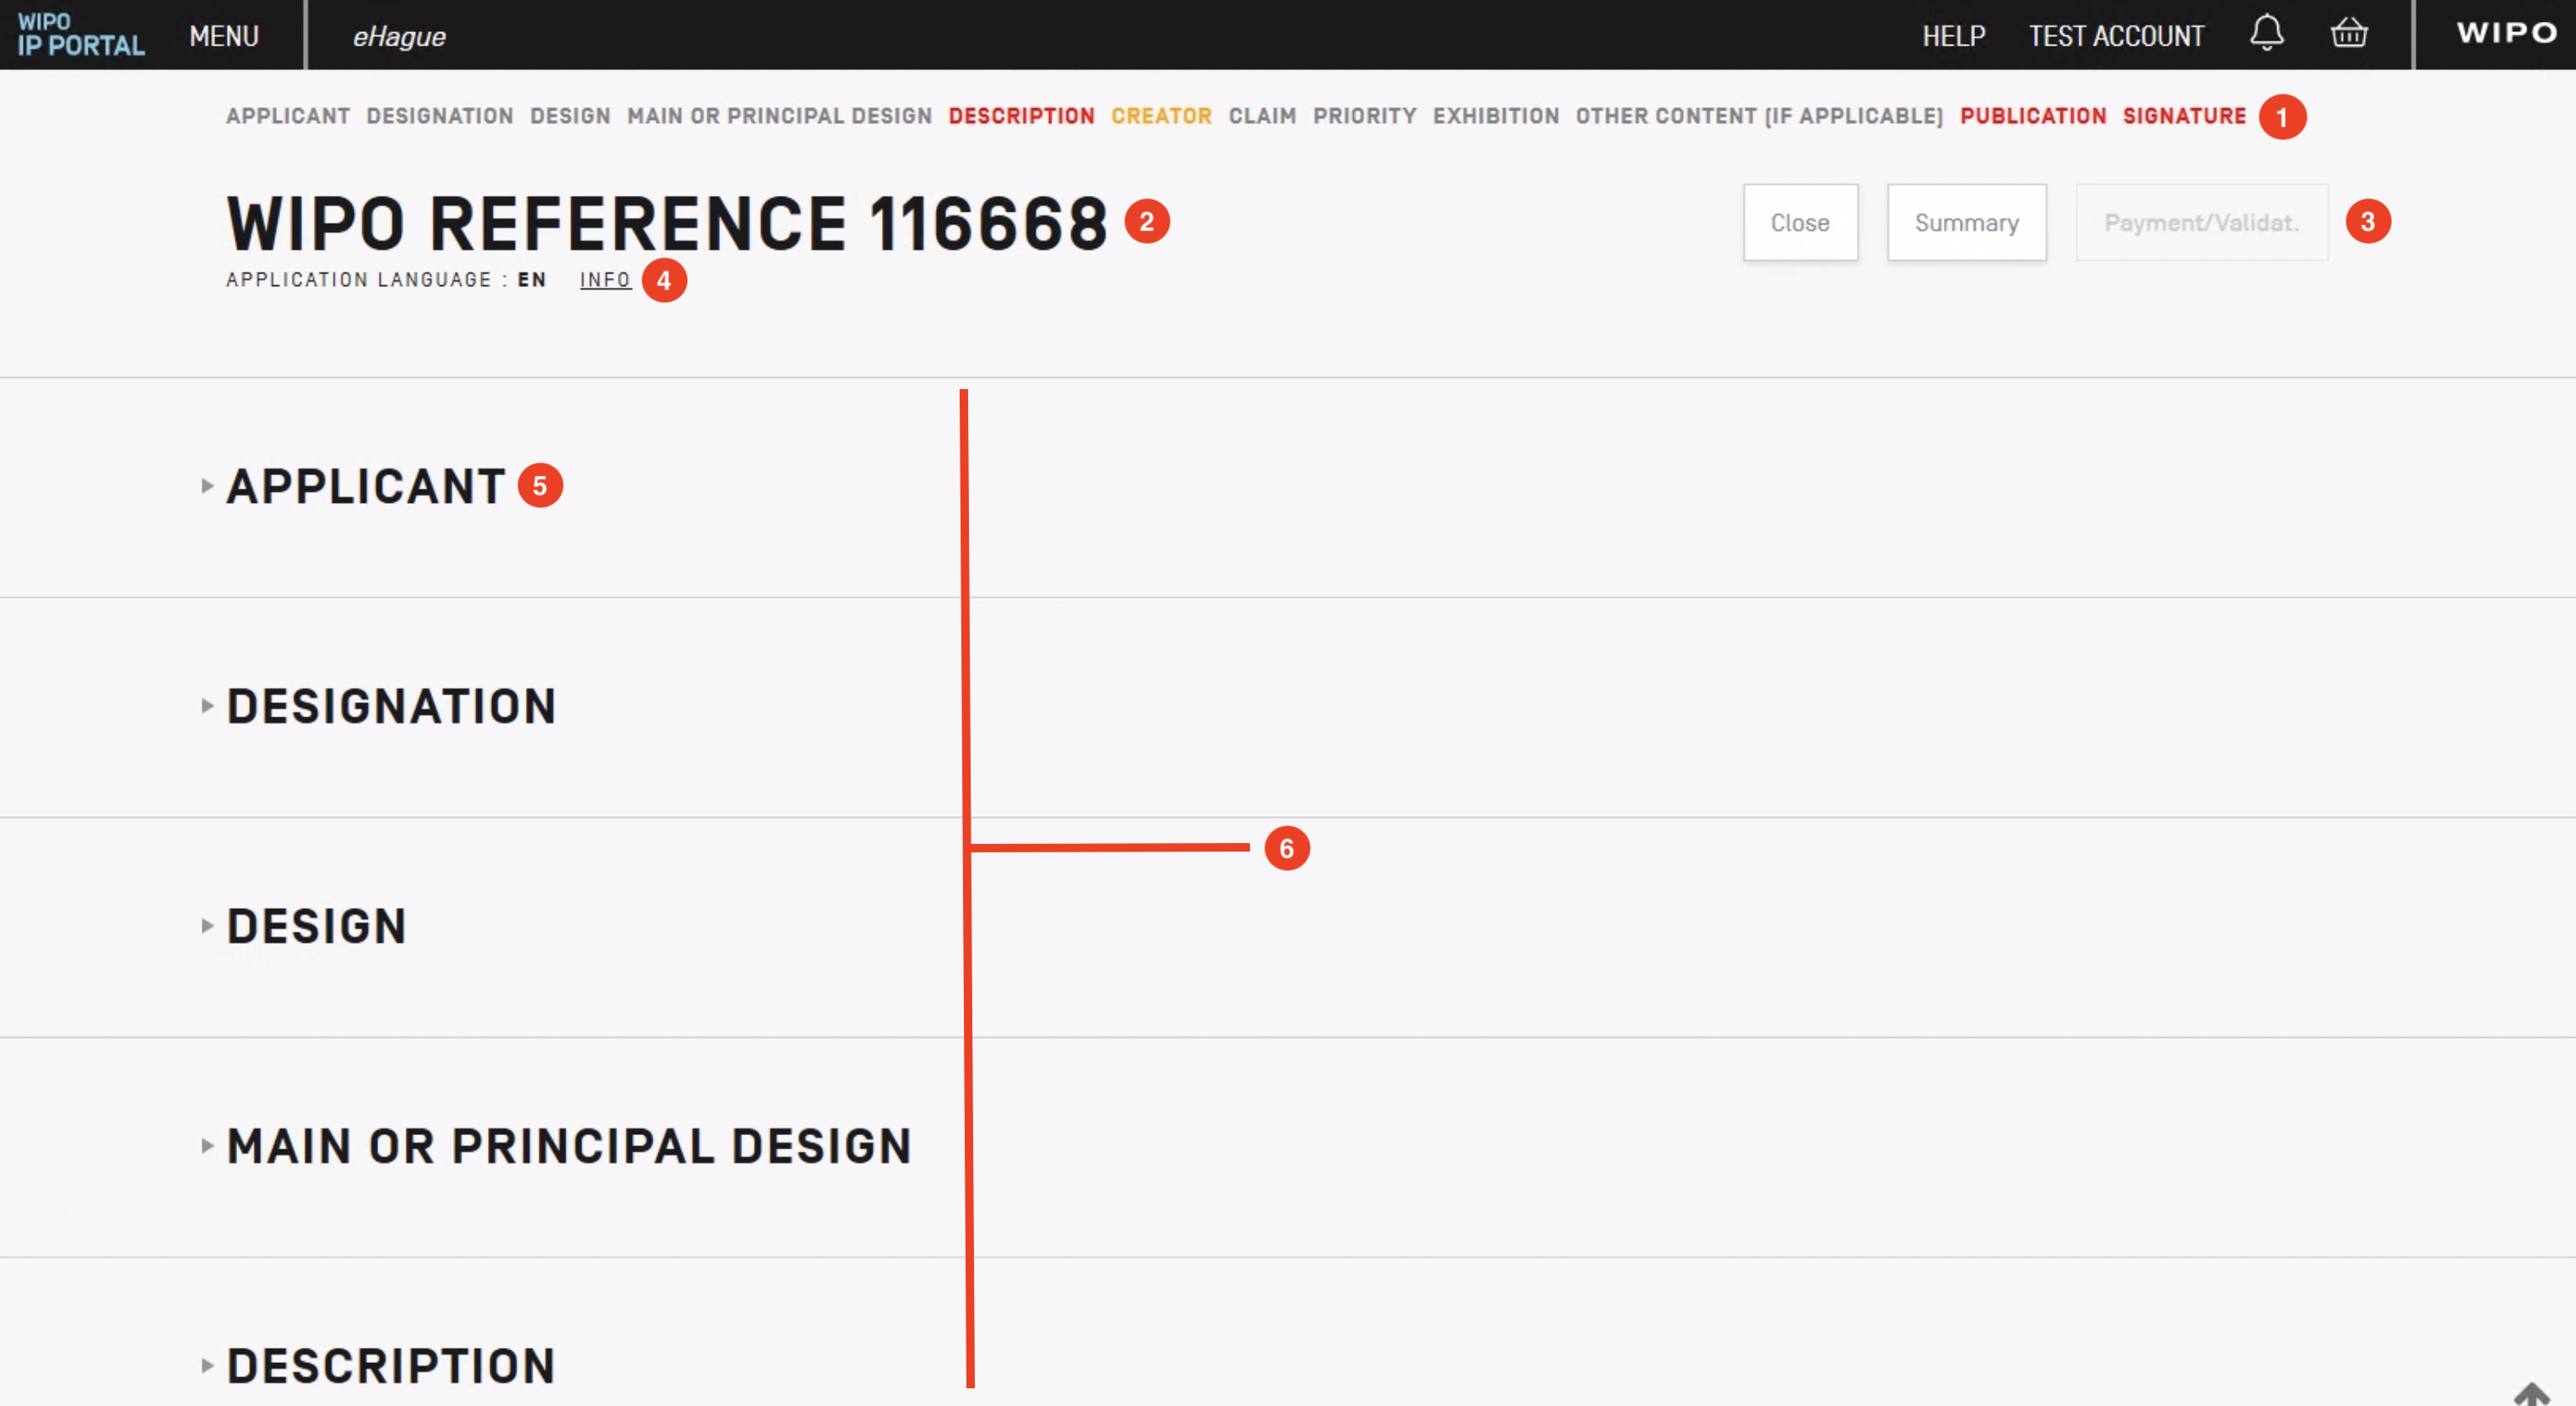
(1) Application section navigation
The international application is divided into sections. Each section is displayed in the application section navigation at the top of the screen, right below the top black navigation bar. The application section navigation is persistent throughout the application, giving you easy access to any section at any time and from any point in the application.
Editable sections are in dark grey while non-editable sections are in light grey. Essential sections that have not yet been completed are in red.
Not all sections will be visible for all applications, as this will change on the specifics of each application. For example, if your application does not designate a Contracting Party that allows for Related Design, the Related Design section will not be editable and will be displayed in light grey (as shown in the above image).
Available sections in the navigation depend on the Contracting Parties designated. For example, in the below image all sections are available.

The following image is an example of an instance when not all sections are available from the application section navigation.

(2) WIPO reference number
The WIPO Application reference number is always clearly displayed at the top of the application form.
(3) Action buttons
Click the appropriate button to Close the current application and return to the Workbench, view a Summary of the current application, or proceed to Payment/Validation of the application. Note that the “Payment/Validation” button is not active unless all required sections of the application have been completed correctly.
(4) Application language
The selected language of the current application. The application language cannot be changed after it has been selected and the application created.
(5) Section titles
The international application is divided into section titles, such as Applicant or Designation. Sections remain closed until they are expanded.
(6) Expanding a section
To expand a section, click on the desired section title or section name in the application section navigation. In the example below, the Applicant section has been expanded.

(7) Action buttons
Each section has various possible actions, which are accessible via the action buttons. These appear before the data entry area of each section. In the above example showing the Applicant section, there are three action buttons available: Add Applicant, Add Representative, or Add Correspondence. Clicking on an action button will bring up the data entry screen that contains various input fields, as shown below.
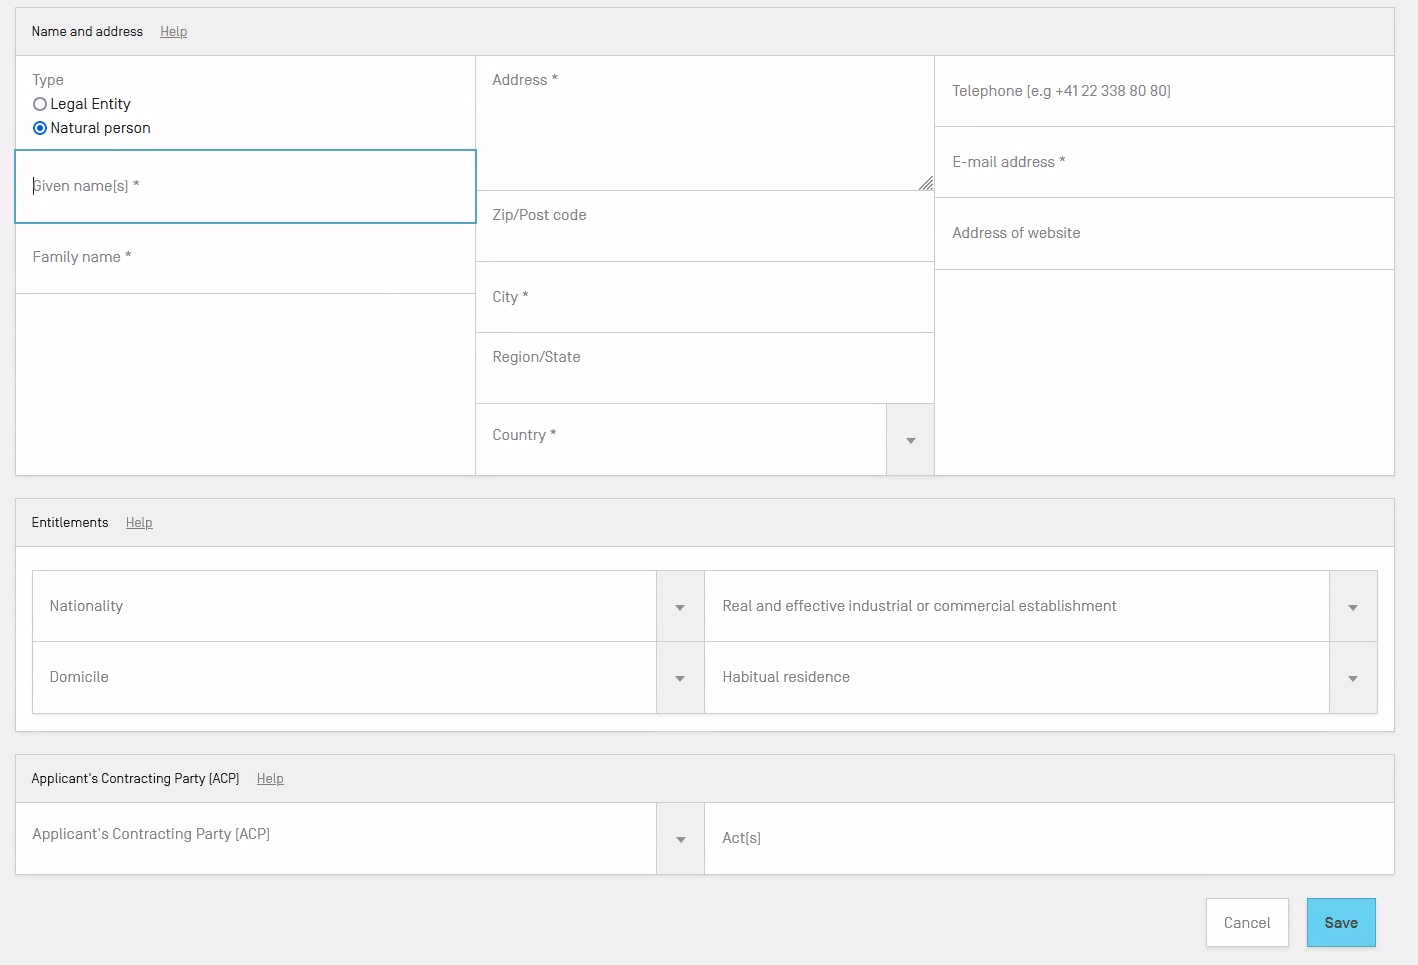
(8) Line Item Action Buttons
For each line of data entered in each section, there are various actions possible. The most common actions are Edit, accessible through the pencil button (![]() ), and Delete, accessible through hovering over the desired row and clicking the trash can button (
), and Delete, accessible through hovering over the desired row and clicking the trash can button (![]() ). Other actions are possible depending on the section you are editing (such as moving a reproduction up or down in the list).
). Other actions are possible depending on the section you are editing (such as moving a reproduction up or down in the list).

In the screen shown above for the Applicant section, the “Delete” and “Edit” action buttons are visible (as outlined).
(9) Information Area
When applicable, an information area will be displayed above action buttons and section line items.

General information about a section will be displayed, such as the example above. This information may include directions on how to complete the specific section and is contained in a grey box.
(10) Warning

When a warning is displayed, the information will be contained in a white box with a yellow warning label on the left, as shown in the above image. The section title will also appear yellow in the section navigation for each section that contains a warning as shown below.

(11) Error

Error messages will be contained in a white box with a red error label on the left, as shown in the above image. The section title will also appear red for each section that contains an error as shown below.

An international application cannot be filed unless all errors are corrected.
Essential sections common to each Hague application
Applicant

Make sure to complete the compulsory fields (name, address, e-mail address, etc.) in the first section. As of March 20, 2020, all communications from WIPO are exclusively by e-mail and indicating an e-mail address for the applicant, representative and correspondence is mandatory. Why? So that we can send traceable electronic communications to applicants, holders and representatives.
The e-mail address of the applicant must be distinct from that of the representative – use a different domain name – unless the representative is in-house.
Where a representative is appointed, the e-mail address of the applicant or holder will only be used in the limited circumstances as required under the Hague Common Regulations.
WIPO will not share your e-mail addresses with any third party.
Next, indicate at least one entitlement for the applicant. Then, select the Applicant's Contracting Party (ACP).
Editing previously saved entries
To edit a previously saved entry (such as an Applicant) in eHague, click on the pencil icon to the far right of the desired row.

As shown below, all of the data previously entered will be visible and available for editing.
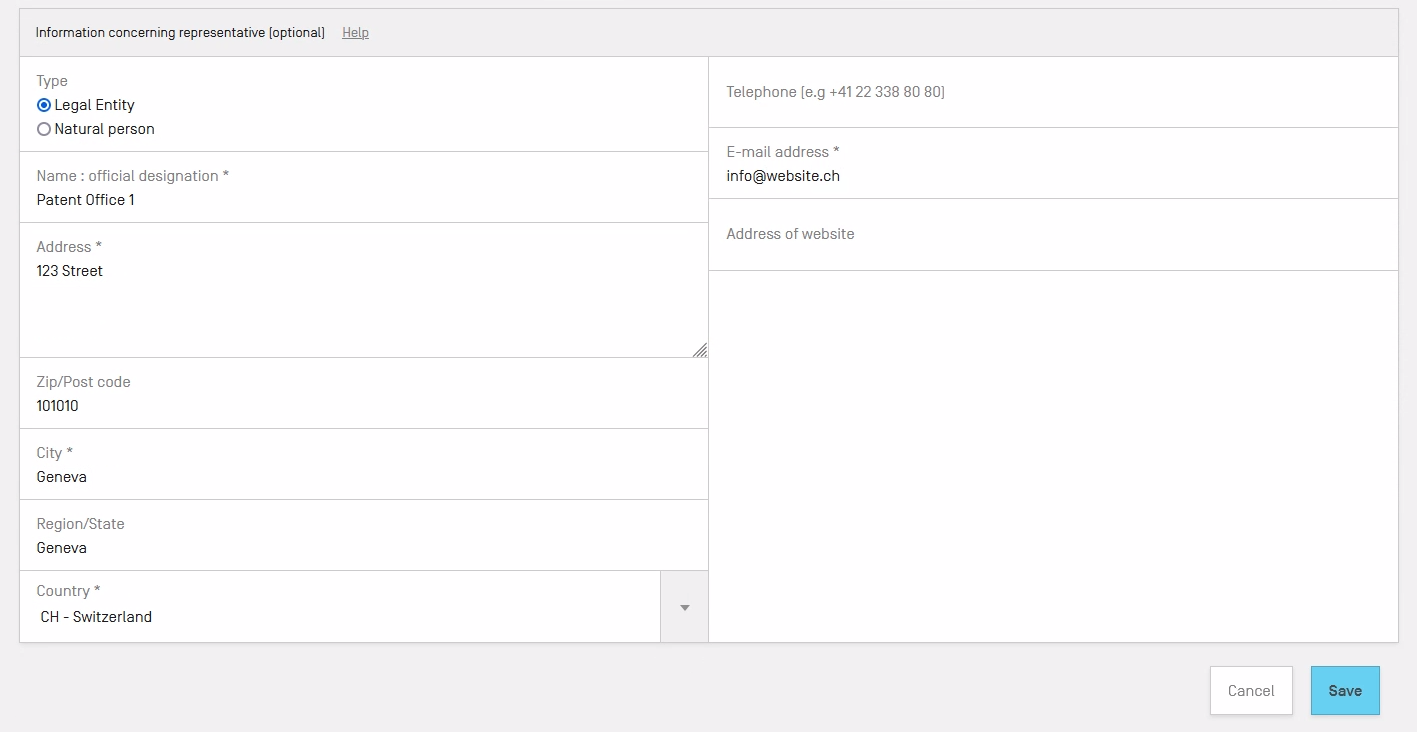
Simply click in any field to edit previously saved data or enter new data.
Changing an Applicant type
If you would like to change your applicant type, simply open the Applicant screen, and select the desired type (“Legal Entity” or “Natural Person”).
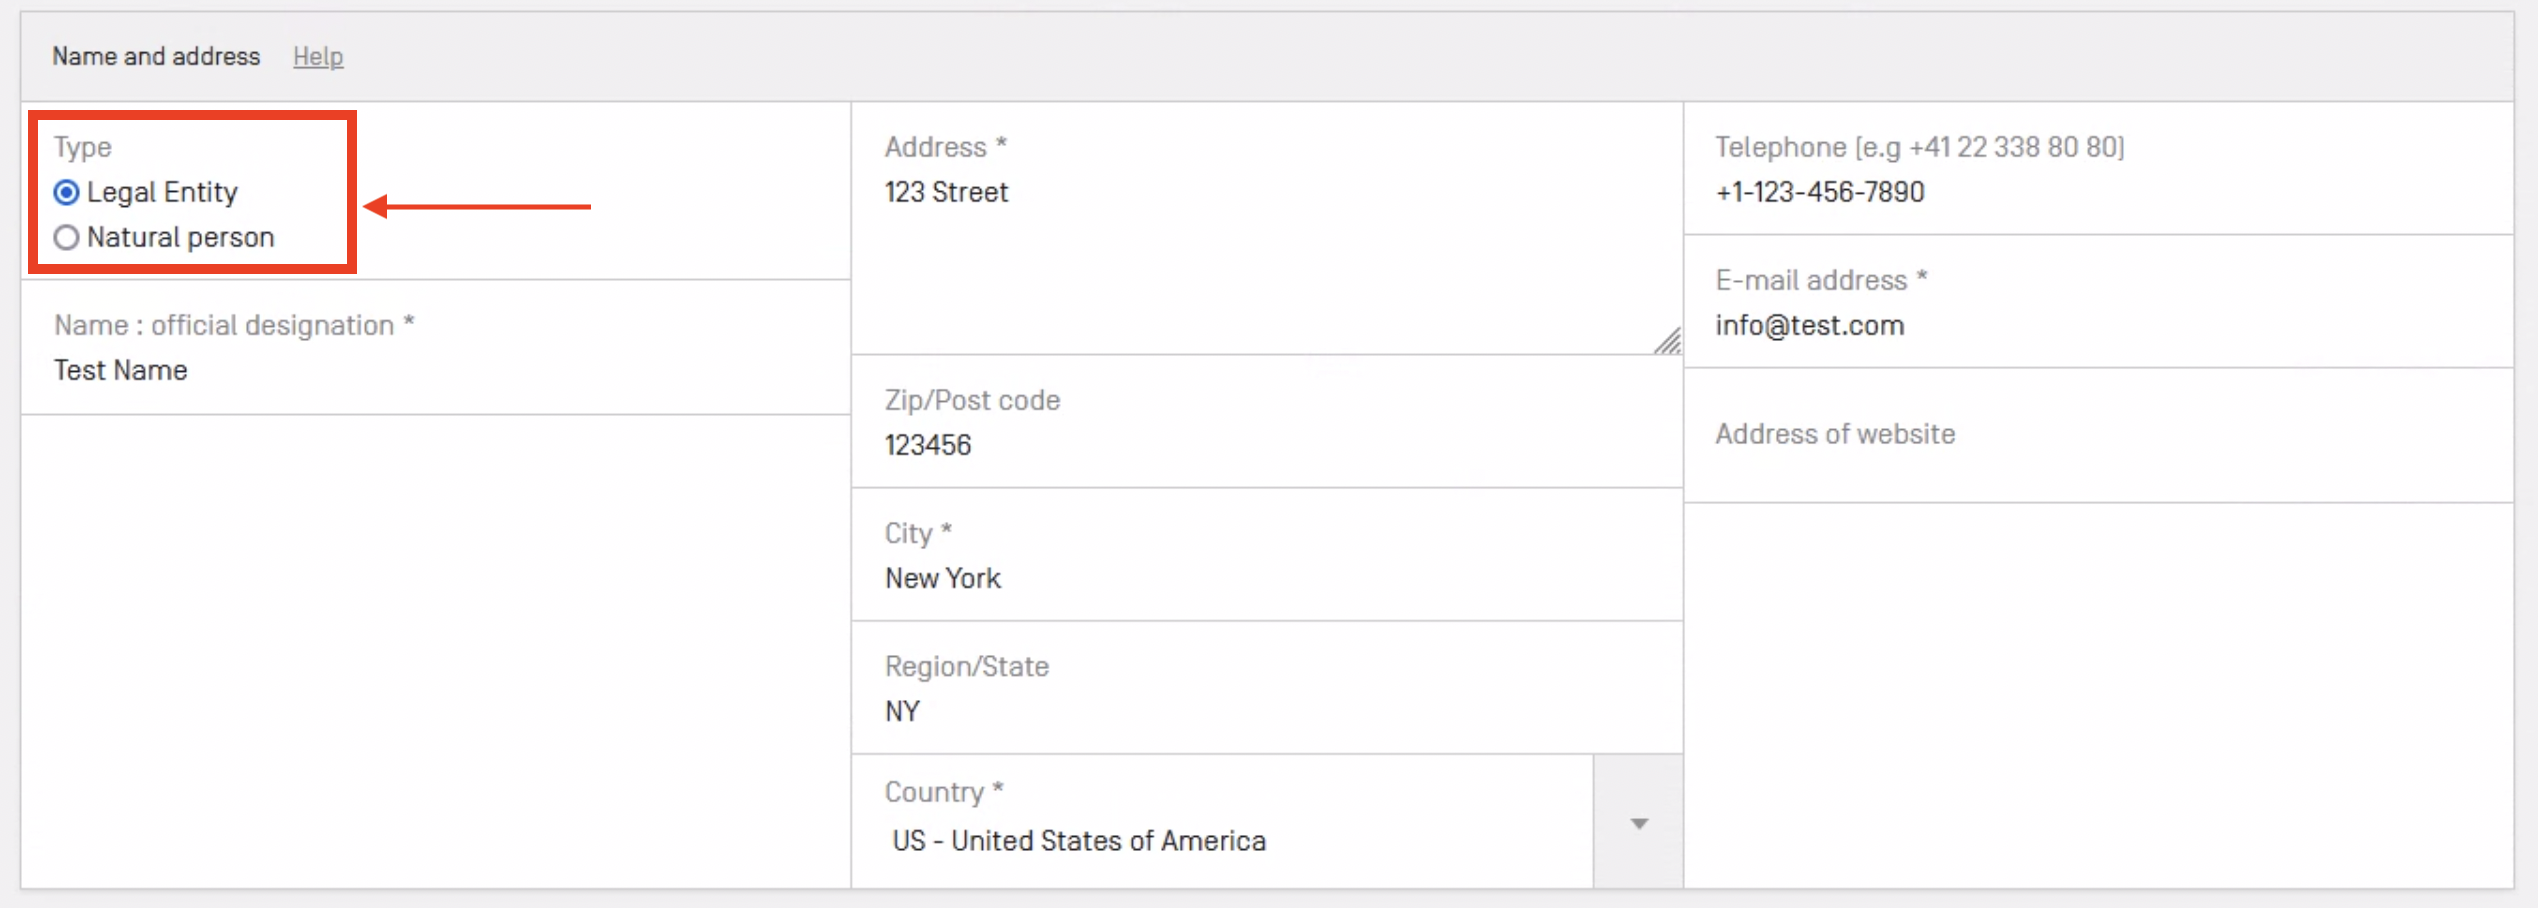
Then, enter the new details. For example, if you are changing from a “Legal Entity” to a “Natural Person”, you will need to indicate a last name.
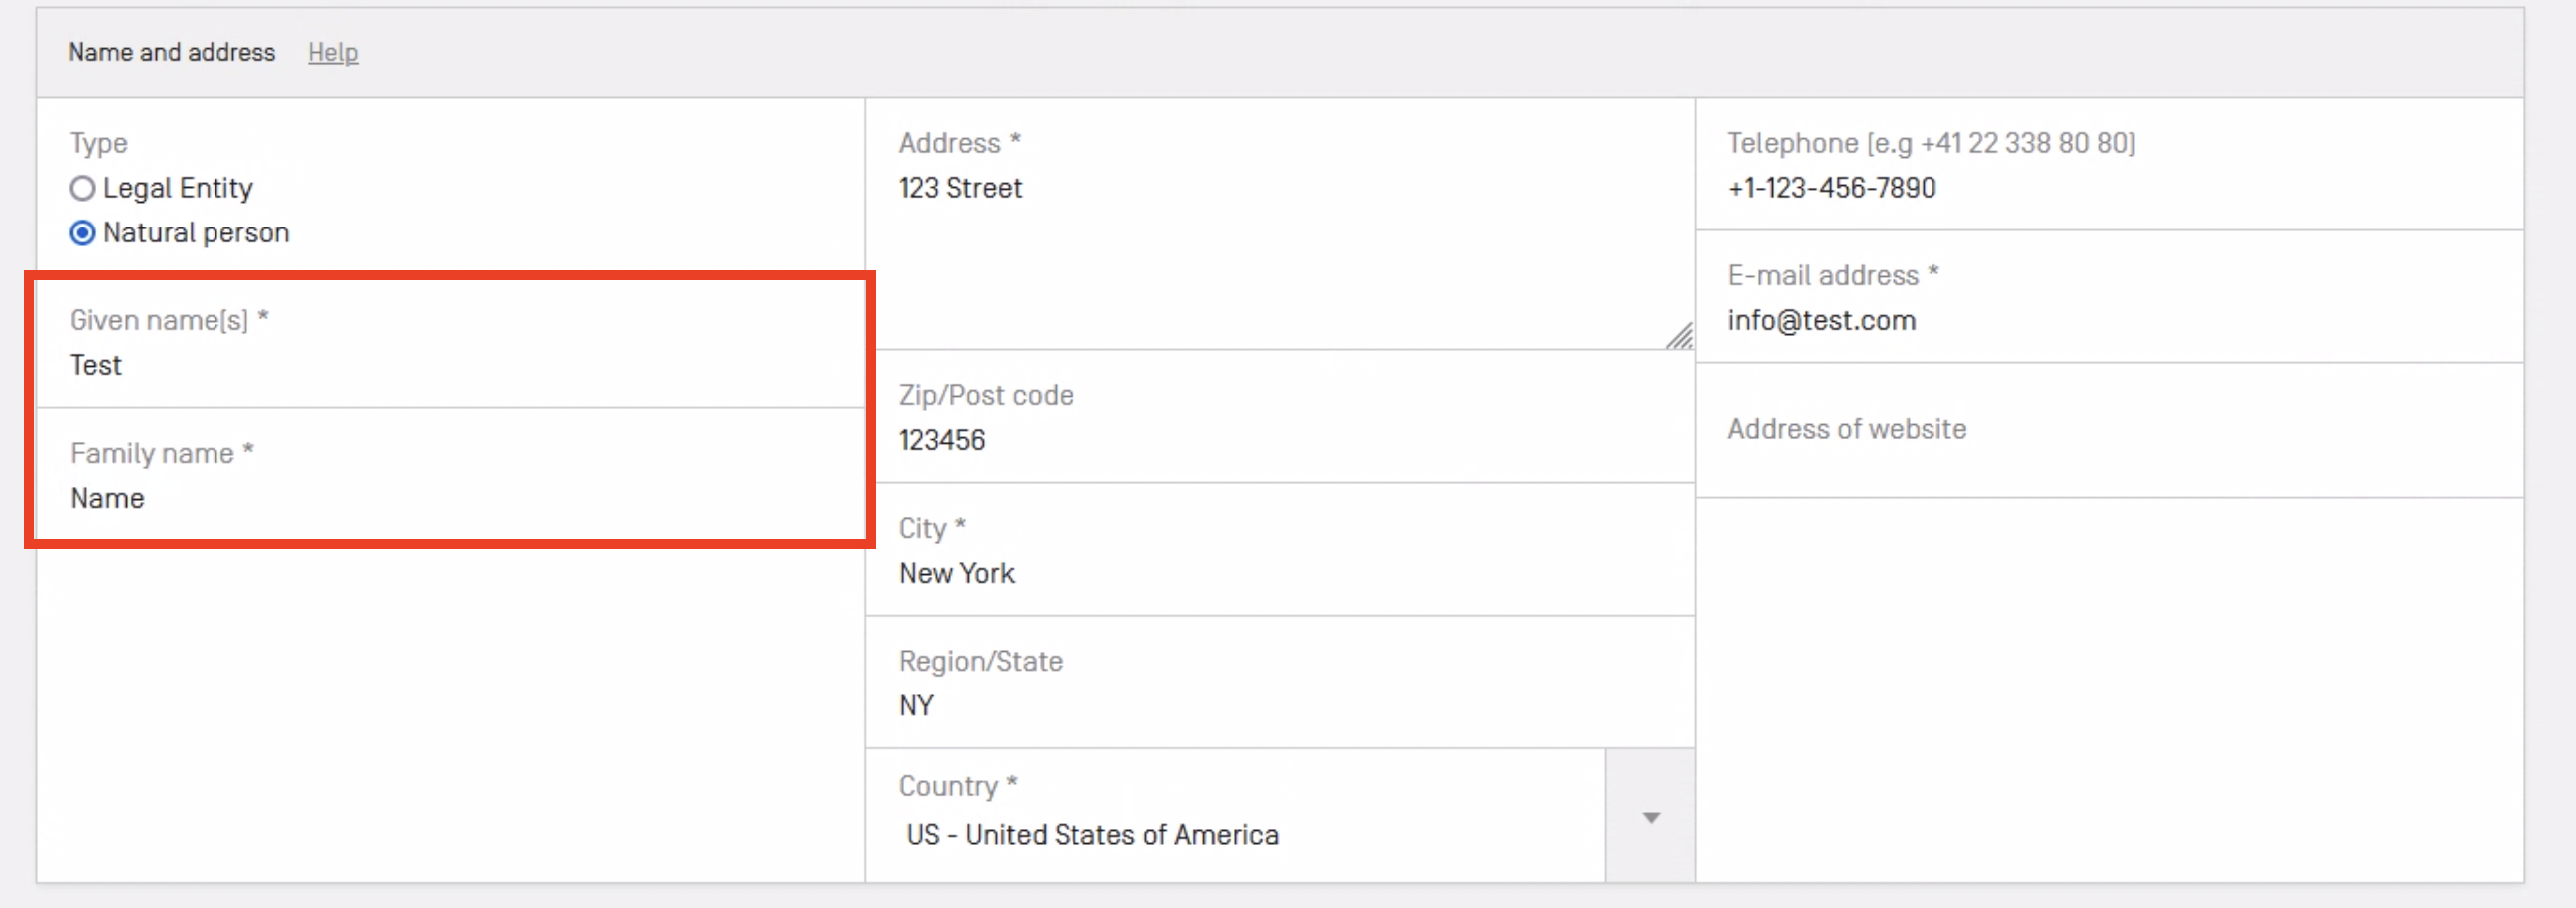
When adding a new applicant, make sure to select your desired applicant “Type” and complete all required information correctly before you save the applicant.
Entitlements? Contracting Party?
If you need help with legal concepts, such as "Entitlements", or "Contracting Party", refer to the contextual help: a “Help” link to the right of the name of an item where help is available.
Designations
The "Designation(s)" section allows you to indicate in which Contracting Party(ies) you seek protection for your design(s).
The white box will indicate the designation(s) that are currently in the application, if any. Click on the “Change selection” action button to the far right, as shown in the image below, to select or remove a Contracting Party.

Check the box next to the Contracting Party that you would like to designate. You can click on the “Deselect all” or “Select all” action buttons at the top right to deselect or select all Contracting Parties.
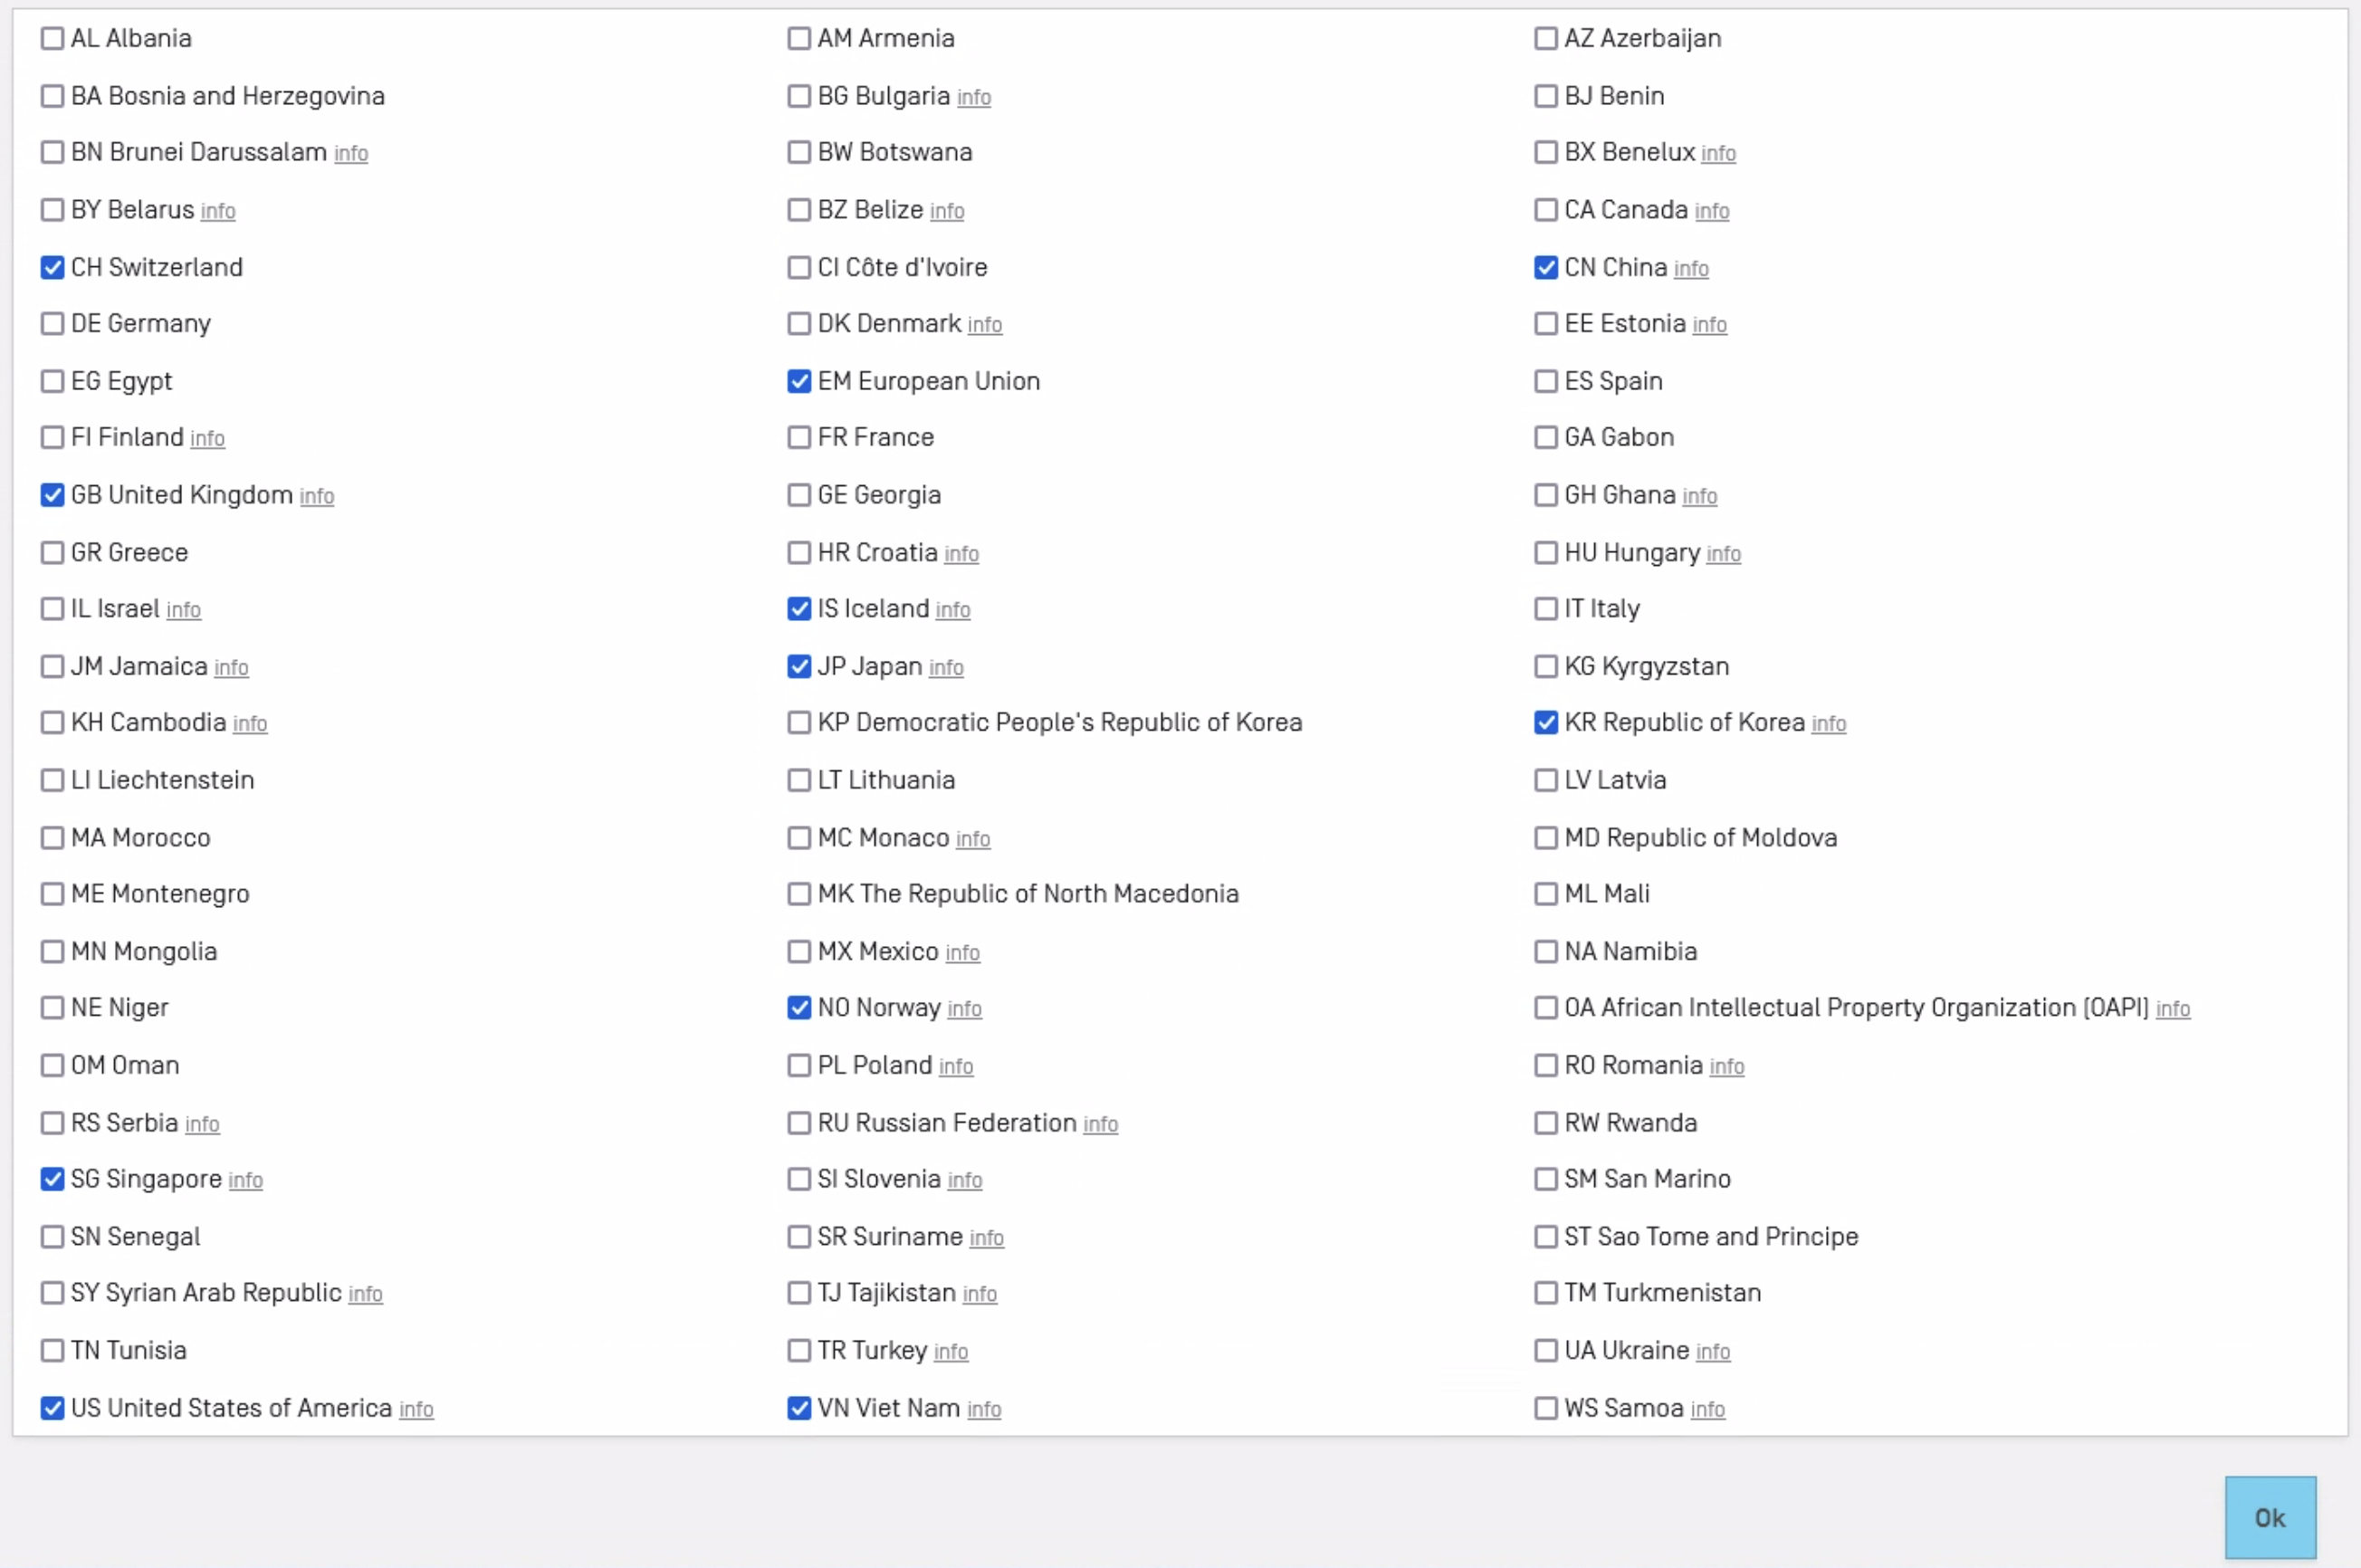
Click on the information icon (![]() ) to find what effect the designation of a particular Contracting Party will have on the data you need to enter. The information will be displayed as below.
) to find what effect the designation of a particular Contracting Party will have on the data you need to enter. The information will be displayed as below.
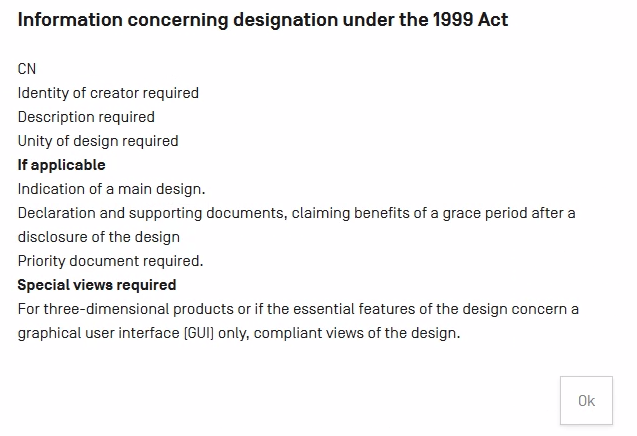
When you have designated all of the desired Contracting Parties, click the “Ok” action button at the bottom right to save your designations. The two-letter code of your saved designations will be displayed as highlighted below.

Design(s)
When you open the Design(s) section for the first time for a new application it will appear as the image below (warnings and/or errors may differ from the below image depending on the Contracting Parties you have designated).
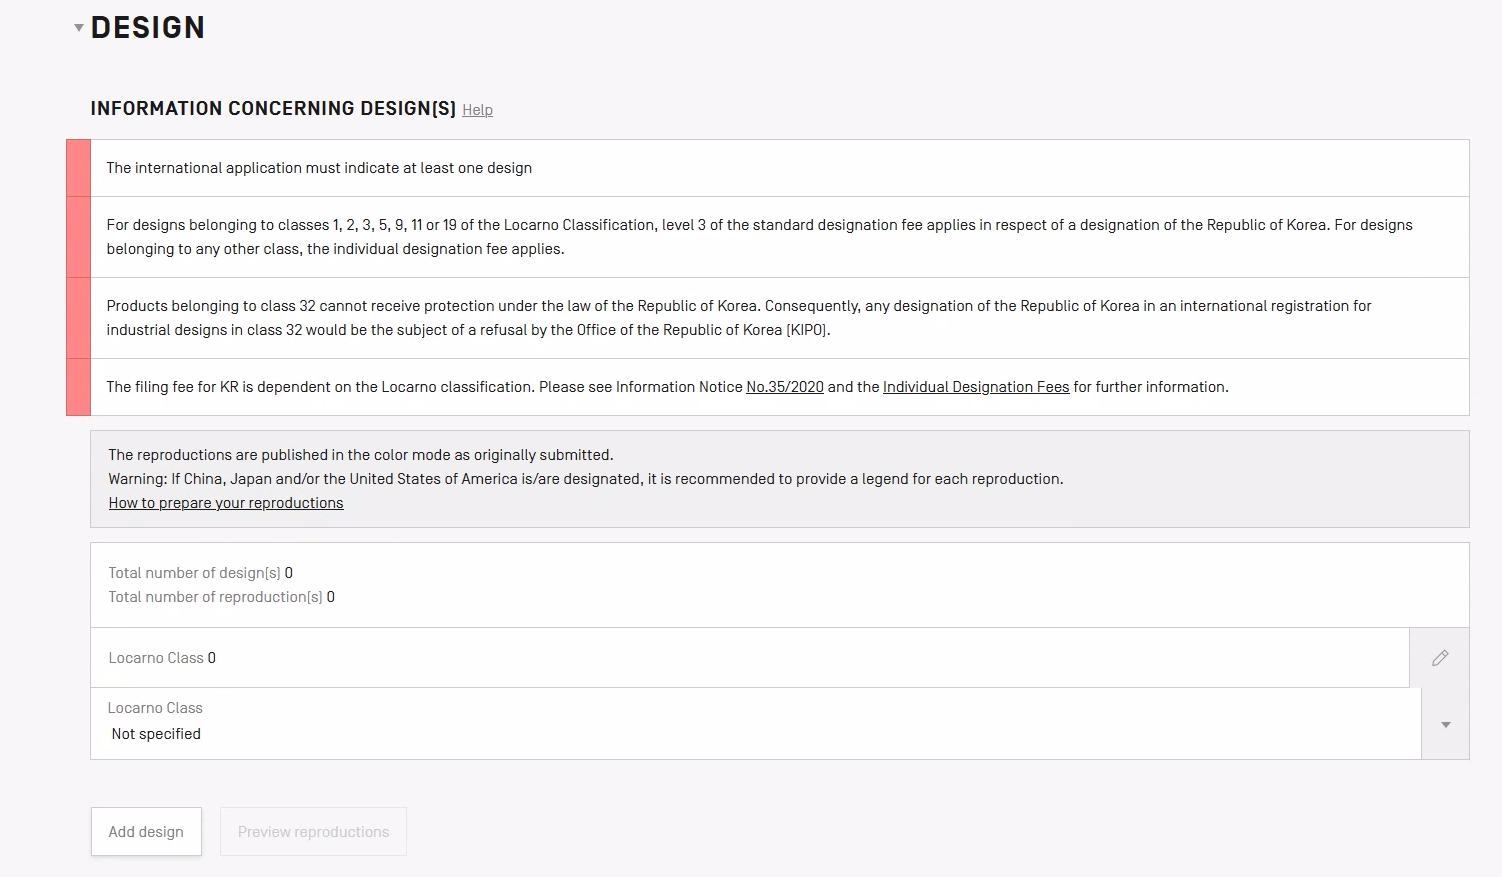
The Design(s) section has three subsections:
General information and Locarno Class

The first subsection is optional and allows you to specify the class, under the Locarno Classification, to which the product or products in relation to the industrial design belong. To do so, simply click on the inverse triangle action button at the far right and select a class from the list, as shown in the image below.

Design(s)
After selecting a Locarno Classification, create design(s) by clicking the “Add design” action button on the bottom left as shown in the image below.
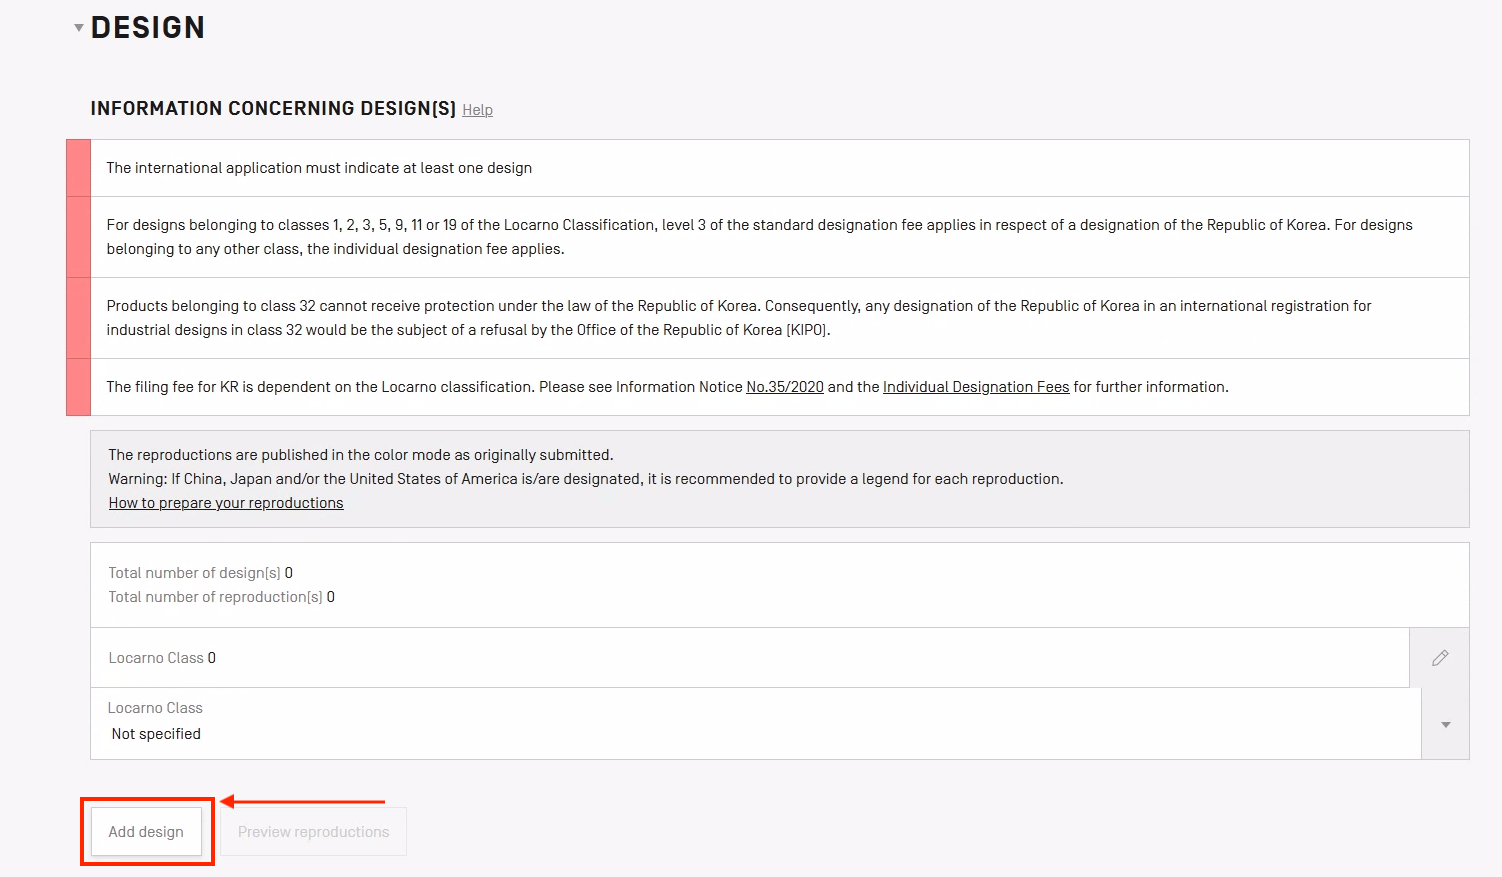
You will be prompted to enter a Locarno sub-class (optional) and a product indication (mandatory) for each design as shown in the image below. To enter a custom product indication, simply enter such indication in the Product Indication field instead of choosing an indication from the dropdown list. Custom product indications cannot be longer than 255 characters.

After selecting the above, click on the “Save” button at the bottom right.

If your application contains multiple designs with the same Locarno sub-class and product indication, click on the “Duplicate” action button to avoid entering the same information more than once. The duplicate action button is shown in the image below.

After you have entered multiple designs, you may change the order in which they are submitted. To do so, either click on the move up (˄) or move down (˅) action buttons. These buttons will appear by hovering your mouse over the line you would like to move and are directly to the left of the copy action button. Click on the up and down move action buttons until you are satisfied with the ordering. The move action buttons are shown in the image below (the move up button is active).

From the list view, use the "Edit" icon (![]() ) to correct the Locarno sub-class or the product indication.
) to correct the Locarno sub-class or the product indication.
Once you have added at least one design, you can upload reproductions. Note that you cannot proceed with your application until at least one reproduction has been uploaded for each design.
To preview how your reproductions will look on a printed sheet of paper, click on the "Preview Reproductions"action button, as shown below.

Reproduction(s)
To upload reproductions, click on the edit action button on the row that corresponds to the design for which you would like to upload reproductions. Then, click on the “add image (.jpg or .tif)” button on the far right, as shown in the image below.

You may upload multiple reproductions at the same time. The system will then run two tests:
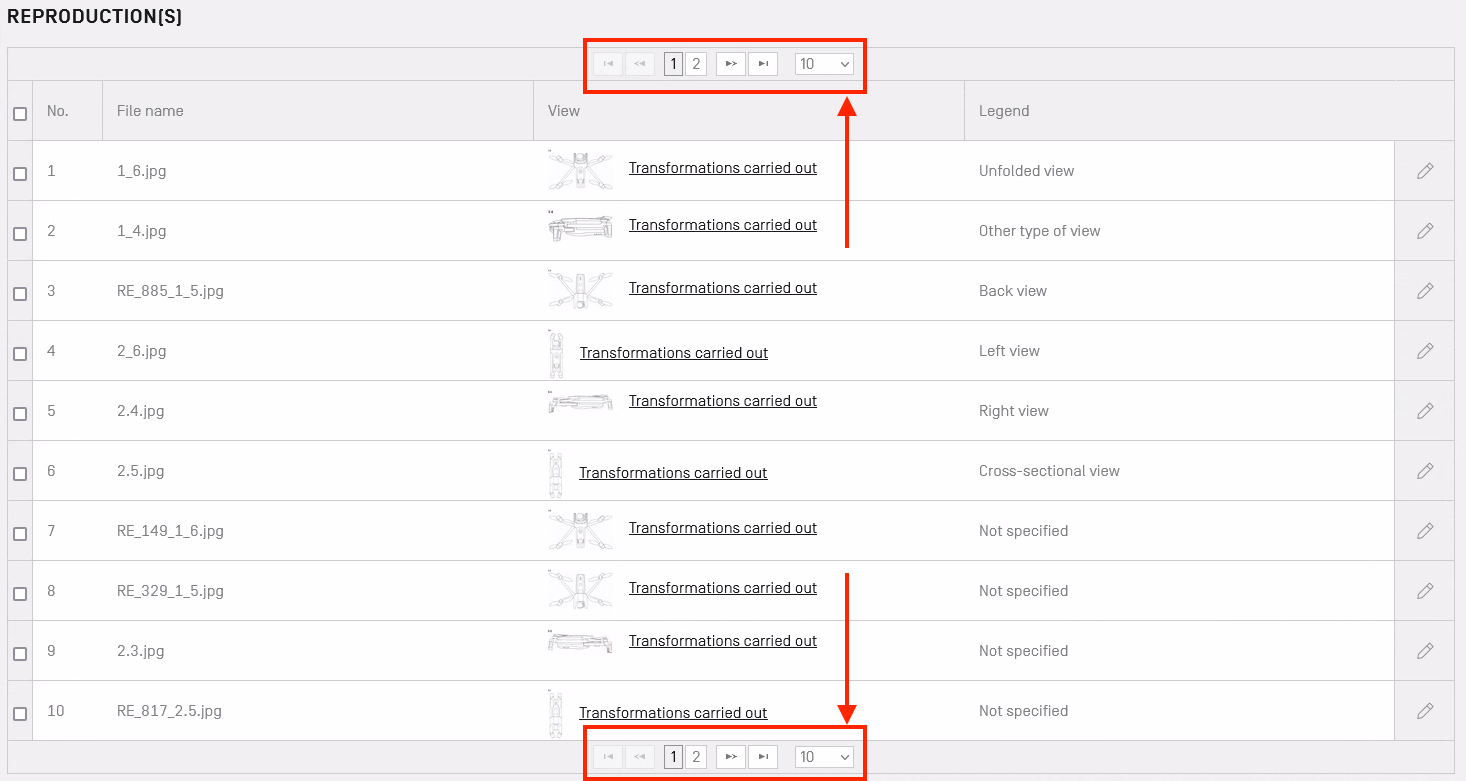
1. The system will automatically ensure your reproductions comply with the file format and size requirements indicated. Once the system accepts the files, you will see them listed as the below screen.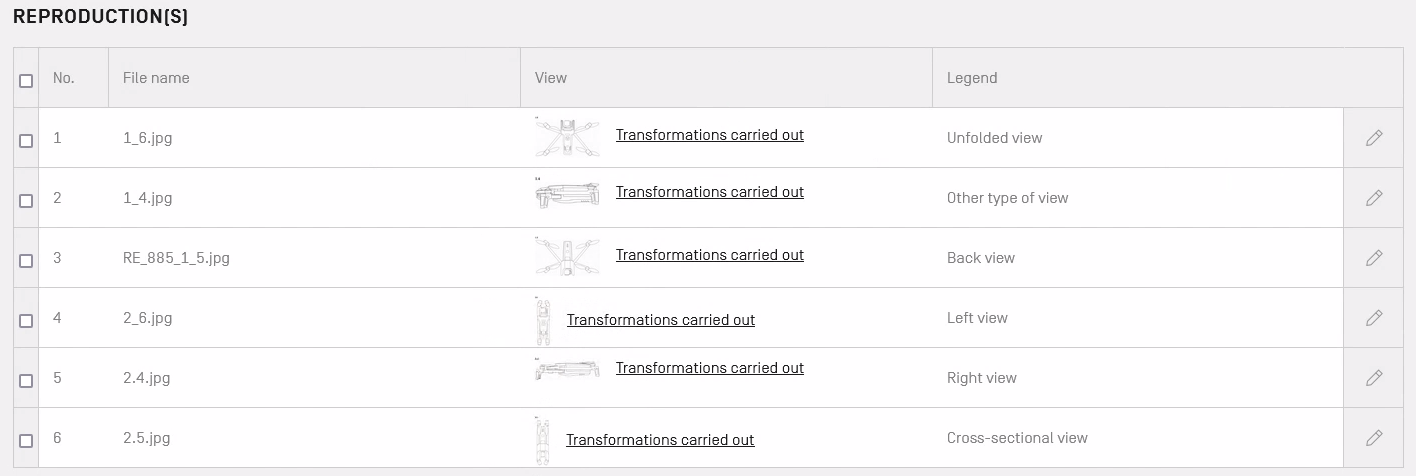 Reproductions: Parrot Drones, registration DM/101359
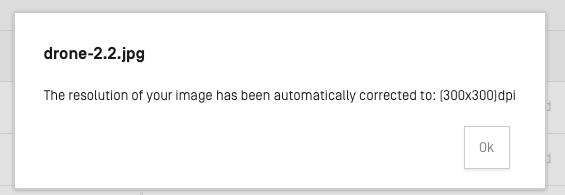
2. The system also automatically ensures that resolution and dimensions (height, width) of your images are compliant with the particulars for electronic communications. For example, if the image is too large, the system will automatically resize it. If automatic transformations were made to the reproduction(s) you uploaded, click on the “Transformations carried out” link in the “View” column of the screen shown in item 1 above to view them. The transformations carried out will be displayed as the screen below.
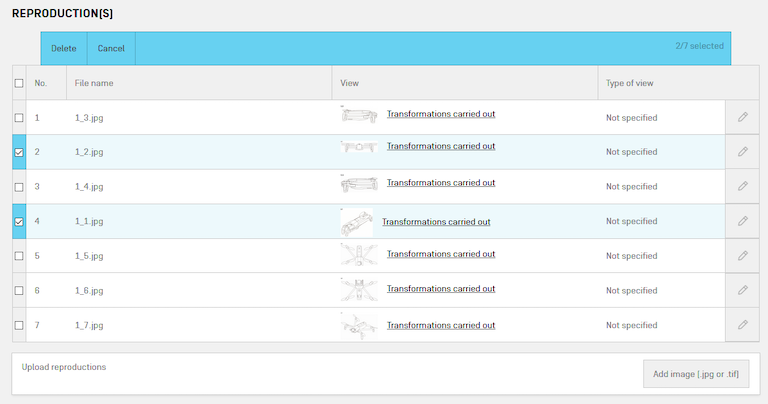
If you are unhappy with any of the transformations carried out, you may delete one or more of the uploaded reproductions. To do so, tick the box in the far left column of each reproduction you would like to delete. As soon as one box is ticked, a new action row will appear at the top of the table as shown below. Click on the “Delete” button to delete the selected reproductions or the “Cancel” button to cancel the deletion.
You may change the order in which a reproduction is submitted by hovering your mouse over the row of the reproduction you would like move and clicking the move up (˄) or move down (˅) action buttons as shown in the box in the image below.

In the below example, images were uploaded one by one and thus retained the desired order of sequential numbering (the filenames of the uploaded images).

In the below example, images were uploaded all at once. However, the desired order was sequential numbering (the filenames of the uploaded images) and this was not retained. This is because when multiple files are uploaded concurrently, files of a smaller size may be uploaded faster than files of a larger size. The first file to be uploaded will be the first image to be displayed in the list. For example, if image 1.1.jpg is 2MB and image 1.3.jpg is 1MB, image 1.3.jpg will likely be uploaded first and will become the first image in the list.

If you would like to have your reproductions in a specific order, you therefore have two options:
- Upload your reproductions one by one.
- Upload your reproductions all at once and then move each one to the desired location (you can move a reproduction by hovering your mouse over the desired row and click the move up or move down buttons that appear).
Specifying a Legend
You may indicate a legend to specify the type of view (i.e. front view, back view, etc.) of the reproduction. To do so for a particular reproduction, click the edit action button on the far right of the row of the reproduction for which you would like to specify the view. The below screen will appear.

Select a type of view from the list, or, if you do not find an appropriate type of view select ”Other” from the list and manually enter your own type of view (up to 50 characters).

After selecting the view from the list, click the “Save” button.

You will then see the view you selected show up in the “Legend” column for the specified reproduction as reflected on the screen below.
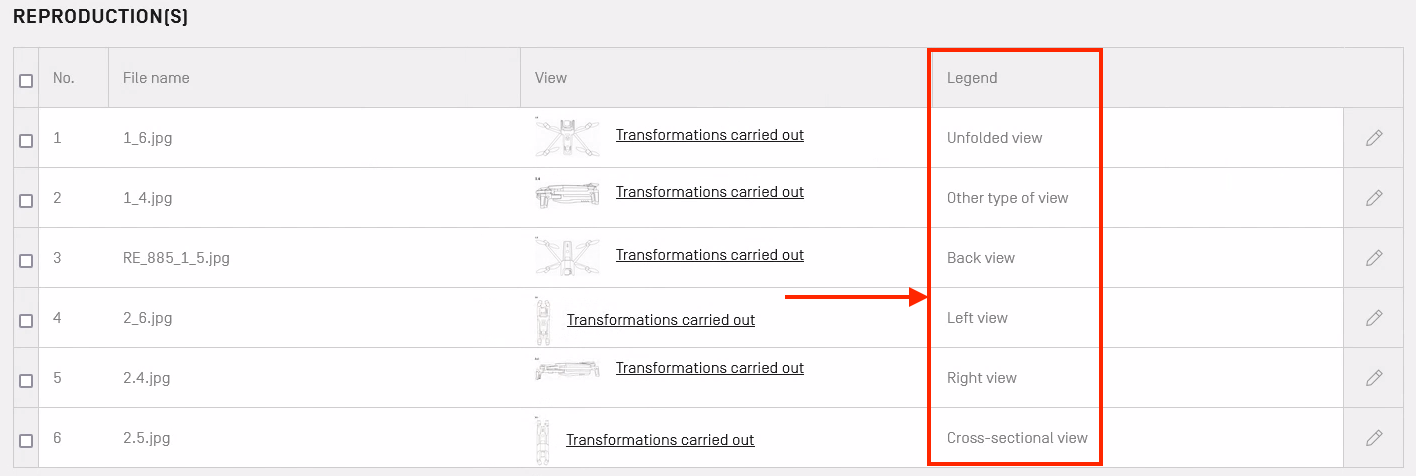
If you have many reproductions, you may use the pagination buttons at the top or bottom of the reproductions list to scroll through the pages of reproductions and show 5, 10, or 15 per page.
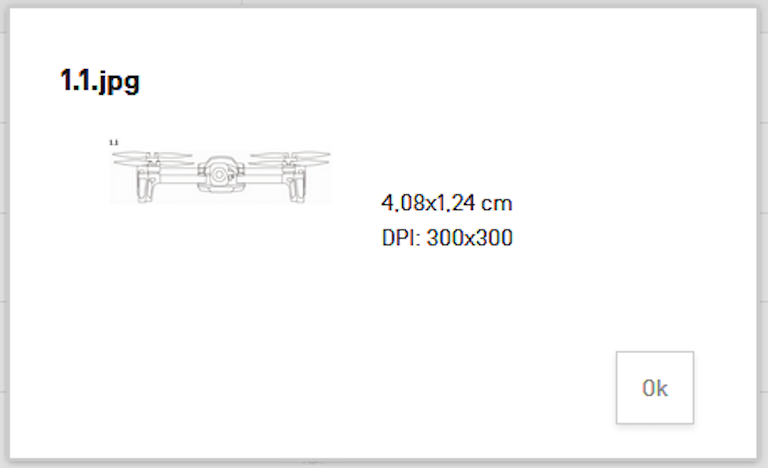
Preview Reproduction from Reproductions Table
You may preview exactly how your reproduction will appear once printed by clicking on the thumbnail of your reproduction. You will see details of the reproduction. An example is provided below.
When at least one reproduction has been uploaded for each design, other options will be available in the application navigation menu and you may navigate through your entire application.
Publication
The publication dates available for an international application depend on the Contracting parties designated. In the Publication section, the Information Area will display information about publication options for Contracting Parties designated in the application.
If a Contracting Party has limitations on deferment of publication, this information will be displayed in the Information Area. If no designated Contracting Parties in your international application have limitations on deferment, publication can be deferred up to a maximum of 30 months. The help text () provides contextual help.
To edit the publication date of the application, click the pencil icon (also known as the edit button) at the far right as shown below.

You will then see a screen presenting you with the following publication options:
- “Standard” publication – twelve months after the date of your international registration.
- Immediate publication – shortly after recording of your international registration.
- Publication at a chosen time (counted in months from the filing date) – enables you to indicate a time earlier than “standard publication”. You will still be able to defer publication beyond the standard publication period – up to 30 months from the filing date, or if you have claimed priority from an earlier filing, from the priority date.
Important! Regardless of your designated Contracting Parties, you can always select “standard publication” or “immediate publication”. Some Contracting Parties limit or do not allow deferment of publication. For full details, refer to Information Notice 10/2021.
Choose the desired publication date from one of the three options provided and click the “Save” button in the bottom far right corner.

If you choose the third option, a drop-down box will be displayed that lists the available period (in months from the filing date or priority date).

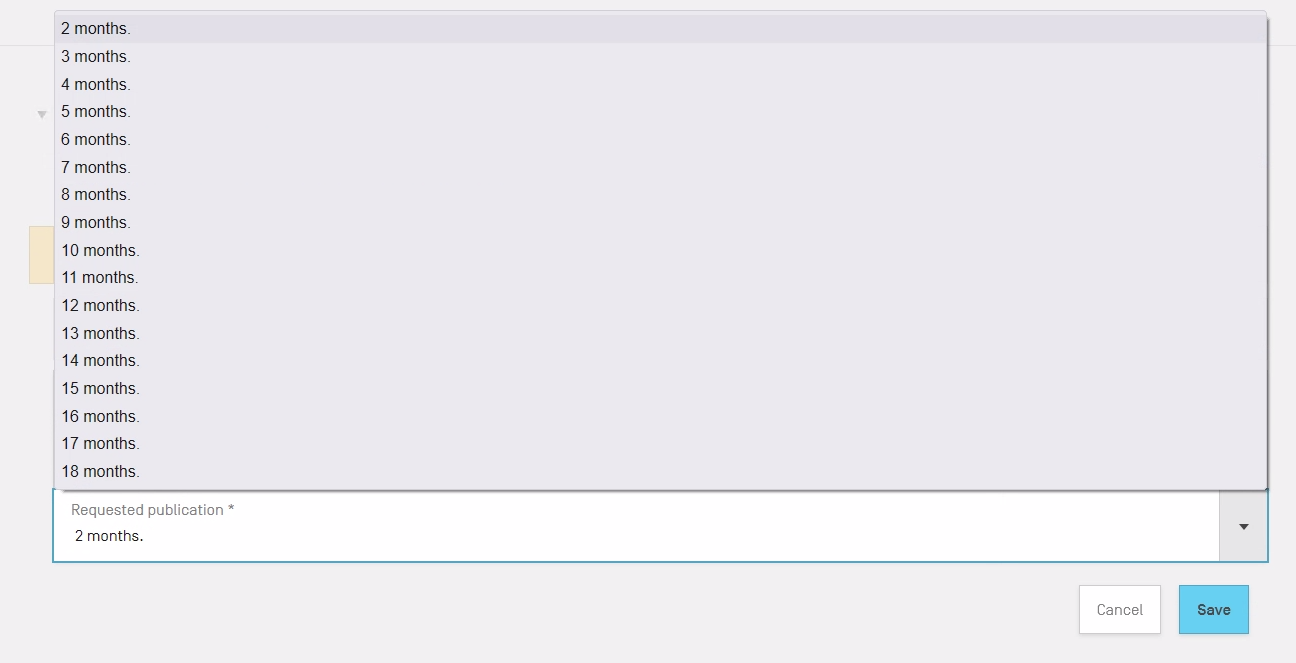
To change the publication period, click on the drop-down menu to see the available options as shown below.
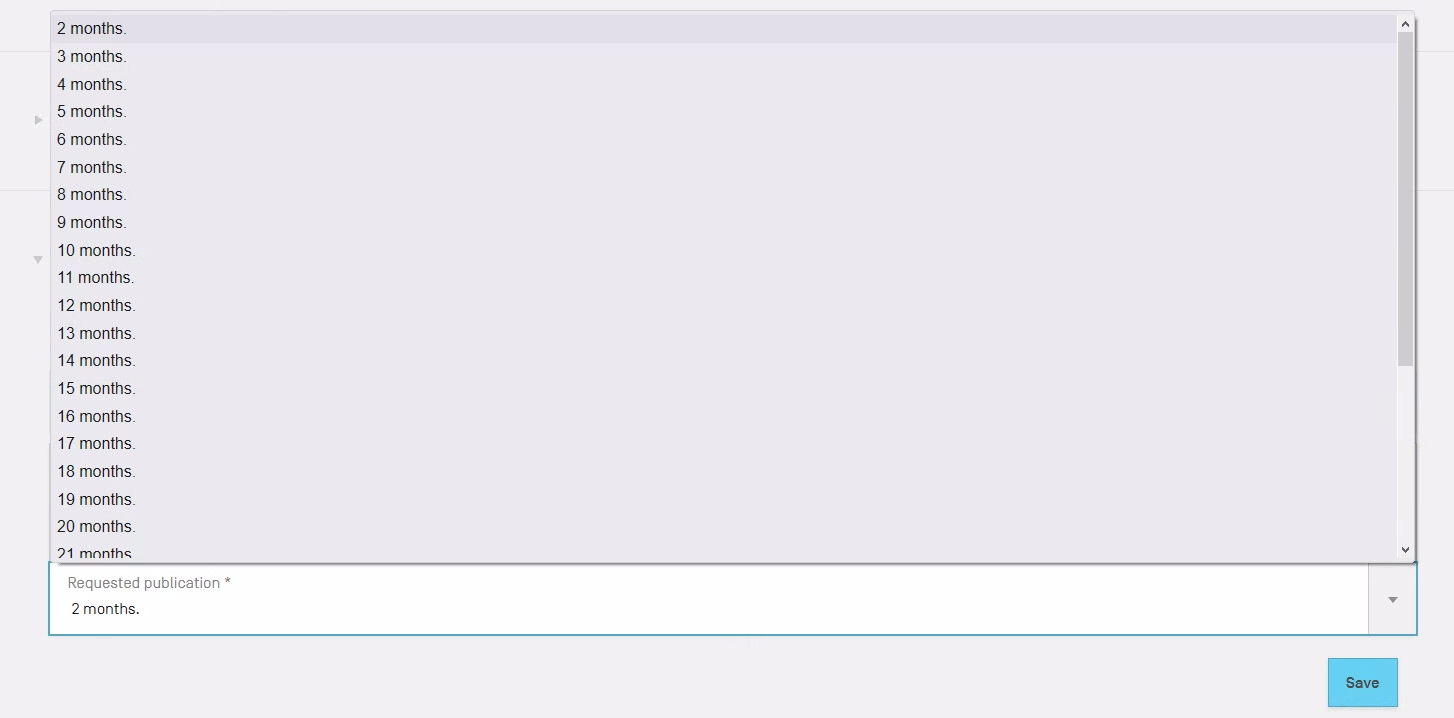
After making your selection, click the “Save” button in the bottom-right corner.

Example 1: Standard publication
You can always select “standard publication”. In the publication section, simply select the first option and click the “Save” button on the bottom right.
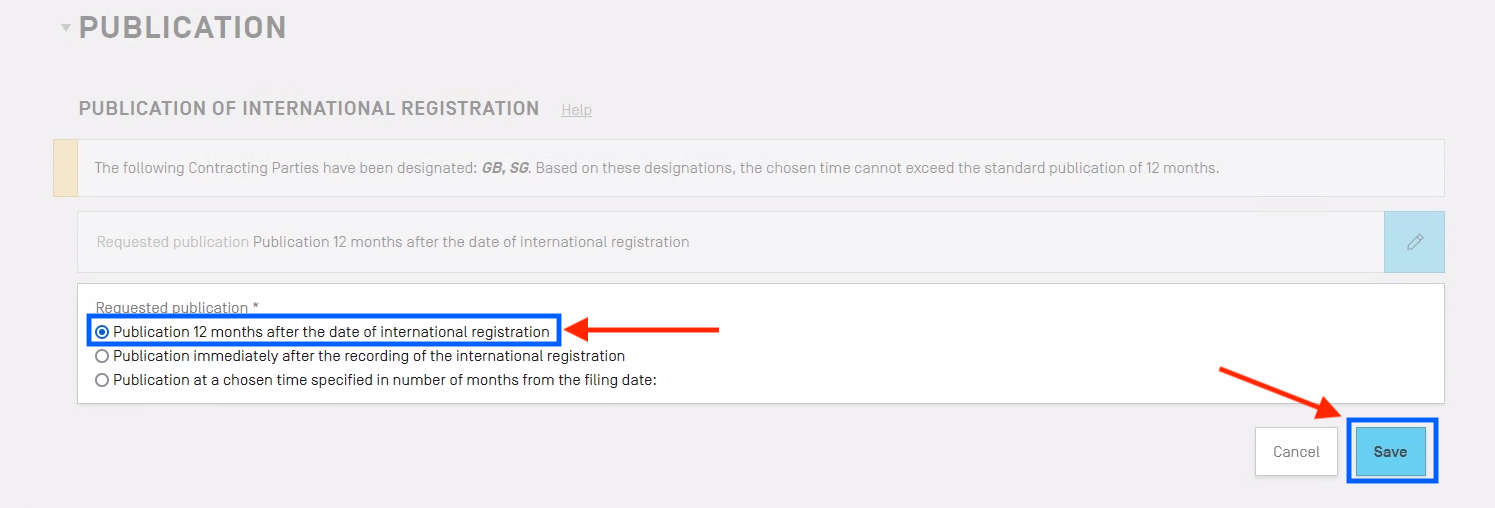
You can see your chosen publication option by expanding the Publication section of the international application as shown below.

Example 2: Immediate Publication
You can always select “immediate publication”. In the publication section, simply select the second option and click the “Save” button on the bottom right.
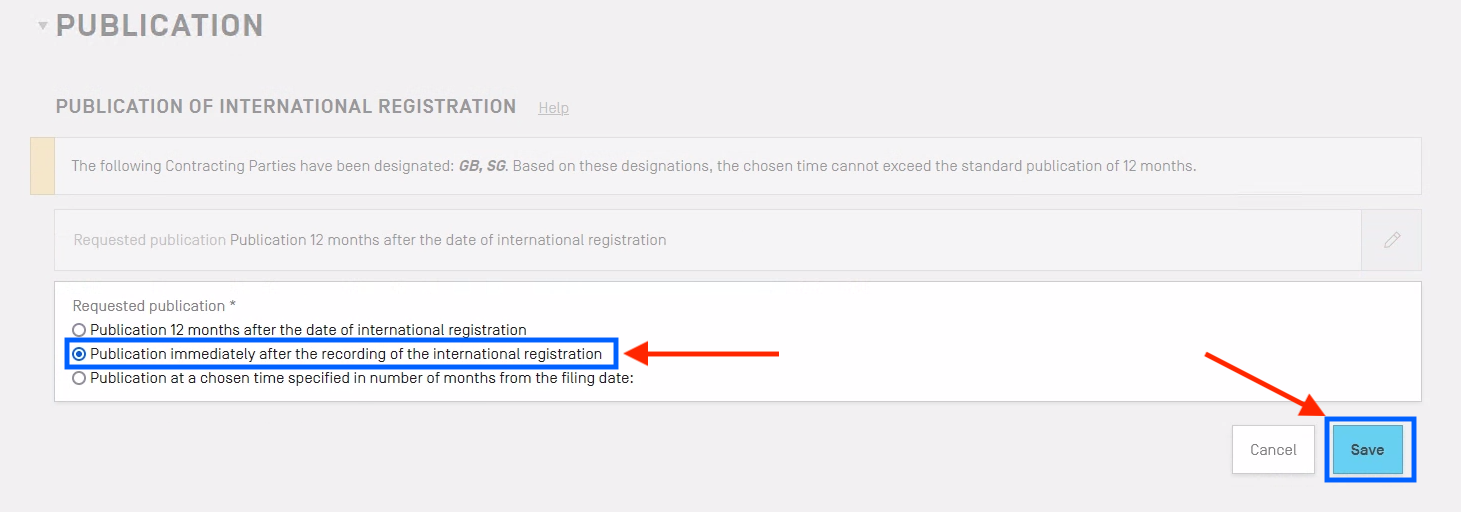
You can see your chosen publication option by expanding the Publication section of the international application as shown below.

Example 3: Publication at a chosen time specified in number of months from the filing date.
If you want to publish the international application at a specific time, click the edit button as shown below.

Then, select the third publication option – “Publication at a chosen time specified in number of months from the filing date” – and click on the “Request publication” drop-down as shown below.
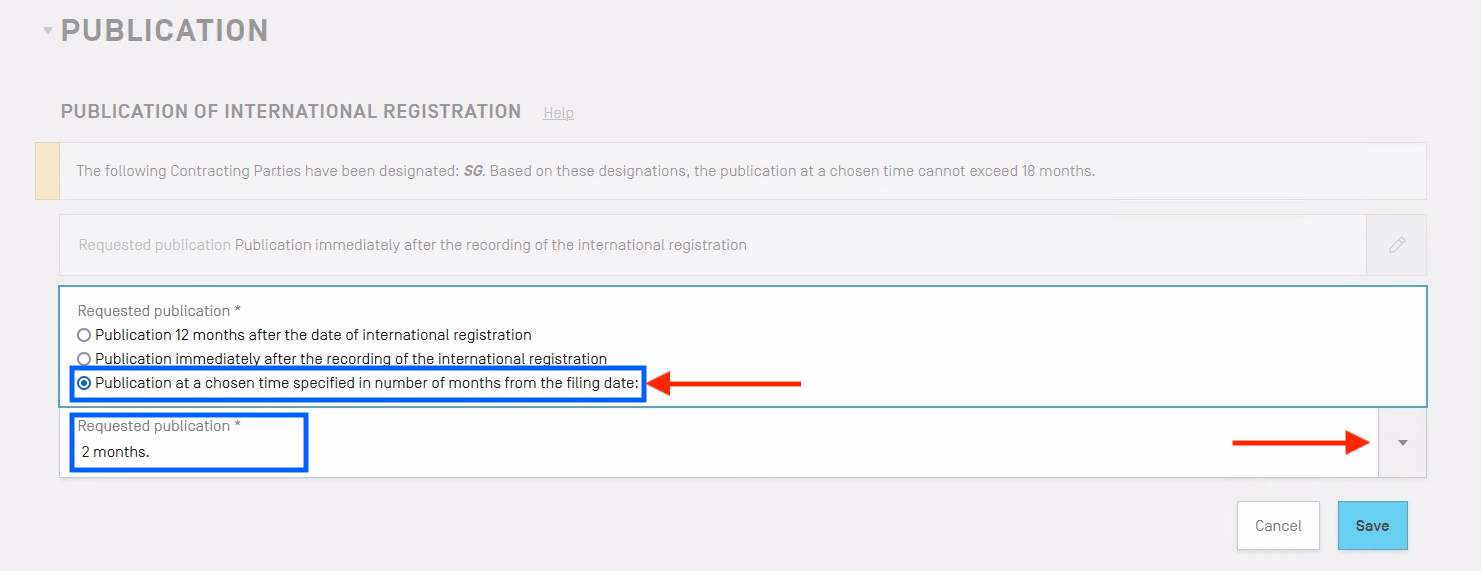
The system automatically limits the available options (in number of months) depending on the Contracting Parties you have designated. The maximum number of months allowed to defer publication will be displayed in the information box in the Publication section. In the example below, because Singapore (SG) is designated, the maximum deferment of publication cannot exceed 18 months.

After clicking on the drop-down list, you can select the number of allowable months in which you wish your registration to be published. In this example, Singapore is designated and the maximum number of months publication can be deferred is 18 months.
After making your selection, click the Save button at the bottom right as shown below.
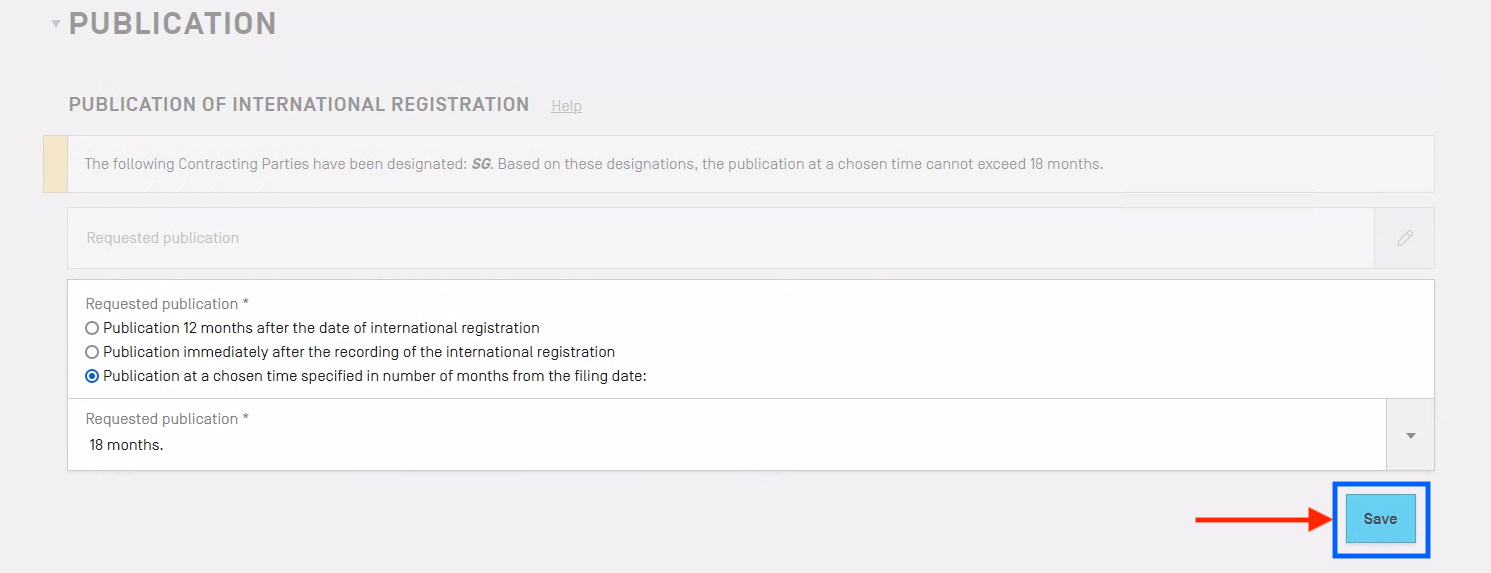
You can see the selected publication deferment period (in this example, 18 months) by expanding the Publication section of your international application as shown below.

You may edit your choice at any time before submitting your application by clicking on the “Edit” pencil icon button at the far right of the row.

The applicant or holder may request earlier publication at any time before the expiration of the publication period initially specified in the international application. Upon the International Bureau’s receipt of any such request, the international registration will be published immediately (taking into account the time required to carry out the relevant technical preparations for publication). Such a request can be made through Contact Hague.
Refer to the Hague Guide for Users for detailed information on publication.
Signature
To identify the person who is signing your application, tick the box to the left of the appropriate name and click the “Save” button as seen in the bottom right of the above screen.

Once you are satisfied with your signature(s), click the blue “Save” button at the bottom right of the screen.
In the “Application reference” field, you may enter your personal reference number for your records. Please note that this number is not published.
Paying for your application
Once you are ready to make payment, click on the “Payment/Valid.” button at the top right, just below the application navigation bar and to the right of the Summary button. The “Payment/Valid.” button is available from any point on the screen (as shown in the image below).

If you have not completed all of the required sections for your application, the “Payment/Valid.” button will not be actionable. This button will be greyed out as shown in the image below.

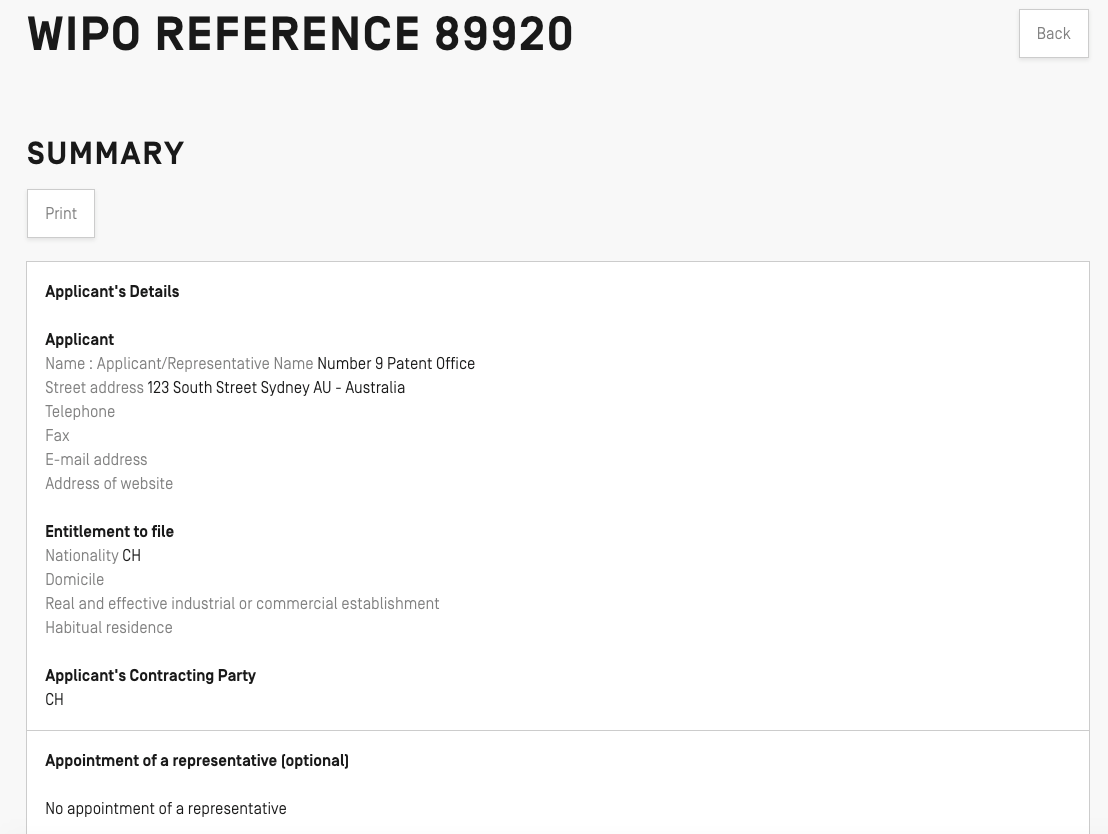
Before sending your application, you should check it carefully by viewing a summary of it. You can do so by clicking on the "Summary" button, which is directly to the left of the “Payment/Valid.” button. An example summary screen is shown below.
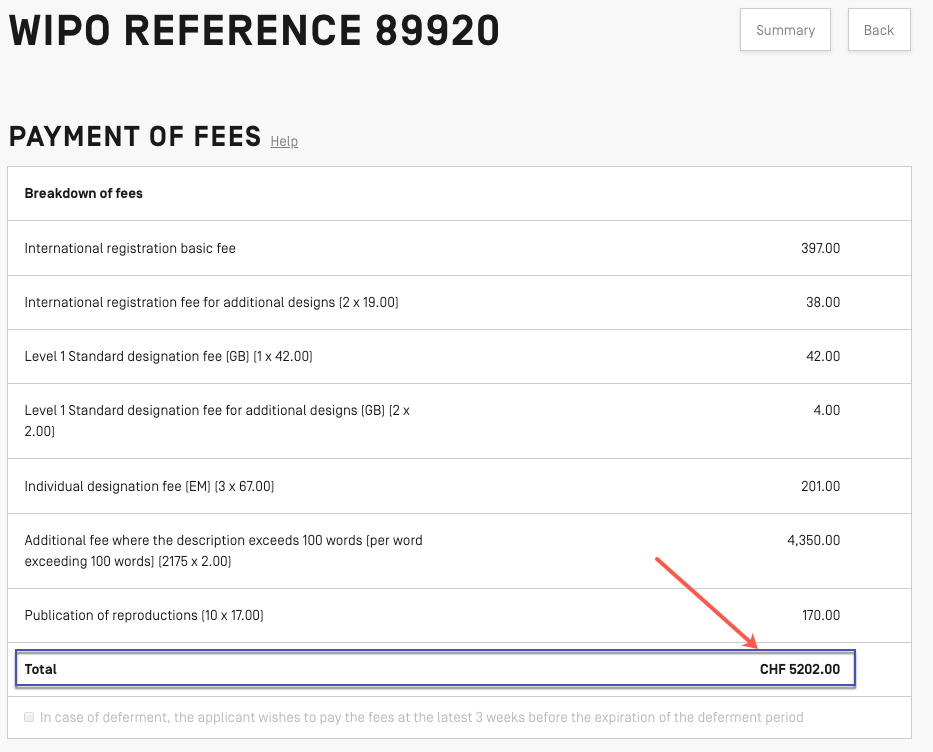
Once you click the “Payment/Validation” button, you will see a screen presenting the item-by-item costs as well as the total amount you have to pay at the time of filing. Confirm the total due, shown in the image below.
If you chose to defer the publication of your application, you may check this box, shown in the image below, to pay the fees at the latest three weeks before the expiration of the deferment period.
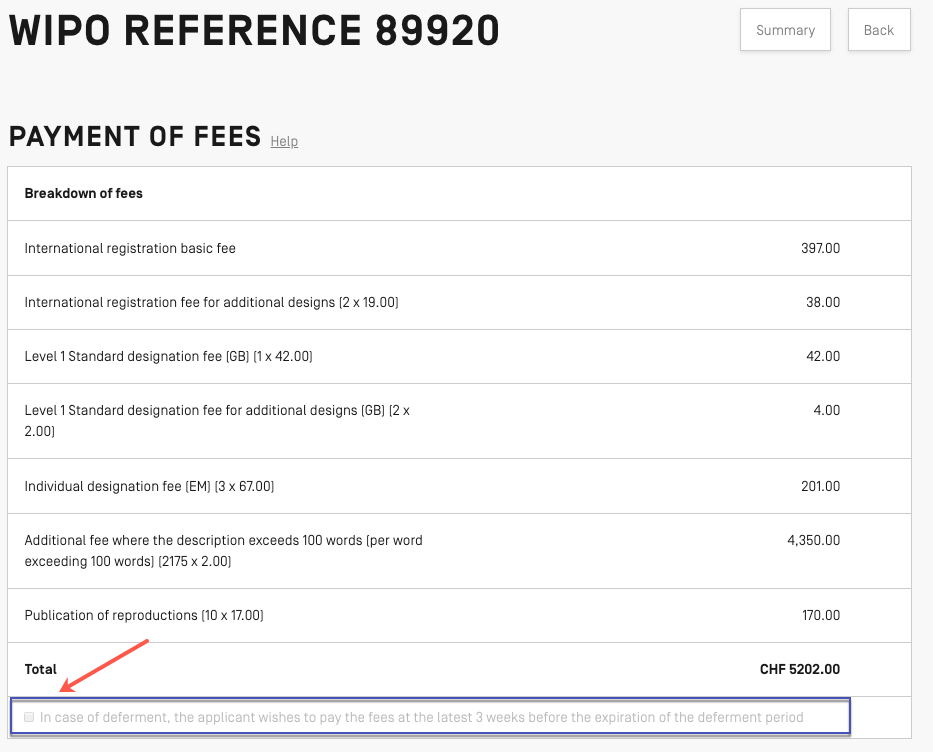
If you did not choose to defer publication, or if deferment is not possible for the designated Contracting Parties, the box will be greyed out and not selectable as shown in the image above.
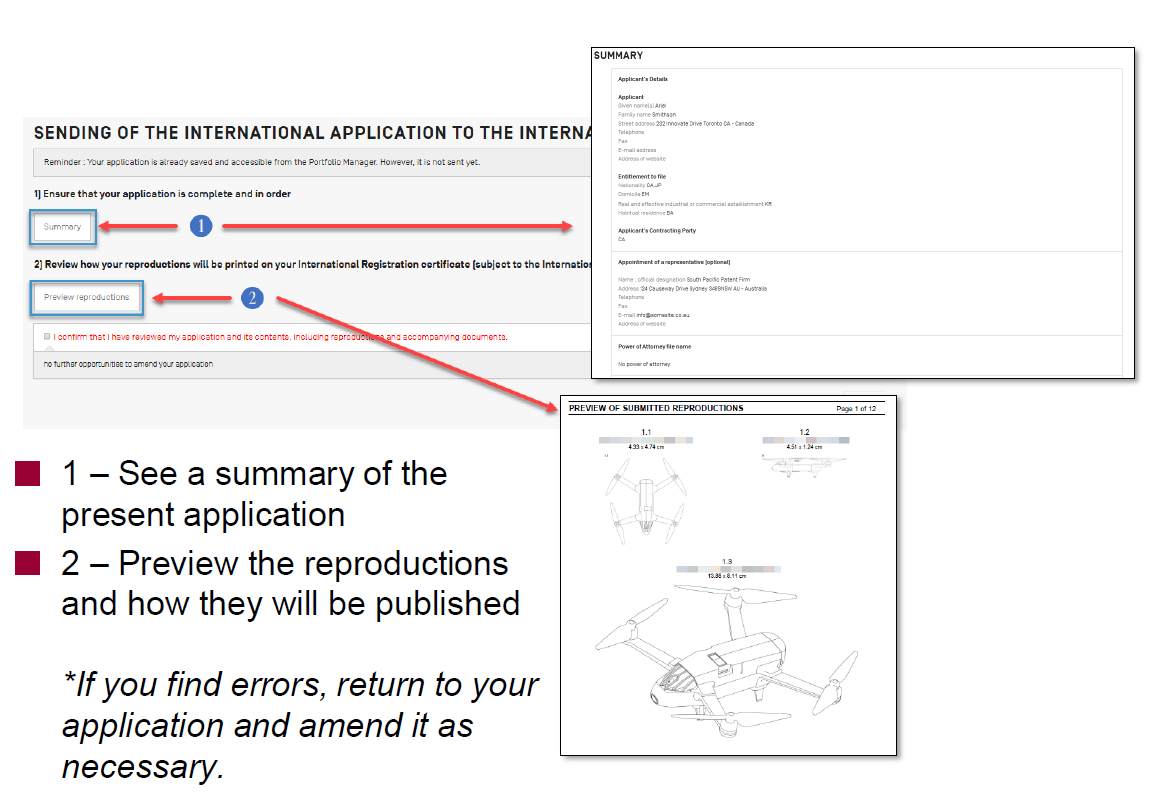
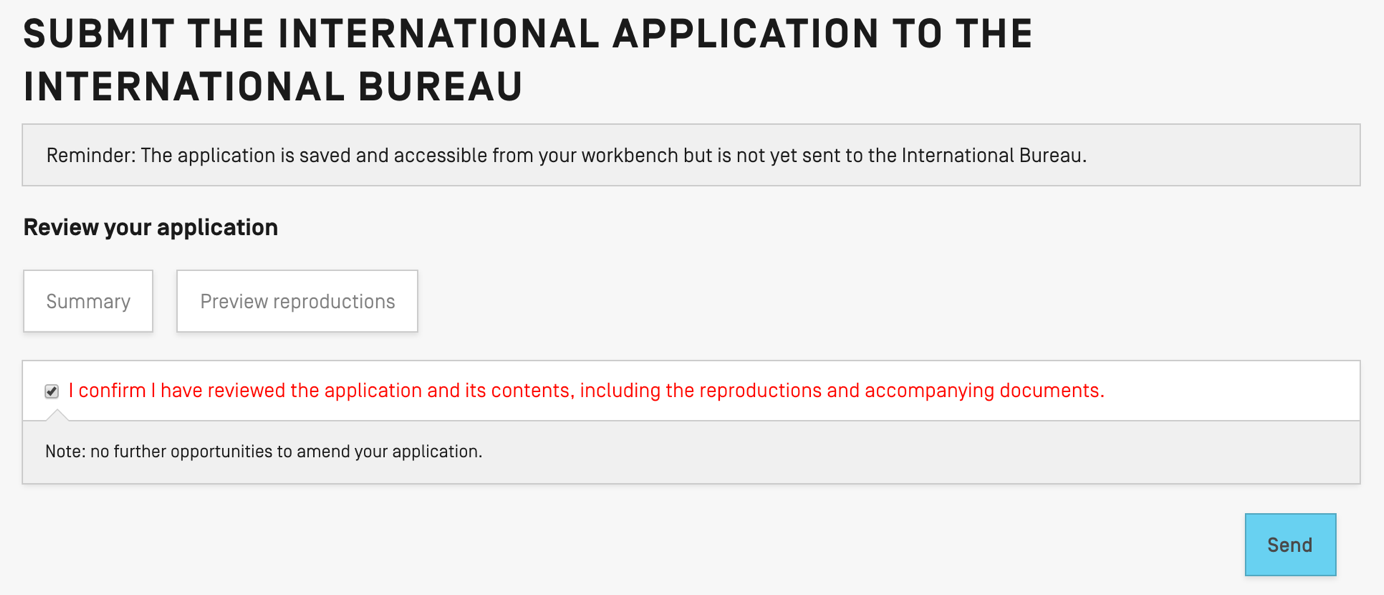
You will have a final opportunity to ensure that your application is in order by following two steps as shown in the screen below. For step one, click on the “Summary” button to view a complete summary of your application to confirm it is correct. For step two, you may preview your reproductions (in PDF) by clicking on the “Preview reproductions” button.
Once you have verified that your application is complete, tick the box next to the sentence in red letters that states, “I confirm that I have reviewed my application and its contents, including reproductions and accompanying documents.” Then click the “Send” button at the bottom right, as shown in the screen below.
After successfully submitting your application, a confirmation screen will appear, as shown below.

To proceed with payment immediately, click on the “Pay” button. If you would like to complete payment later, click on the “Workbench” button to return to your eHague Workbench from where you can download your Acknowledgement of Receipt.
How to pay
If you choose to pay for your application immediately upon submission, after clicking on the “Pay” button in the confirmation screen, a Payment Details screen will be displayed. This screen will vary depending on whether or not you have made payment previously with a WIPO Current Account, thus linking your WIPO (online) Account with your WIPO Current Account.
If you are making payment for the first time or have not previously made payment through your WIPO Current Account (thus linking your Current Account to your WIPO Account), you will see the screen as shown below. If your WIPO Account is linked to your WIPO Current Account, your payment will be automatically processed through your WIPO Current Account.

From this screen, you can return to your application, pay using your WIPO Current Account, or, if you do not have a WIPO Current Account, pay with a credit card, debit card, PayPal, or by bank transfer. Click on the “I do not have a Current Account at WIPO” button.
Enter your name and address as shown in the screen below.
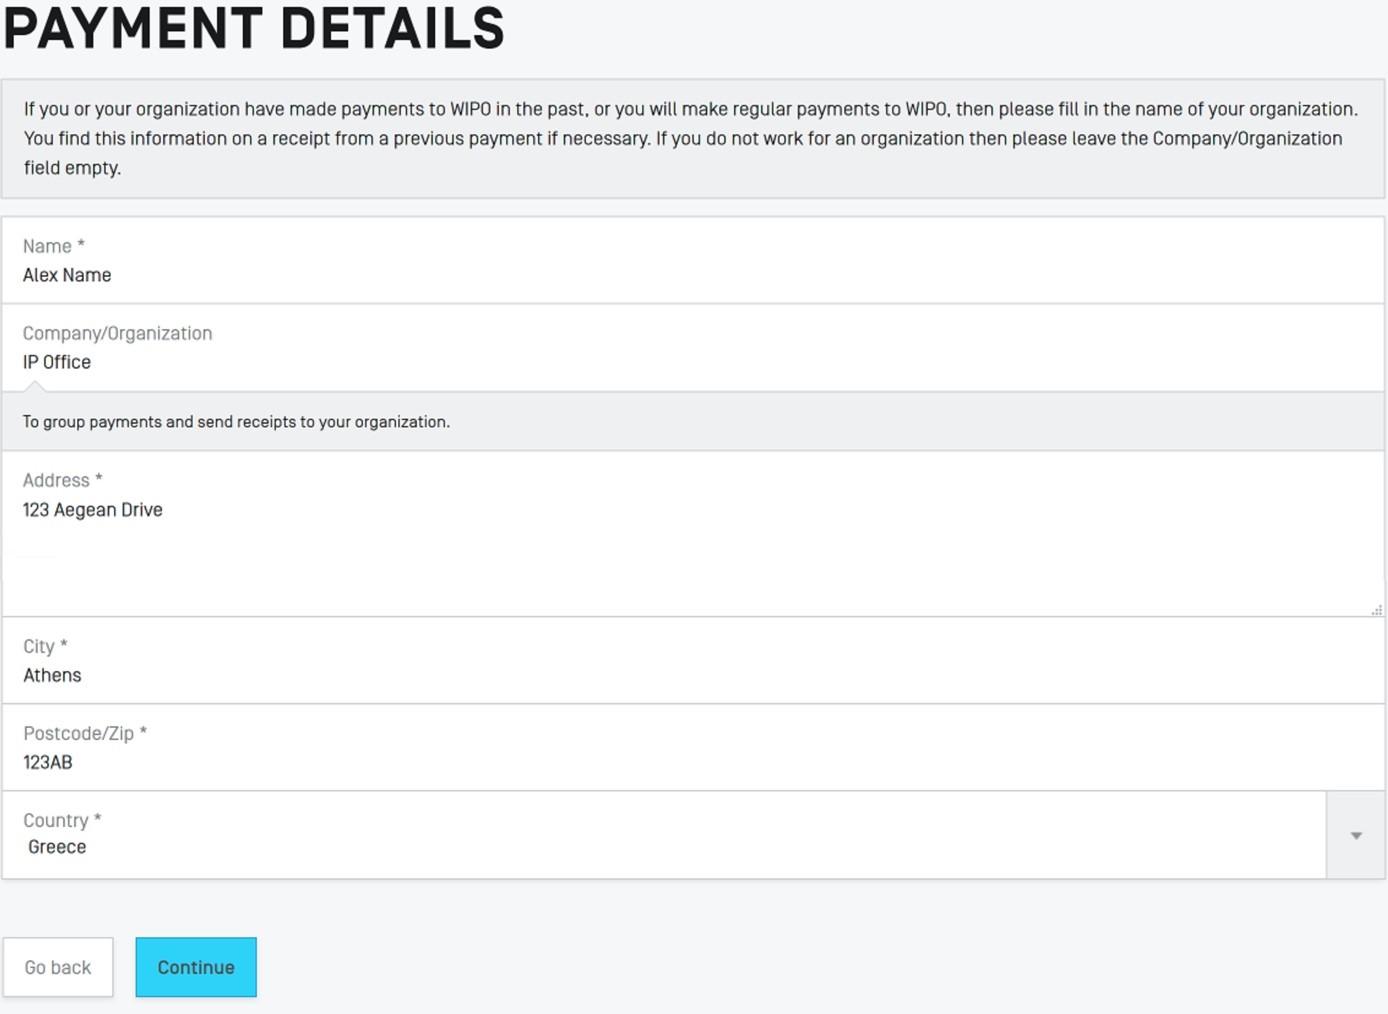
Clicking on the “Continue” button will take you to the following screen.
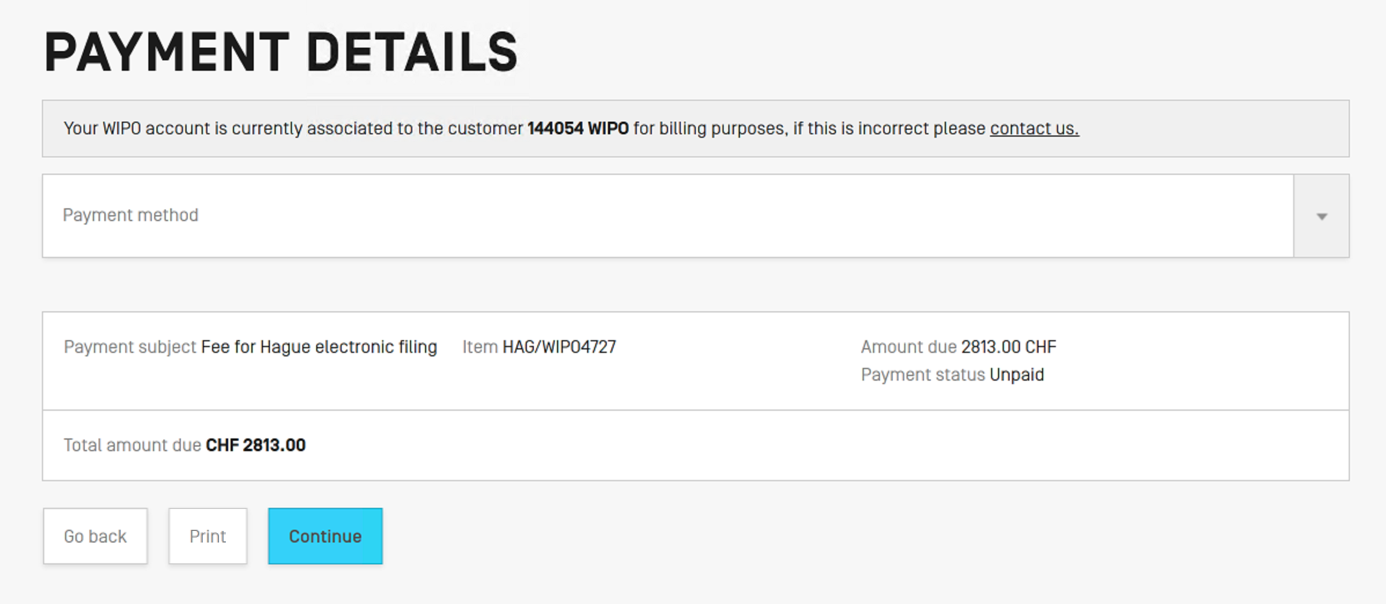
Choose your desired payment method from the dropdown field. Available options include bank transfer, credit card (choose this option when using a debit card), Current Account at WIPO, or PayPal. If you have not previously made a payment with a Current Account or have not linked your WIPO Account with your WIPO Current Account (which you can do by making payment with your WIPO Current Account), you cannot select the Current Account from the dropdown field on this screen.
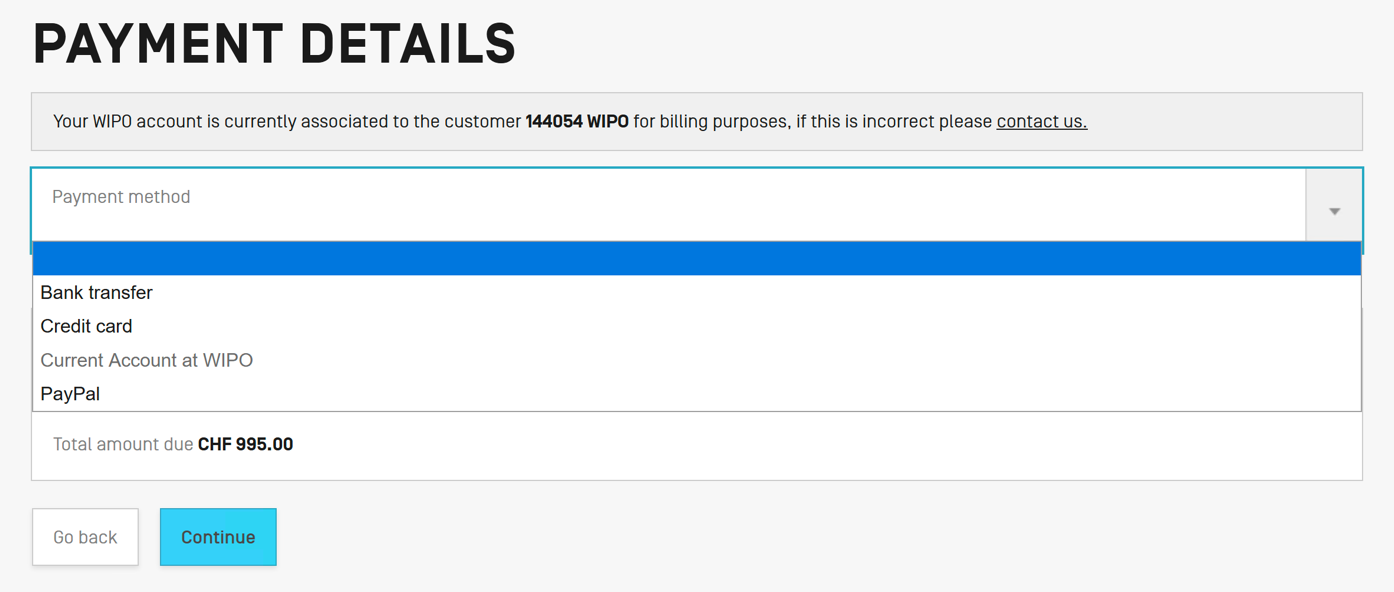
Payment by credit card
To pay by credit card, select the credit card option, verify the total amount and customer number are correct, and click the “Continue” button as shown in the screen below.
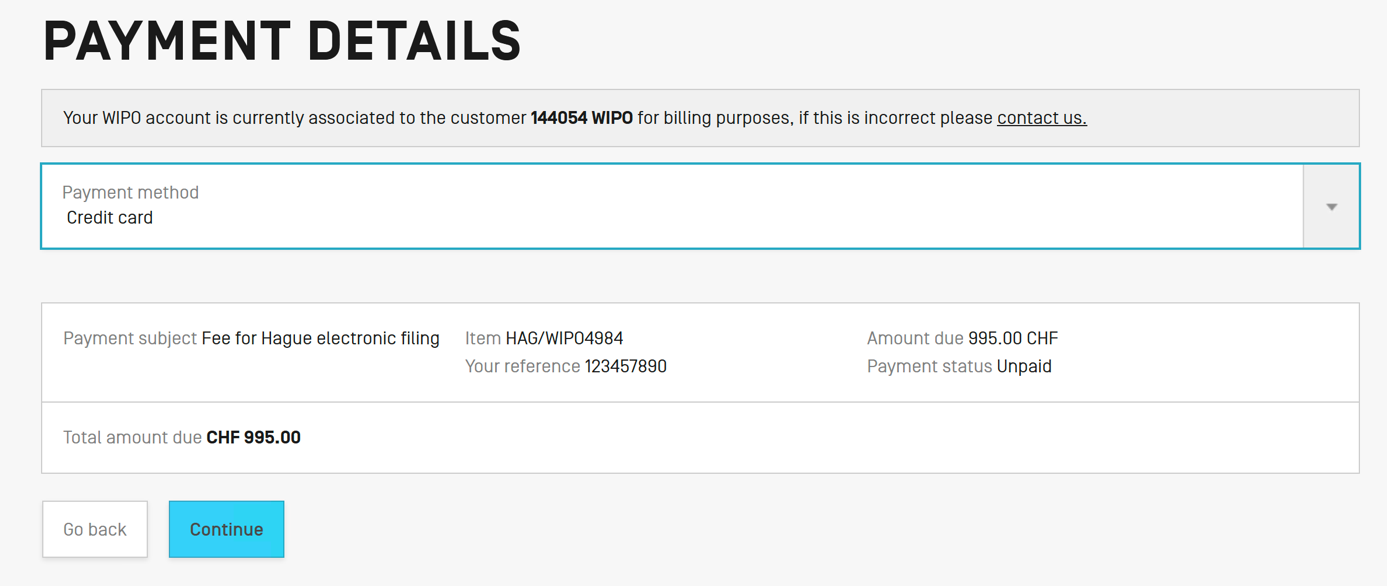
This will take you to WIPO’s secure credit card processing service. You will see the below screen to select your credit/debit card payment method.
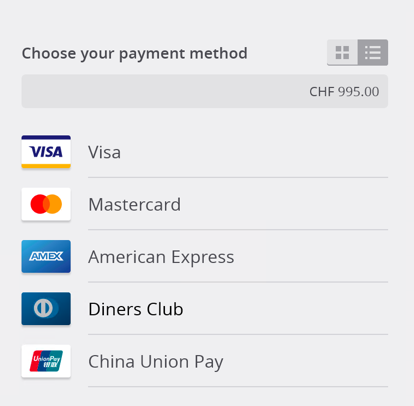
After selecting one of the above, enter your card details as shown in the example below.
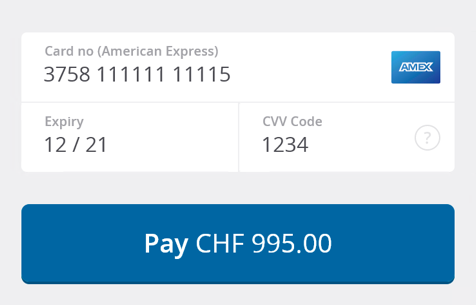
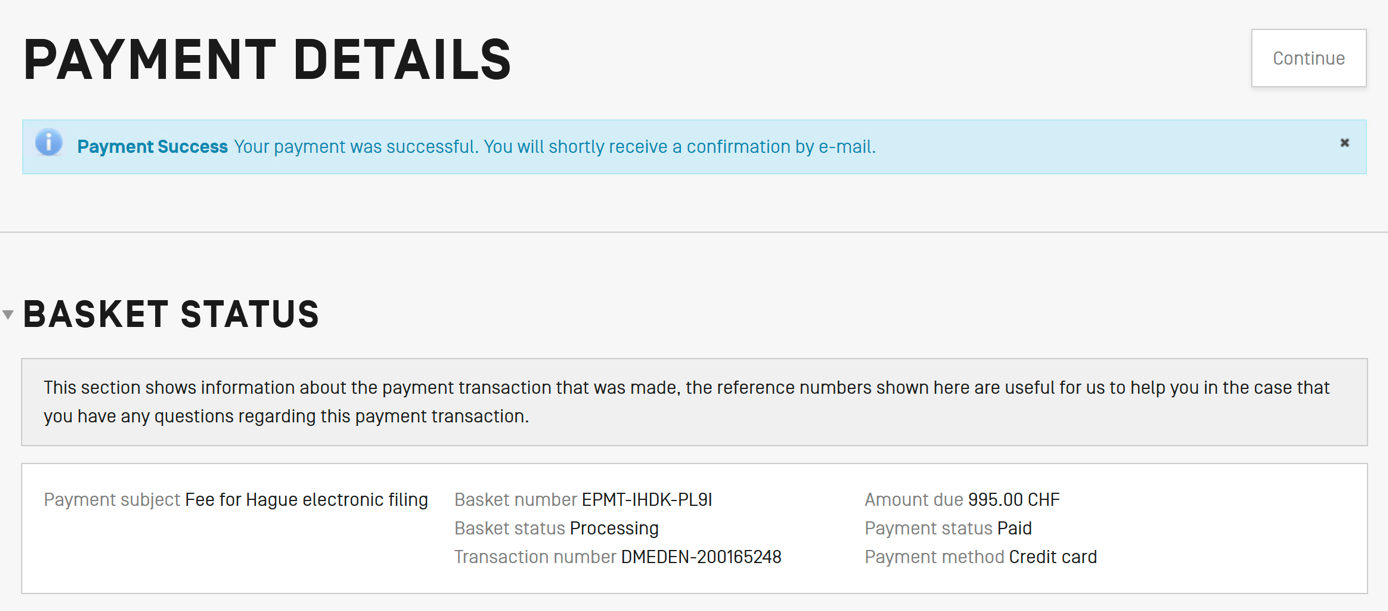
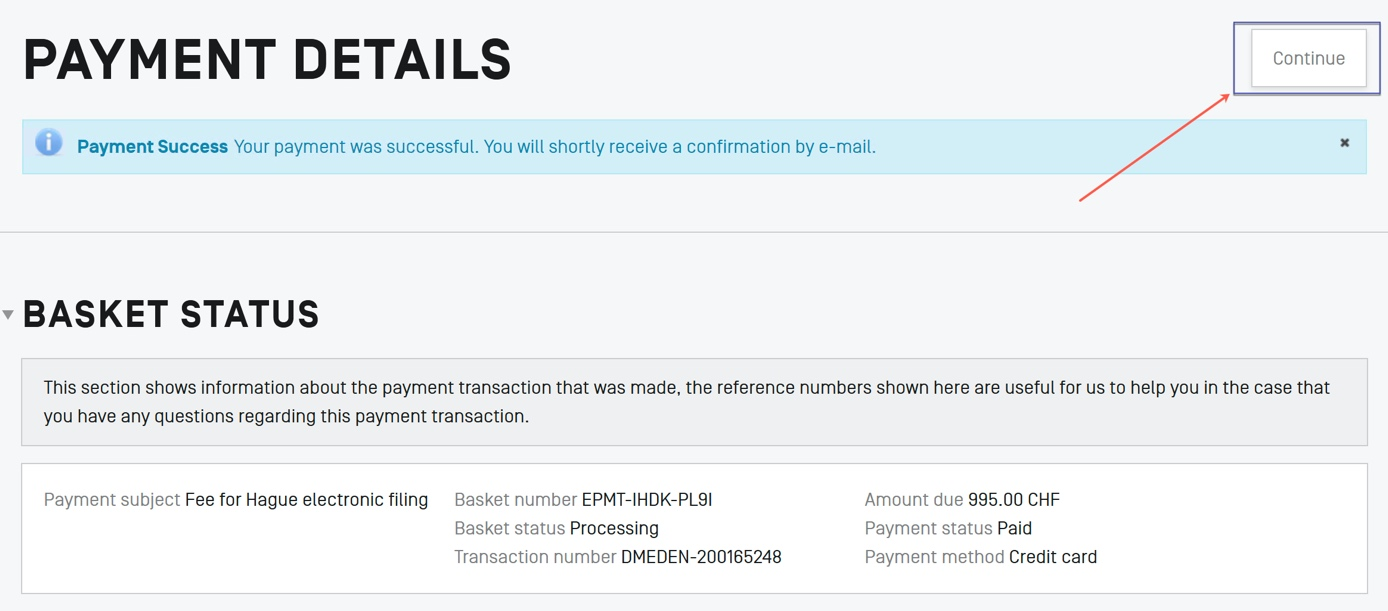
Click on the “Pay” button. When your payment is successfully processed, you will see the payment success message as shown below. The Basket Status section shows the information about the transaction that was made.
You will also receive an e-mail confirmation including all of this information. The e-mail will be from noreply@wipo.int and will appear as the below example.
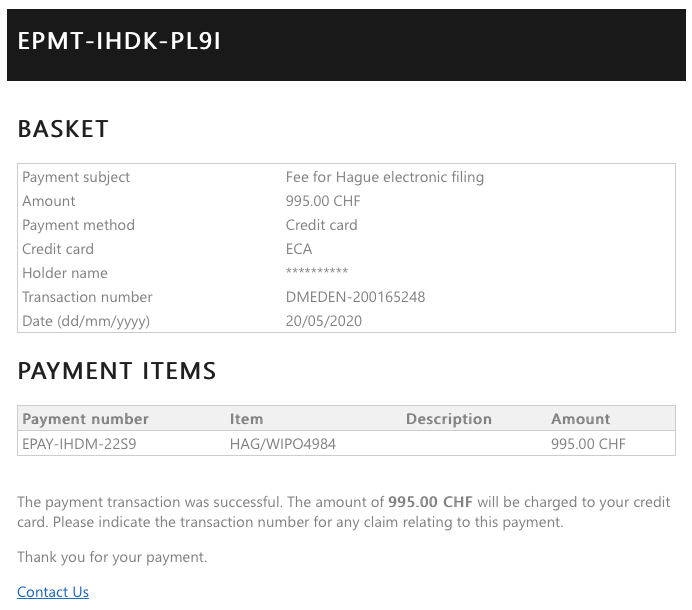
After successfully making payment, click on the “Continue” button (located to the far right of the Payment Details text and as outlined in the image below).
This will return you to your eHague Workbench where you can download the Acknowledgement of Receipt for the submitted application by clicking on the button outlined below.

Payment by WIPO current account
If you have a WIPO current account, it will automatically be selected on the Payment Details screen, as shown below.

Verify the total amount is correct and click on the “Continue” button. After payment has been processed, you will see details of your payment as shown in the screen below. If the payment status, shown in the far-right column, indicates “Received,” your payment was received successfully.

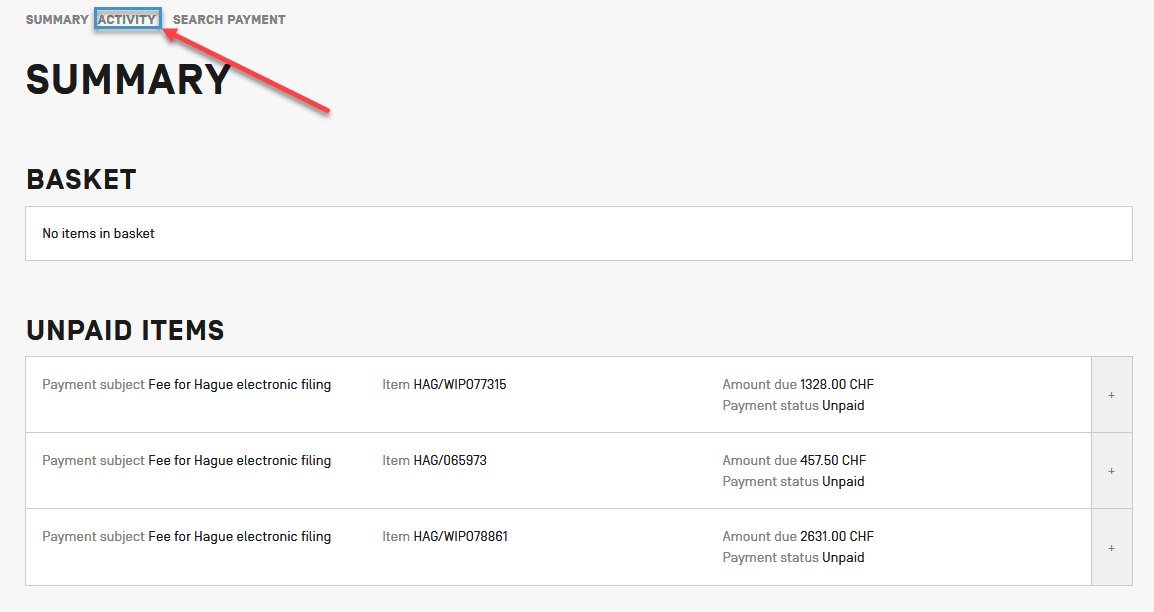
Logging in to WPO Pay will allow you to check the status of your payments made by Current Account (and also by other methods). After logging in, you will see a Summary page as shown in the image below. Click on the “Activity” link in the top left portion of the screen.
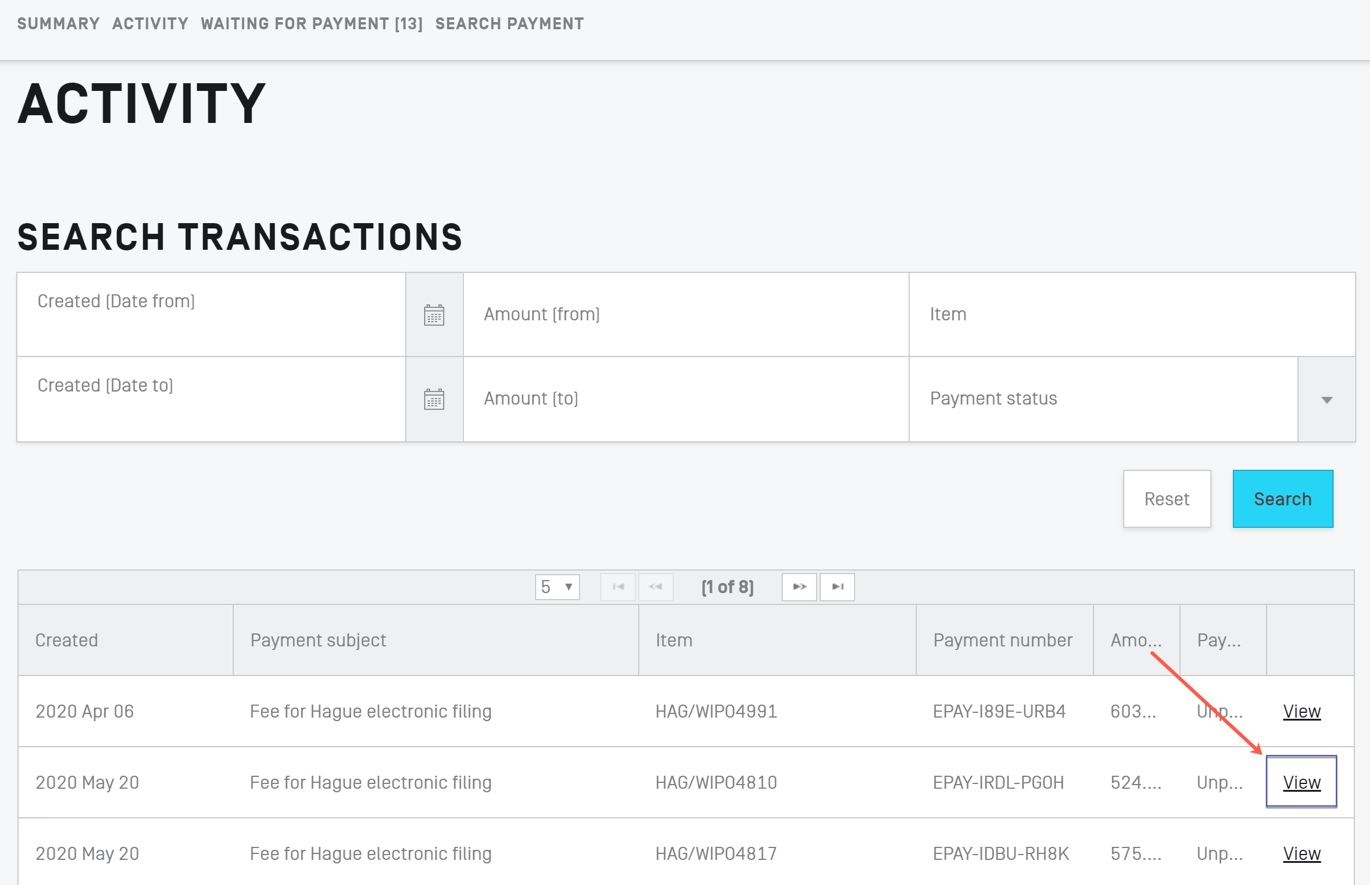
You will then see a screen listing all of your outstanding or received payments. To view details of a transaction, click on the “View” button in the far right of each row, as in the example below.
On the next screen, you will see all the details of your payment(s). The details shown differ depending on the status of the payment (paid/unpaid). In the example below, the details are shown for a completed payment.
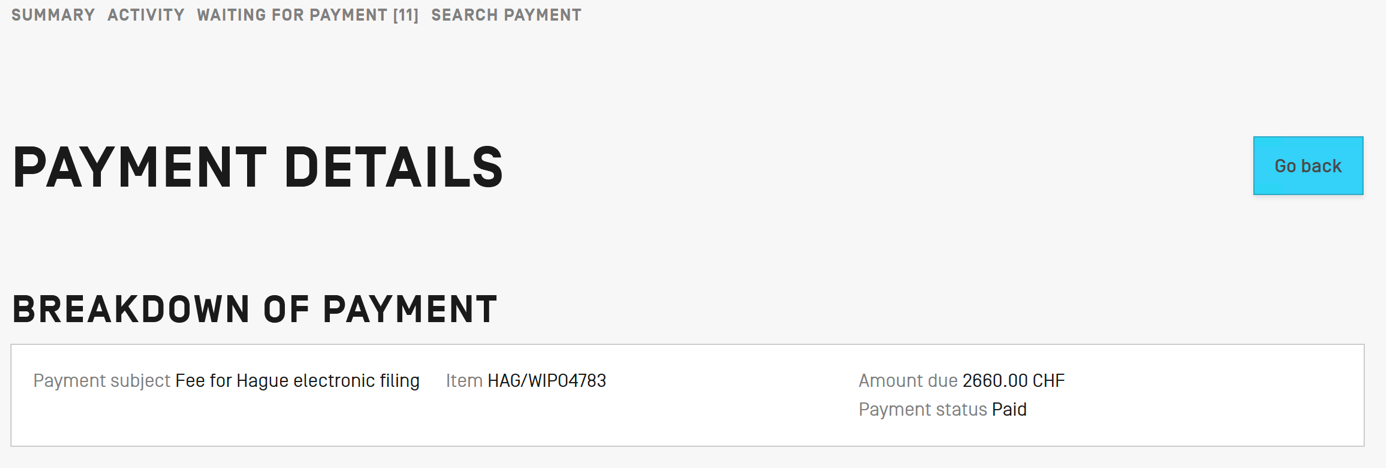
Clicking on the “Go Back” button at the top right will return you to the WIPO Pay summary page showing a list of your payment activities.
Once you return to your eHague Workbench, you will see all of your filed applications. After your payment has been processed, the acknowledgement of receipt for the application you filed will be available for download. From this screen, you may also view the acknowledgement of receipt for previously filed applications. To do so, click on the “Download Receipt” button of the row that corresponds to your desired application.

Payment by bank transfer
To pay by bank transfer, select the bank transfer option from the payment method drop down, verify that the total amount and customer are correct, and click the “Continue” button as shown in the screen below.
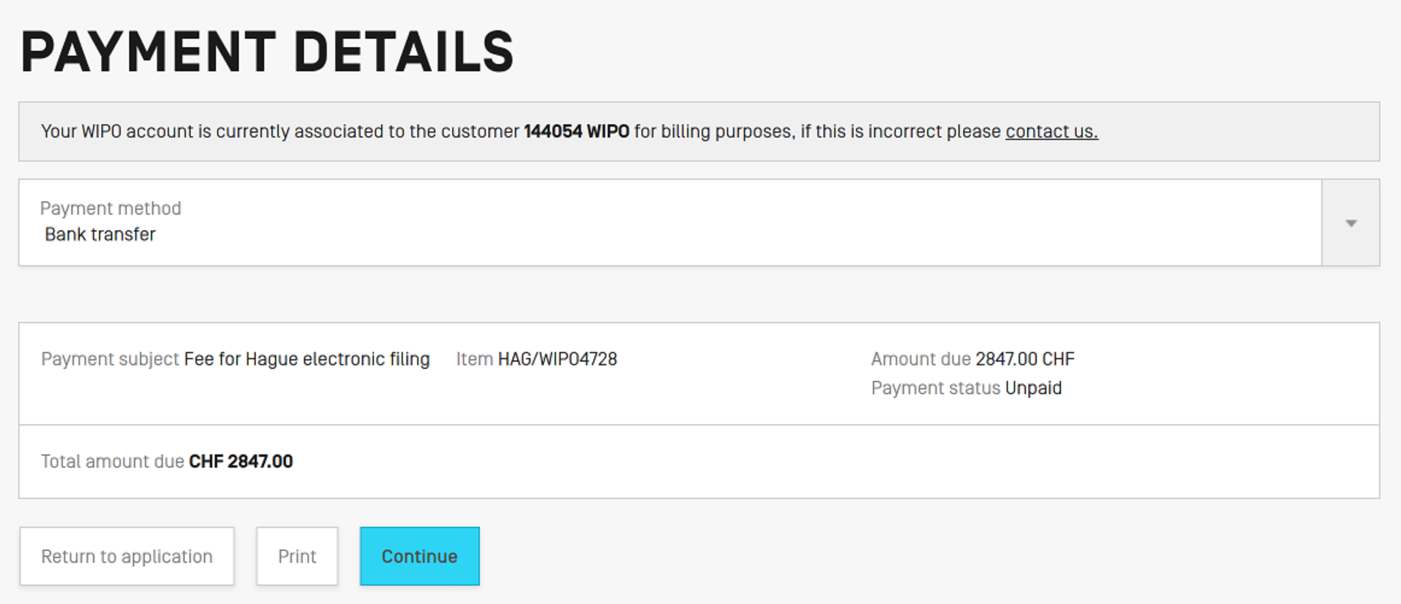
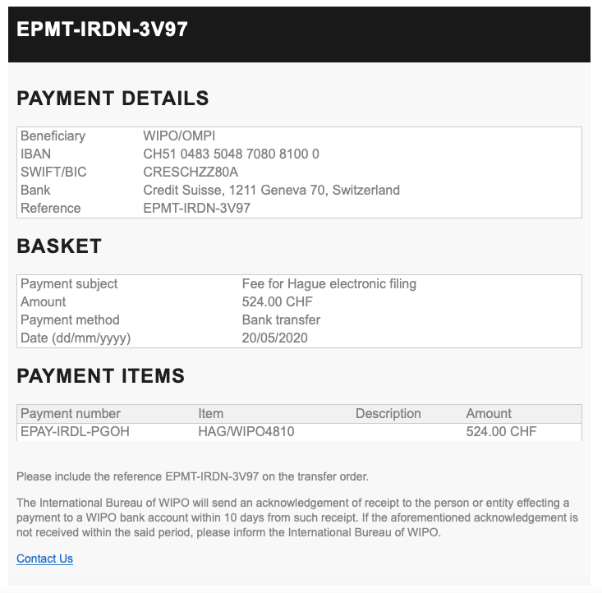
You will then be taken to your eHague Workbench from where you can download the Acknowledgement of Receipt. You will also receive a confirmation e-mail that contains the information needed to complete a bank transfer. The e-mail will be from noreply@wipo.int and will appear as the below example.
You can also access the payment details for a bank transfer through WIPO Pay. After logging in, you will see a summary as shown in the image below.
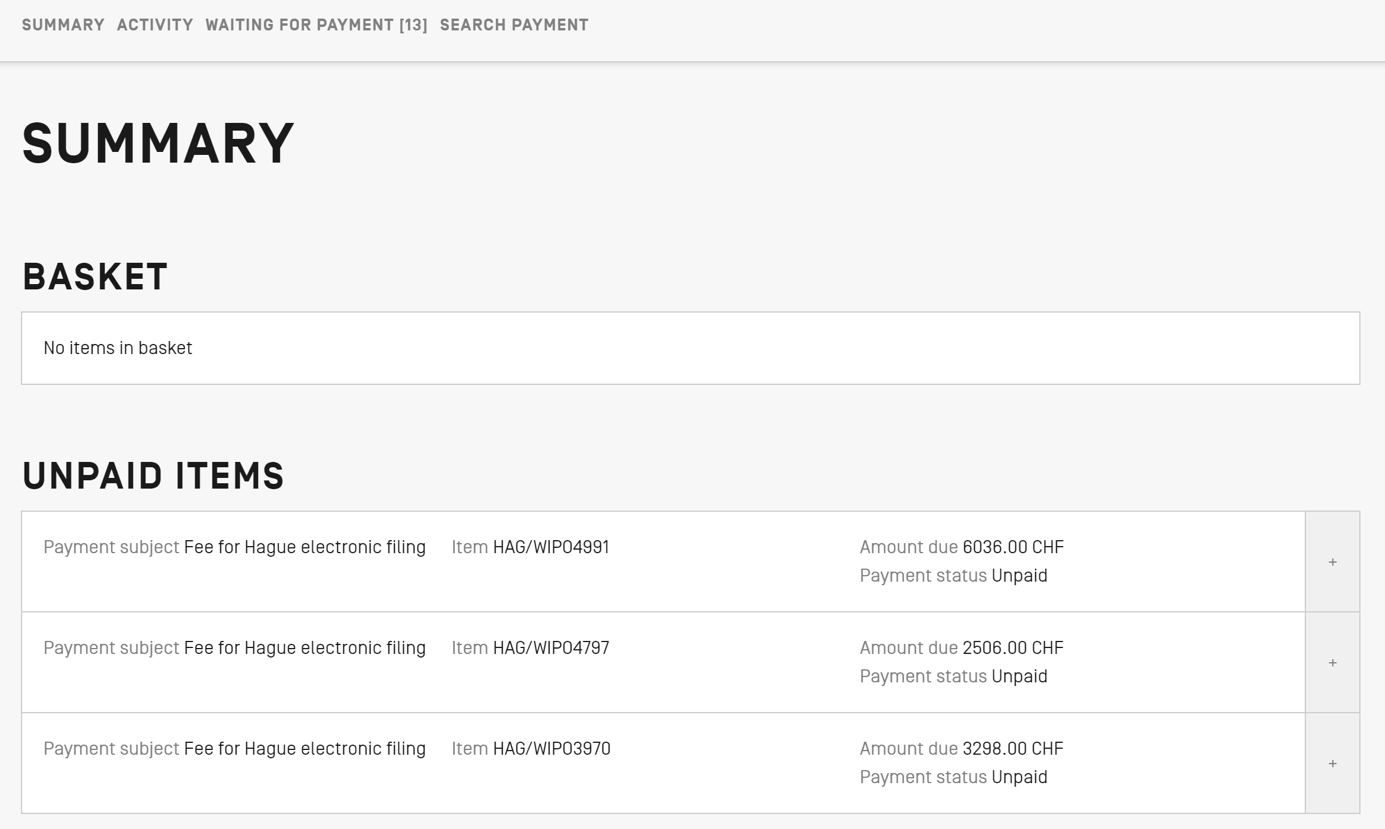
To find the payment information for a bank transfer, click on the “Waiting for Payment” link in the top navigation menu. You will then see a list of all your pending payments. Those that are pending due to a bank transfer will have a Payment Method of Bank transfer listed in the record. To view the payment information, click on the “View” button as shown below.

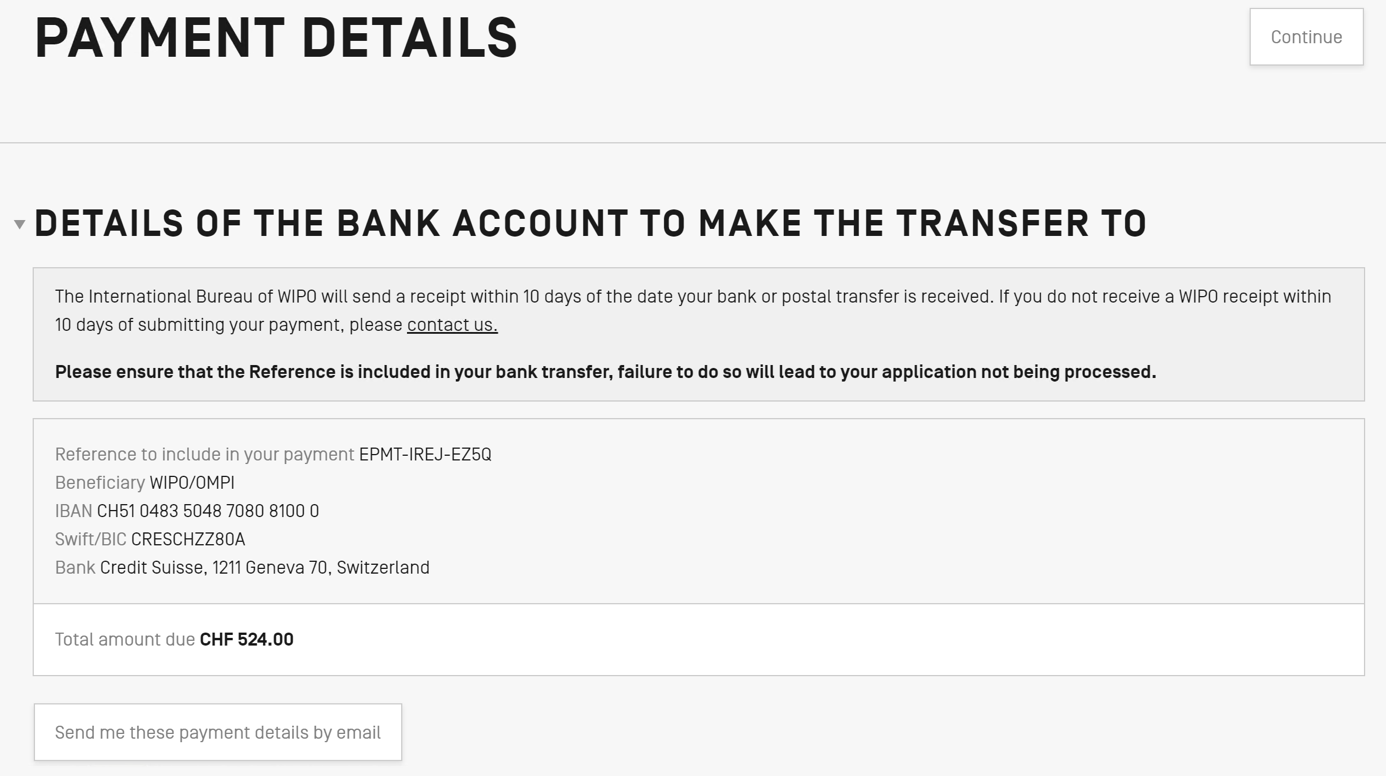
The following screen will then be displayed, showing you the details of the bank account to which to make the transfer. Click the “Send me these payment details by e-mail” to receive the details by e-mail. Clicking on the “Continue” button at the top right will return you to the Payments Summary screen.
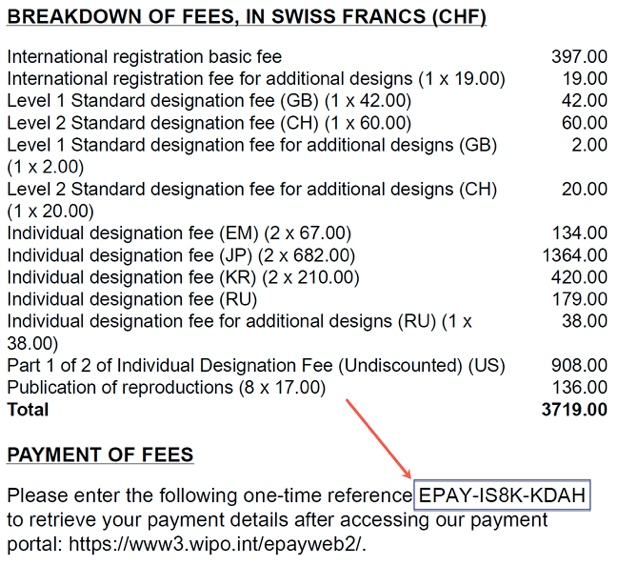
If you cannot find your desired payment from the Waiting for Payment screen, you may also search for the payment using your WIPO Pay reference number. This unique number is in the format of EPAY-XXXX-XXXX and is accessible from the confirmation e-mail you received (under the “Payment Items” section) or the Payment of Fees section in the Acknowledgement of Receipt that you can download from your eHague Workbench. An example of the number in the Acknowledgement of Receipt is shown below.
To search for this payment in WIPO Pay, click on the “Search Payment” menu item.

Then, enter the WIPO Pay reference number as shown in your Acknowledgement of Receipt or confirmation e-mail in the field shown below and click the “Search” button.

If the reference number is valid, the screen showing the details of the bank account to which the transfer of the relevant amount should be made will be displayed.
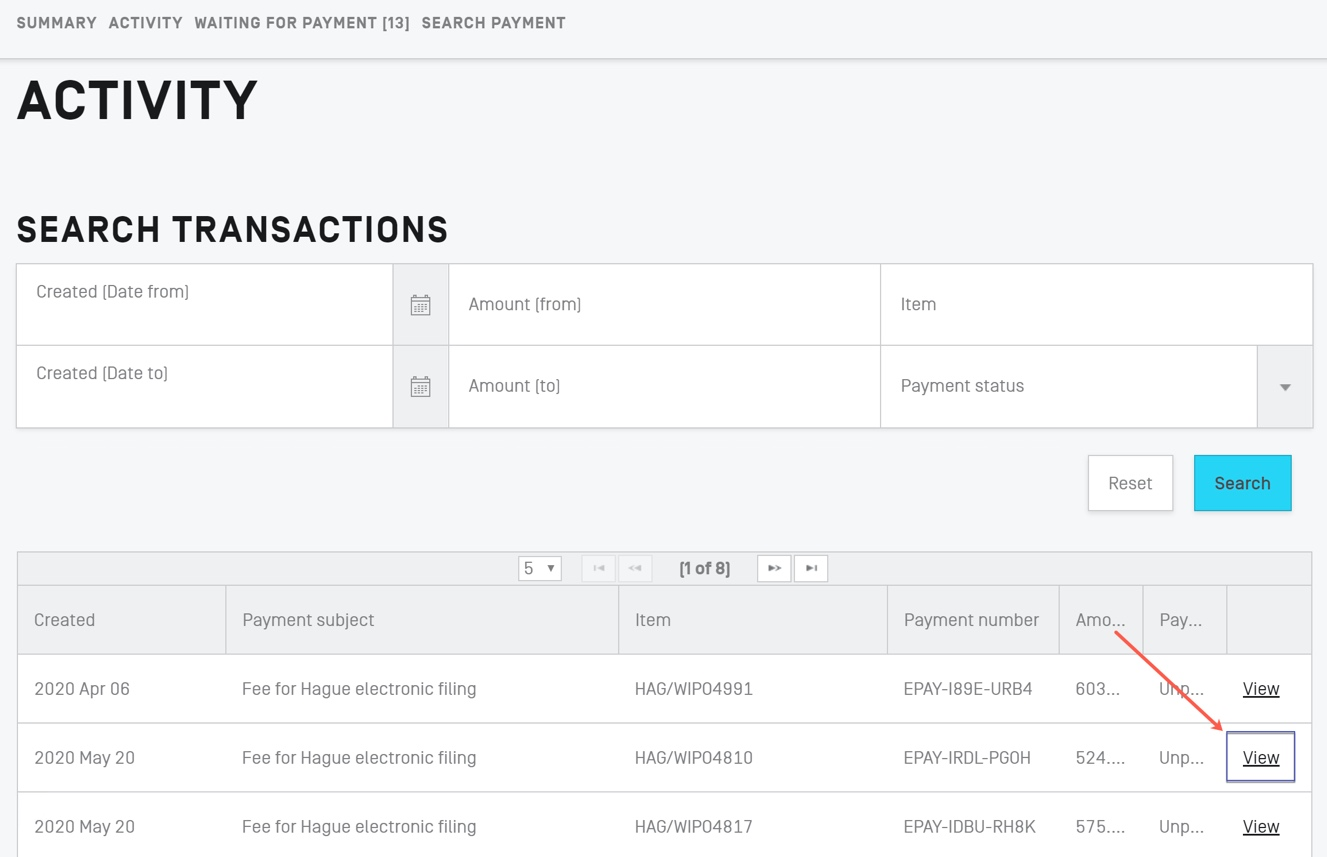
You can find the status of your payments by clicking on the “Activity” menu item. From your payment activity, you can search for transactions and, when you find the transaction that you would like to see, click on the “View” link as shown below to see further details.
Should you like to pay by another method and before you have made the bank transfer, scroll down and click on the section entitled “I Don’t Want to Pay by Bank Transfer but Want to Pay by Another Payment Method”.

Then, click on the “Pay another way” button.

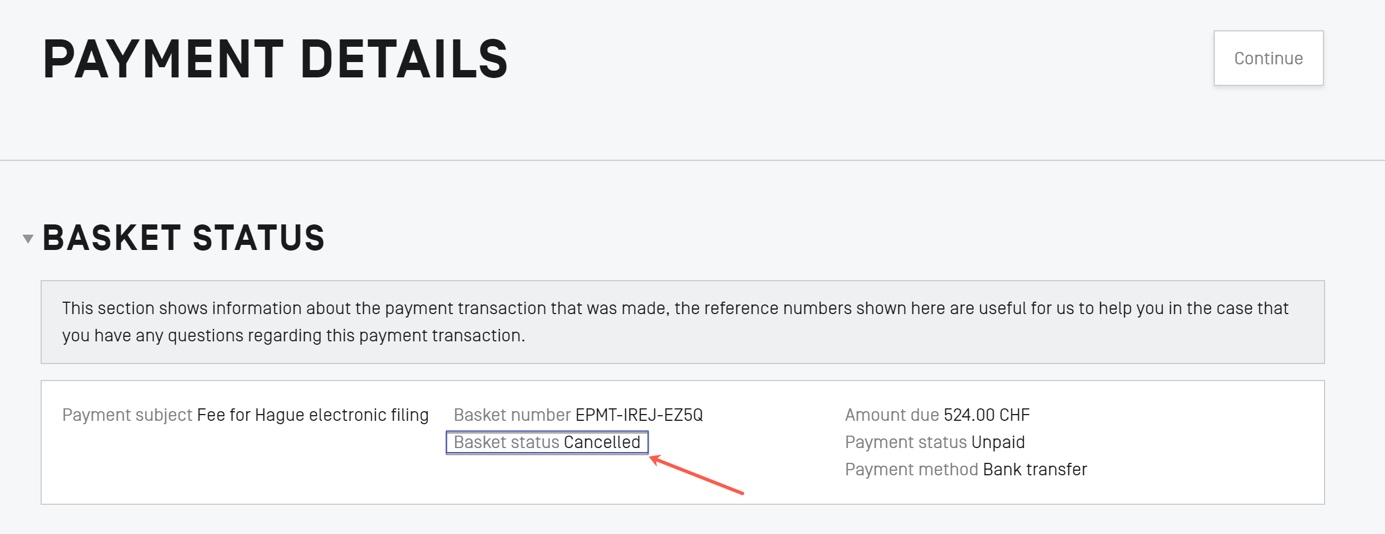
After doing so, you will be taken to the Payment Details page of the transaction, where you can see that the payment status has changed to canceled (outlined in the image below).
To continue with a different payment method, click the “Continue” button. This will return you to the Summary screen. The payment that was cancelled can then be found in the Unpaid Items list. To proceed with payment, click on the “+” of the row that contains the item you would like to pay.

Doing so will add the item to your Basket. If you have more unpaid items that you would like to pay for at the same time, click the “+” button for each item to add it to your Basket. When you are ready, click on the “Checkout” button to proceed with payment.

You will then see the Payment Details screen, where you can choose your desired payment method.
Payment by PayPal
To pay by PayPal, on the Payment Details screen select the PayPal option from the payment method drop down, verify that the total amount and customer information are correct, and click the “Continue” button.
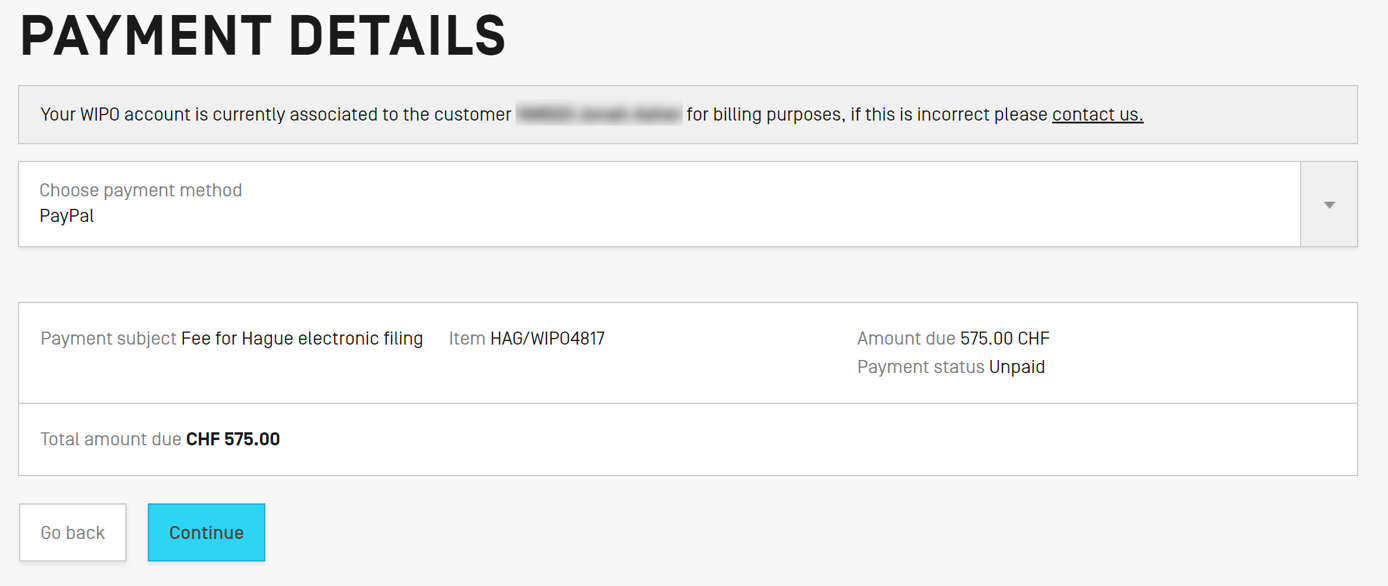
You will then be taken to the PayPal payment screen. Login with your PayPal credentials or enter your credit card information and create a new PayPal account to proceed with PayPal payment.
Once payment via PayPal has been successful, you will be returned to the eHague Workbench. To see the acknowledgement of receipt for the application you just filed, or for a previous application, click the “Download Receipt” button in the row containing the desired application.

Sections related to certain designation(s)
This part of the tutorial covers the sections of your application that are related to the designation of certain Contracting Parties. Depending on the Contracting Party(ies) which you designate, you may have to provide additional mandatory content, have the possibility of submitting additional optional content, or both.
Following a designation of the United States of America (US)
If you designate the United States of America, the "Creator" section will enable you to submit an oath or declaration of the creator. In addition, the “Claim (US)” option in the menu will become available and two additional options will become available in the “Optional Content” section: “Economic Status Indication” and “Eligibility for Protection”.
(1) Oath or Declaration of the Creator
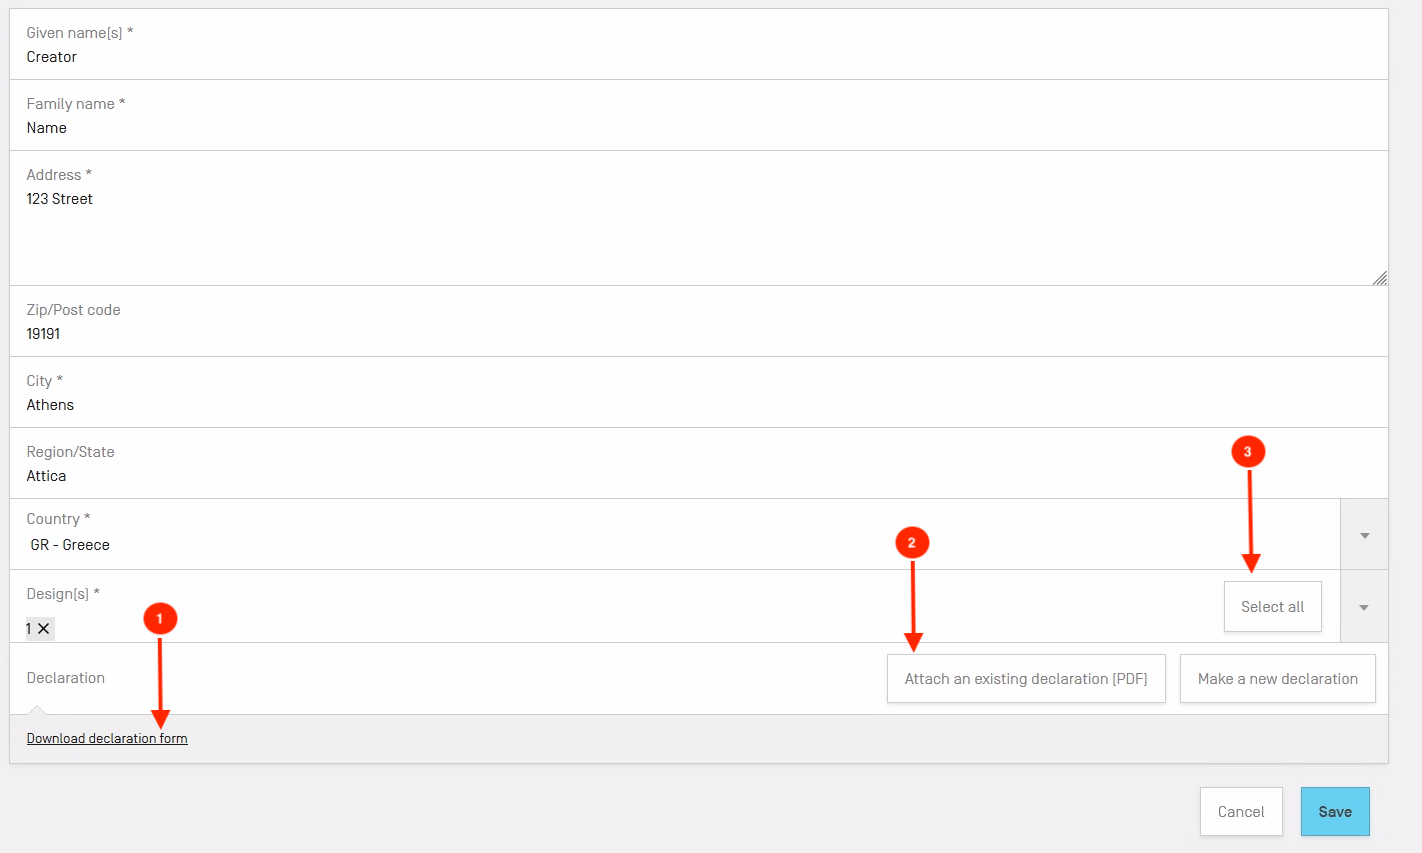
In the "Creator" section, for each creator identified, you will be prompted to submit an oath or declaration. To do so, you may (1) download a declaration form to attach; (2) attach a downloaded form or an existing declaration by clicking the “Attach an existing declaration (PDF)” button; or (3) make a new declaration by clicking the “Make a new declaration” button. These steps are shown in the image below. Please note that you must complete all the required fields for the “Make a new declaration” button to become accessible.
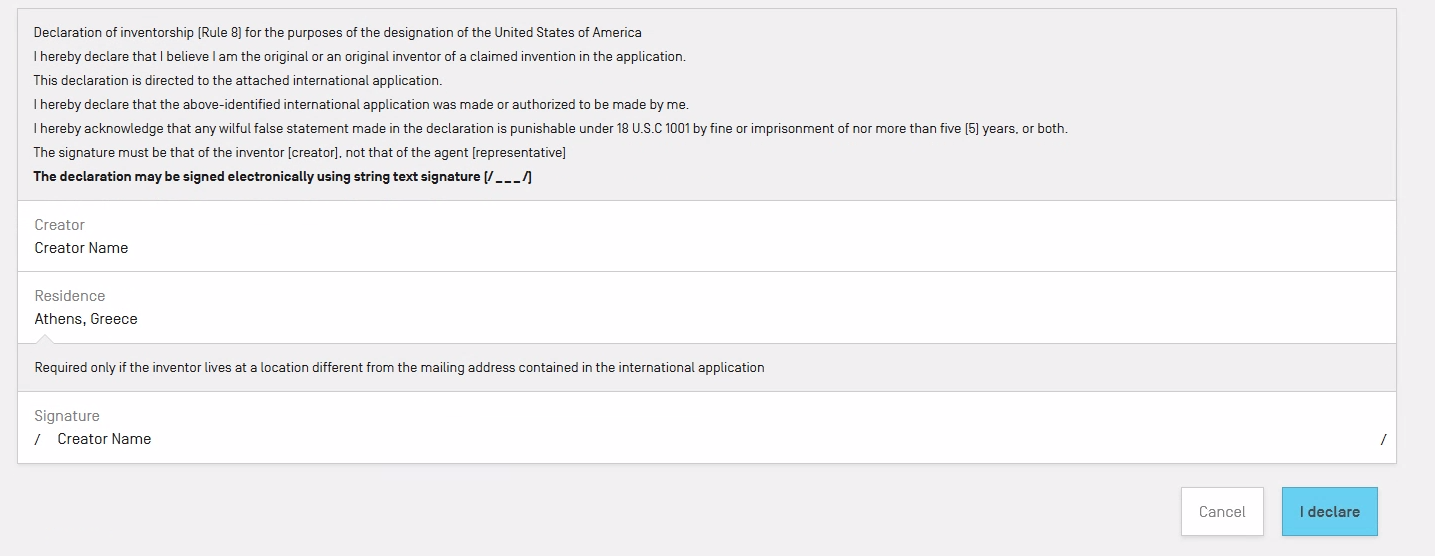
Once you click on the “Make a declaration” button, the declaration text will appear on the screen. The creator must type in their signature between the two slashes and click the “I declare” button in the bottom right.
Tip: The slashes for the signature are automatically entered and you do not need to enter either slash in your signature.
When you have finished entering a creator and the associated declaration, click on the “I declare” button. Once you click this button, the creator’s Declaration of Inventorship will be added to the information about the specific creator. Click the “Save” button to save all of the entered creator information.
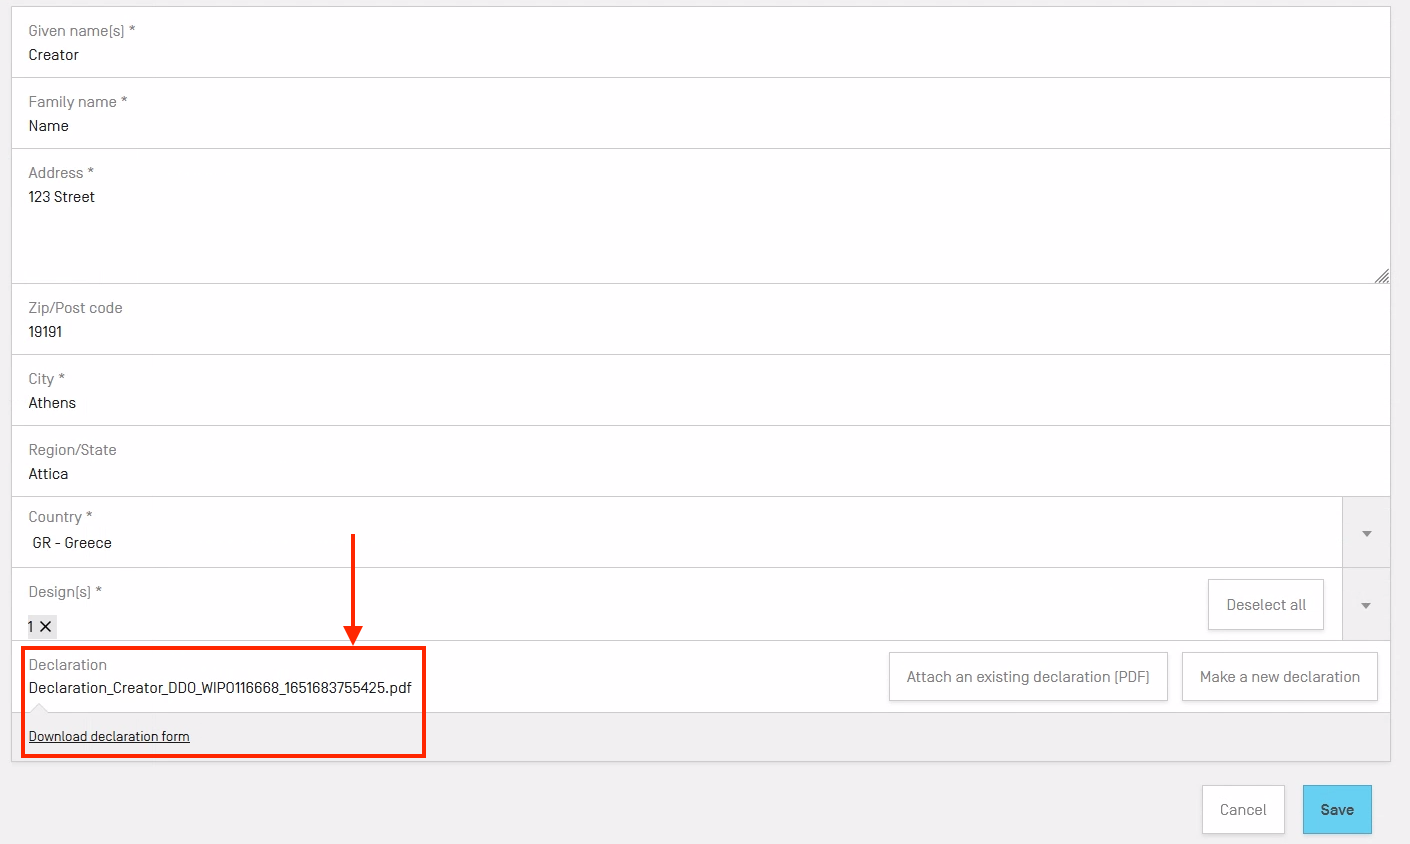
To view the recorded declaration, hover your mouse over the desired row and click on the “Preview” button. This will allow you to download a PDF of the declaration. Click on the trash icon to delete the creator and associated declaration from your application.
(2) Claim
This section will allow you to submit a claim. To do so, first click on the “Add” button in the Claim section.

Indicate an article in the blank space provided and click on the blue “Save” button.

(3) Eligibility for Protection
In the “Other Content (If Applicable)” section, an Eligibility for Protection option will be available should your application designate the US. This allows you to submit an Information disclosure statement. To do so, click on the "Add document (PDF)" button and choose your file.

You may repeat this action if you have multiple documents to upload.

To view the uploaded file(s), hover your mouse over the desired row/file and click on the “View” button. This will allow you to download a PDF of the file you uploaded. Click on the trash icon to delete the creator and associated declaration from your application.

Please note that when you upload submit one or more documents in this section, the file names will automatically be renamed.
(4) Economic Status Indication
This section allows you to indicate an economic status in order to benefit from a reduction of the United States of America individual designation fee. To indicate an economic status, click on the edit button (the pencil icon) as shown below.

Then, choose the applicable economic status among those listed below.

To find out if you meet the requirements for either small or micro entity status, click on the “Determination of entitlement to small entity status” or “Determination of entitlement to micro entity status” links as shown below.

If you choose a micro-entity status, you will be prompted to attach the certification in PDF format. In this case, links are also provided in the micro entity radio box description to the appropriate forms on the USPTO website. Click on the “Upload Micro Entity certificate” to attach it to your application.

After you have uploaded a Micro Entity certificate, it will be renamed by the system as shown in the image below. You may upload more than one certificate. To view the uploaded certificate, hover your mouse over the desired row and click the “View” button, as highlighted in the image below.
Following a designation of China (CN), Japan (JP), or the Republic of Korea (KR)
If you designate China, Japan, or the Republic of Korea, the “Main or Principal Design” option will be available in the navigation menu as well as a “Declaration Concerning Exception to Lack of Novelty” in the “Other Content (If Applicable)” section.
(1) Main or principal design
This section will allow you to specify a main or principal design for China and principal and related designs for Japan and the Republic of Korea. To do so for each Contracting Party, first click on the “Add” button as shown in the image below.

Then, select the Contracting Party concerned (CN, JP, or KR).

If you select CN, the only other option available will be to indicate the principal design. The remaining fields will not be shown because the system will automatically include the correct information.

After selecting the main or principal design for CN, click on the Save button. The saved data will appear in a table as shown below. Note that no data will be shown for the "Reference of Main or Principal Design" since the "Reference Type of Main or Principal Design" is the present international application.
To specify a related design for Japan or the Republic of Korea, click on the Add button to display the data fields. Enter the required information and click on the Save button. In the case of Japan and the Republic of Korea, one of the available options for the “Reference Type of Main or Principal design” is “The present international application” as shown below.

If you choose this option, the system will automatically save the correct data (the WIPO reference number of the present application) and the “Reference of Main of Principal design” field will not be shown. An example of this is below.

After entering all the remaining required information, click on the Save button. The table will be populated with the data you entered for all Contracting Parties concerned. You may add multiple related designs. Note that for Japan and the Republic of Korea, no data will be shown for the "Reference of Main or Principal Design" if the "Reference Type of Main or Principal Design" is the present international application.
To delete any record, simply hover your mouse over the desired row and click on the trash icon.

(2) Declaration concerning exception to lack of novelty
In the “Other Content (If Applicable)” section, you will be able to complete a “Declaration concerning exception to lack of novelty.” First, click on the “Add” button as shown in the screen below.

In the next screen (as shown below), select the Contracting Party concerned from the drop-down menu and then the design(s) to which your declaration will apply.

After you click the Save button, a new button will appear for you to add supporting documents. Only one document can be uploaded, and it will be applicable to all Contracting Parties (CN, JP, or KR) for which a declaration is made.
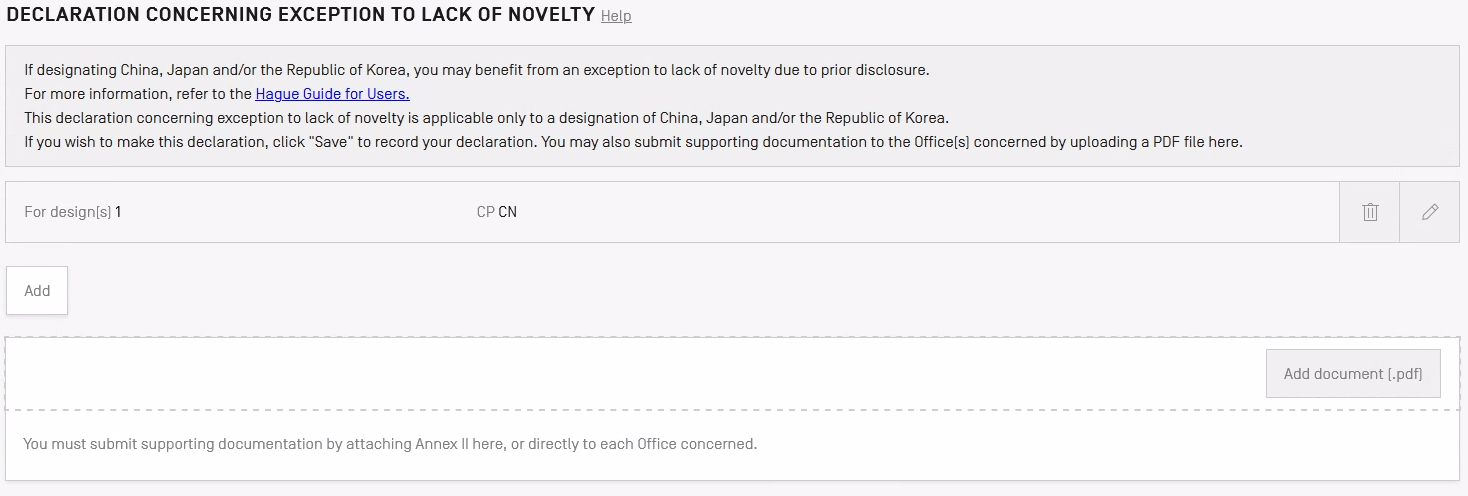
Saving multiple declarations will display a table as shown below.

For Japan, the applicant must send the original documents directly to the Japan Patent Office within 30 days of the publication of the international registration in the International Designs Bulletin.
(3) Priority document
If you designate China, Japan, or the Republic of Korea in your application you may also upload priority documents (PDF) in the Priority section (Important information about the submission of priority document). The International Bureau will forward the submitted documents to the respective Contracting Parties. To add a priority document, first click the Add button as shown below to add a priority claim.

Then, upload the documents by clicking the Upload PDF button as shown below.

One priority document can be uploaded for each priority claim. After a priority document has been uploaded, you can view it by clicking on the PDF link as shown below.

If your application does not designate China, Japan, or the Republic of Korea, the Upload PDF button will not be available in the Priority section as shown below.

Following a designation of Israel (IL)
(1) Economic status indication
This section allows you to indicate an economic status in order to benefit from a reduction of the individual designation fee for Israel. To indicate an economic status, click on the edit button (the pencil icon) as shown below.

Then, choose the applicable economic status among those listed below. Note that if priority is claimed, the undiscounted individual designation fee applies.
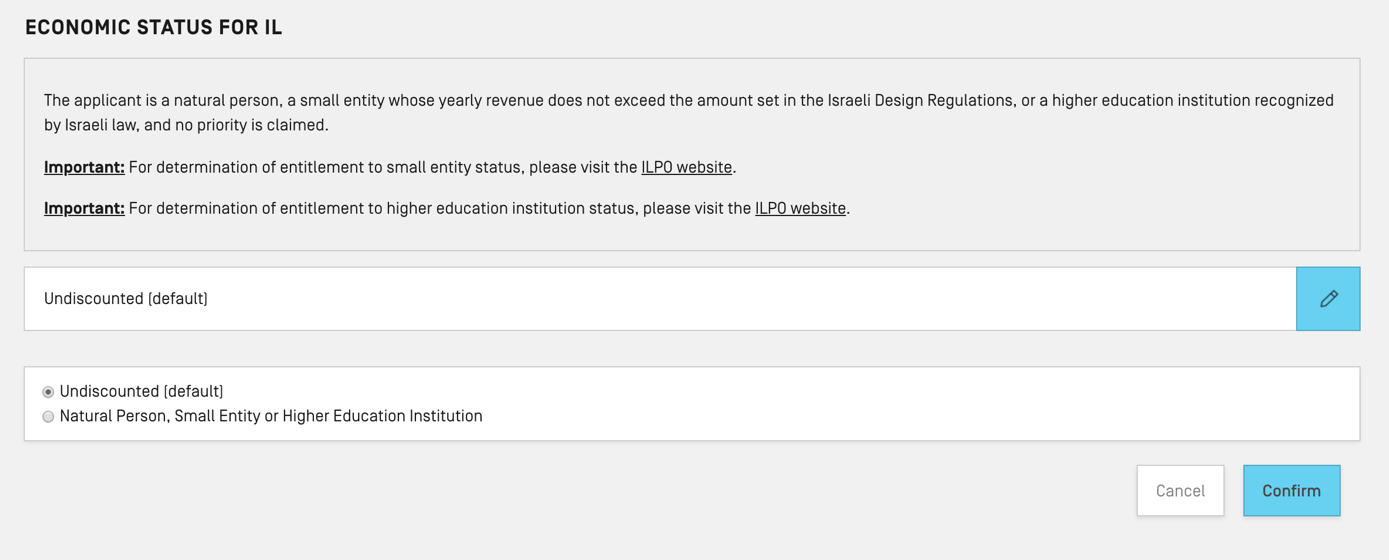
To find out if you meet the requirements for entitlement to small entity or higher education institution status, please follow the links as shown below.

After selecting the economic status, click the “Confirm” button. Your economic status for Israel is now recorded.

Following a designation of Viet Nam (VN)
(1) Claim
When designating Viet Nam, a default claim will be saved in the Claim section as shown below. The claim for Viet Nam is not editable.

Following a designation of Mexico (MX)
(1) Economic status indication
This section allows you to indicate an economic status in order to benefit from a reduction of the individual designation fee for Israel. To indicate an economic status, click on the edit button (the pencil icon) as shown below.

Then, choose the applicable economic status among those listed below.
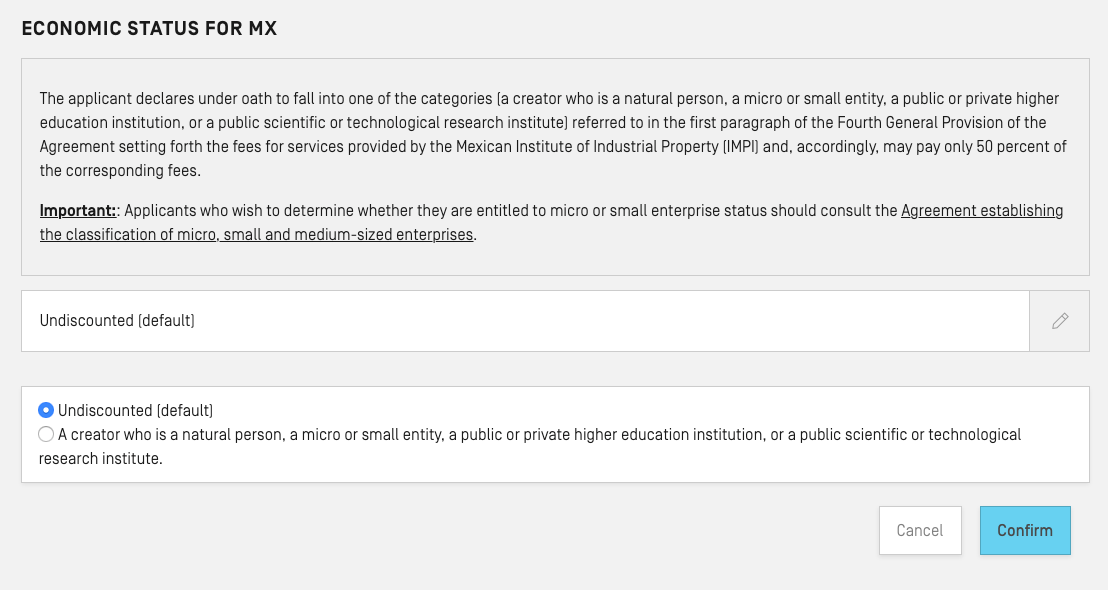
To find out if you meet the requirements for entitlement to small entity or higher education institution status, please follow the links as shown below.

After selecting the economic status, click the “Confirm” button. Your economic status for Mexico is now recorded.

Sections applicable to many designations
(1) Description
If you designate a Contracting Party that requires you to provide a description of the characteristic features of your design, the "Description" item in the navigation menu will turn red and there will be a red warning displayed when you open the “Description” section. This will also be the case for Contracting Parties for which WIPO recommends that you submit a description.
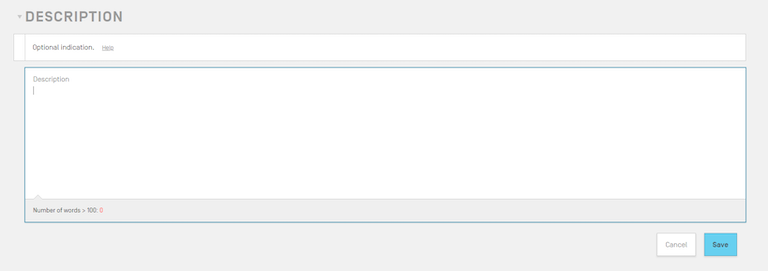
Once in the description section, fill in the box with your description and click the "Save" button when you are satisfied.
The counter at the bottom of the section will tell you by how many words you have exceeded the limit of 100 (above which an extra fee applies).

(2) Creator
If you designate a Contracting Party that requires the creator to be identified, or a statement related to the creator to be submitted, the creator item in the navigation will be displayed in yellow and there will be a yellow warning within the section (as shown below).

To add a creator, click the “Add” button, fill in the creator’s name and address, and indicate which design they created.
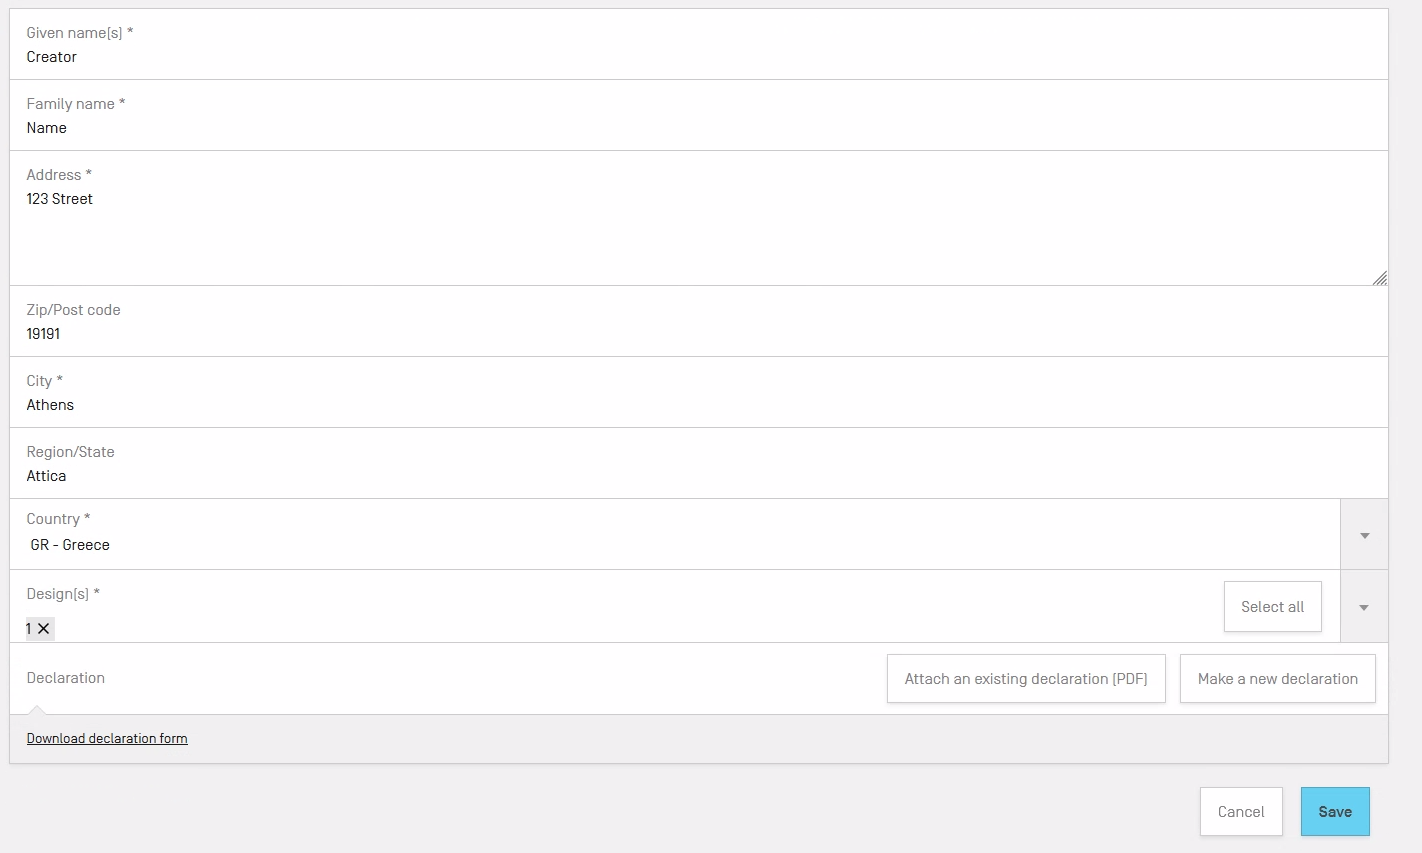
As is the case for applicants, each saved creator is displayed in a row with basic details of the creator shown initially. If you would like to see more details for a creator, click on the triangle at the far left of the row. Hover over a row to preview or delete the declaration for a creator. Click on the pencil icon at the far right of a row to edit a creator’s details.

Remaining sections (optional in all circumstances)
The "Description" and "Creator" sections, described in the part of this tutorial dedicated to certain designations, may always be completed. When not required by a Contracting Party they are optional.
Representative
To appoint a representative, expand the “Applicant” section and click on the “Add Representative” button, as shown in the screen below.

Similar to the fields when adding an Applicant, fill in the representative’s type (Legal Entity or Natural Person), name, address (including city and country), and e-mail address. Click the "Save" button to save the representative details.
Correspondence

Fill in the correspondence e-mail address and click the “Save” button.

The correspondence information will then be displayed along with the list of Applicants as shown below.

Priority
You may add multiple priority claims of an earlier filing under the Paris Convention to your application. To do so, expand the “Priority (If Applicable)” section and click on the “Add” button as shown below.

Complete all required fields and click the “Save” button. An example of a completed claim is shown in the image below.
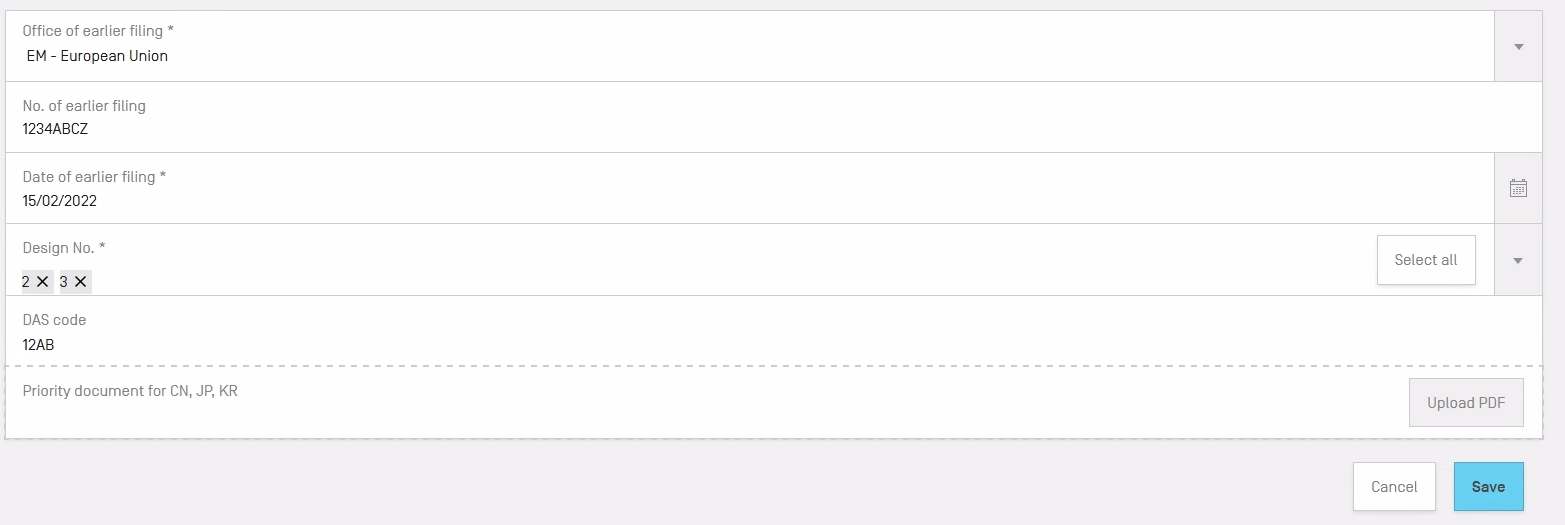
Saved priority claims will be displayed in a list as shown in the image below. Click on the edit (pencil icon) or delete (trash icon) buttons to perform these actions.
Exhibition
If you wish to claim temporary protection for industrial designs exhibited at an international exhibition, expand the “Exhibition (If Applicable)” section and click the “Add” button as shown below.

Fill in all required fields and click the “Save” button as shown below.

Each saved exhibition is displayed in a row with detailed information. If you would like to edit or delete a row, click the pencil icon (edit) or trash icon (delete).

eHague Communication: Reply to Irregularities
After filing an international application through eHague and if the International Bureau of WIPO finds irregularities, an invitation to correct the irregularity will be sent. Examiners may also issue other types of communications during examination, such as observations for which a reply may not be required. Even if a reply is not required, it is important to view the observations as they may contain information about corrections that will be applied if no response is received from the applicant.
Such communications are always sent by postal mail. When the application was initially filed through eHague (and not through the paper form DM/1), the communication is immediately available in the eHague Workbench. Moreover, an e-mail alert is sent to inform the applicant that a new communication is available.
For security reasons, no link is provided in the e-mail alert.
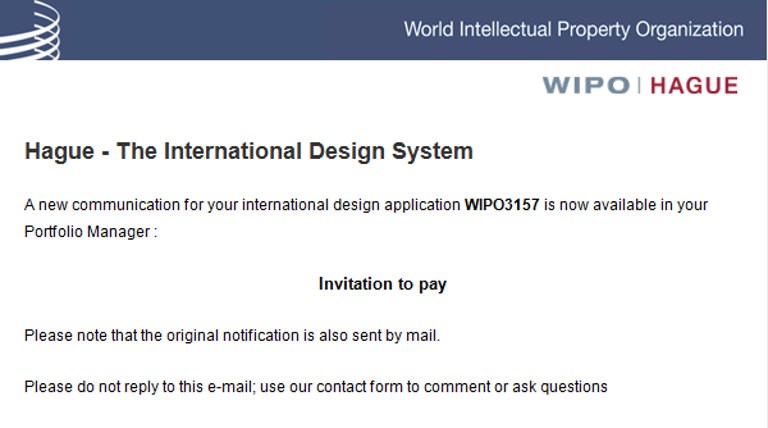
Once you receive an e-mail alert, log in to eHague and locate the eHague communication" tab, which is directly to the right of the “Draft(s)” tab as outlined in the screen below.
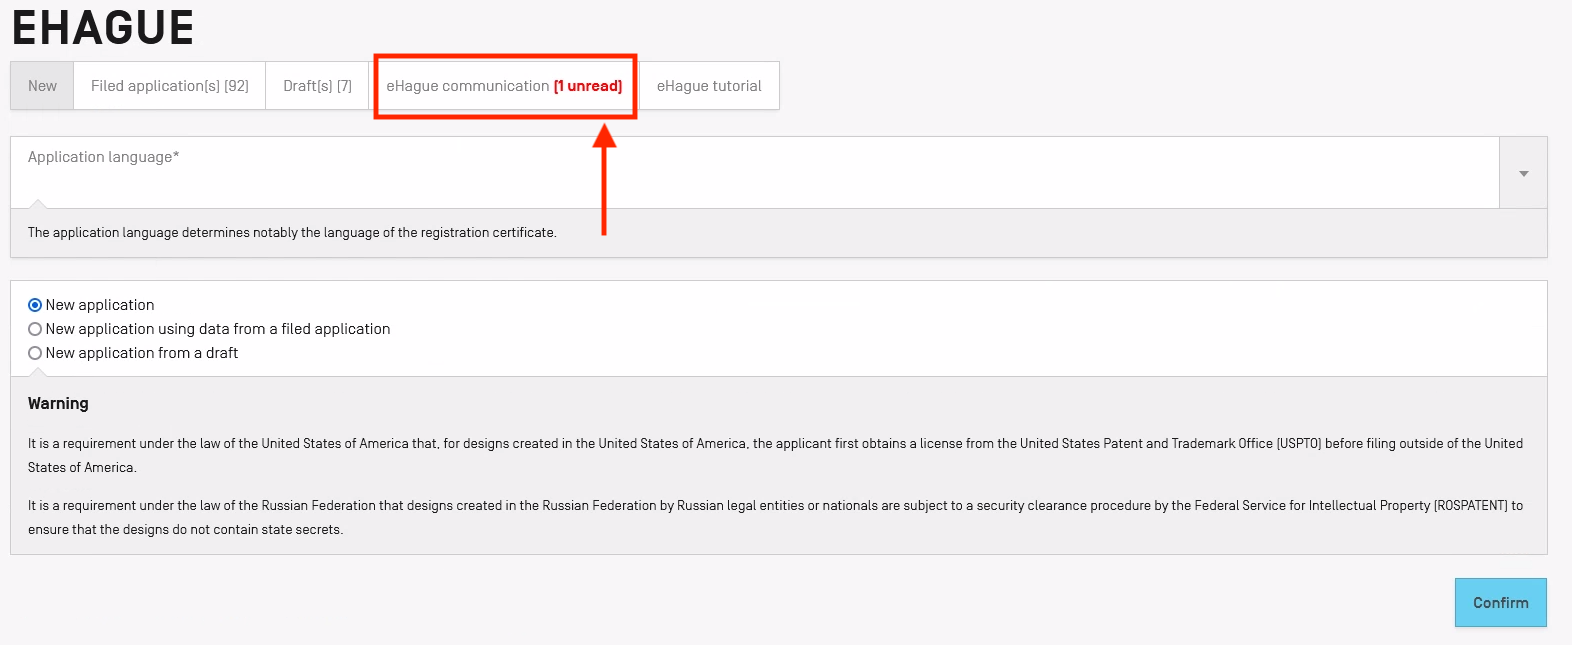
The "eHague communication" interface allows for the retrieving of and replying to communications sent by the International Bureau concerning international applications.

There are three principle tabs in this view:
- "Action Required", to reply to invitations to correct irregularities;
- "No Action Required", to retrieve observations and abandonment letters;
- "Archived", to retrieve previous notifications.
There are also tabs to return to the eHague Workbench and view this tutorial.
(1) Action is required: reply to invitations to correct irregularities
To locate an invitation to correct irregularities, make sure the "Action required" tab is highlighted in light grey. If not, click on it.
Under "Action required," you will find a list of invitations to correct irregularities or minor defects for which an action is expected.
You can download the notification by clicking on the PDF icon under the "Letter" column.

In the above screen, the “Action(s)” contextual buttons appear to enable you to execute various actions when you hover your mouse over a desired row:
- "Reply" opens the form to reply to the invitation to correct certain irregularities or minor defects online;
- “Letter” allows you to download the letter for the highlighted communication; and
- “History” allows you to review the history of the communications concerning each international application.
If you have a pending payment due, a “Pay Online” button will also be visible.
(2) Reply form
Using the reply form (as shown in the image below), you can:
- Type your response in the text field;
- Attach documents in PDF format (power of attorney/declaration of the inventor/micro-entity certification form/other documents) as shown below;

- Attach reproductions by indicating the number of the design and reproduction (i.e., 2.3 = design number 2, reproduction number 3) and uploading images in JPG or TIF format;
- Delete uploaded reproductions by hovering your mouse over the reproduction row and clicking on the trash icon.
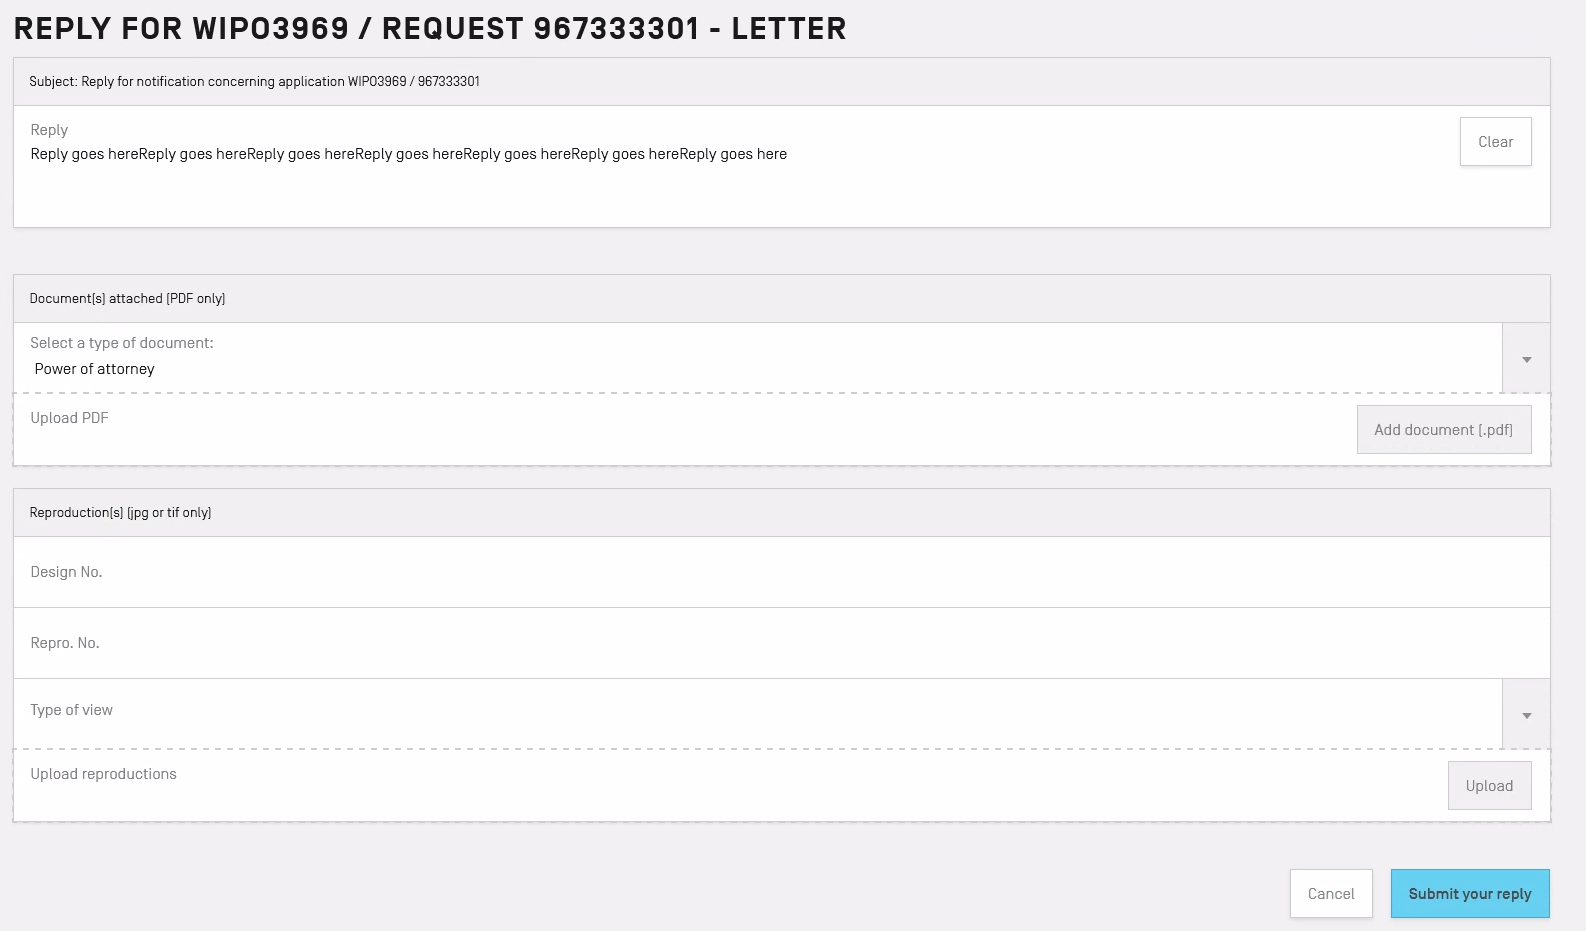
Once all required actions are completed, click the "Submit your reply" button.
Click the “Cancel” button if you would like to cancel your reply. Note that once you have submitted a reply it cannot be canceled or deleted.
(3) Submission of new copies of reproductions replacing the originals in replies to irregularity letters
General recommendations
For facilitating the processing of the replies to the irregularity letters, it is recommended to submit the new copies of replacement reproductions together with precise written explanation typed in the text filed of the reply form (item 1 in the image above).
Resolution
The new copies of reproductions should be in the image formats JPEG or TIF, its file size shall not exceed 2 megabytes. Any reproduction shall have a resolution of 300 x 300 dots per inch (dpi).
Numbering and order
Each reproduction must be identified by an individual number (when the same design is represented from different angles, the numbering must consist of two figures, separated by a dot, for example: 1.1, 1.2, 1.3, etc., for the first design, and 2.1, 2.2, 2.3, etc., for the second design, and so on).
The numbers of the replacement reproductions should correspond to the numbers and order of the original copies of reproductions to be replaced (please refer to the numbers and their order indicated in the Acknowledgement of Receipt of the Electronic Application).
In the eHague interface, the numbers of the replacement reproductions reproduction should be entered in the respective fields of the reply form (i.e. for reproduction 2.3, number 2 should be entered in the filed “Design No.”, number 3 should be entered in the filed “Repro. No.”).
Note that alternative ways of numbering (e.g. “987654.1”; or “1/12” or “Fig. 1”, etc., appearing on the margins of the reproductions) will be considered incorrect as they do not correspond to the requirements of Sections 402 (c) and Section 405 of the Administrative Instruction.
Legends
In the eHague interface, the legend (description of the type of view) of a replacement reproduction should be entered in the field “Type of view”. Legends should not be indicated in the margins of the reproductions”.
(4) No action is required
The “No Action Required” tab contains observation letters and notifications of abandonment of international applications. The number of unread communications is shown in parentheses. These communications do not require any action (the image below does not show any “no action required” records).

Once read, communications are available in the "No Action Required" tab for 30 days. After that, they are moved automatically to the "Archived" section.
(5) Archived
This section contains communications concerning international applications that are either recorded or abandoned, and therefore cannot be the subject of any reply or other communications. You will also find in this section communications for which no action was required. Such communications are moved to the "Archived" section 30 days after they have been read.


